
Use PPP Workflow to Create and Link PS Project
Problem
Requirement to automate the creation of PS Projects via workflow within SAP Portfolio and Project Management (PPM).
Environment
SAP Portfolio and Project Management (PPM) integrated with Project System (PS), including workflow framework and BRF+ configuration.
Prerequisites
- Access to SPRO customizing
- Workflow framework configuration available
- BRF+ configuration access
- Required authorizations for PPM, PS, and workflow setup
- RFC destinations configured (if ERP and PPM are on different systems)
Reason
Manual PS project creation is inefficient and error-prone. Automation via workflow requires proper configuration of item types, integration settings, and workflow steps, which are not available by default.
Solution
1. Customize PS Project Creation in SPRO
Two possible scenarios depending on business requirements:
Scenario 1: Create PS Project directly linked to RPM Item
- Define a new portfolio item type with Project System integration in transaction
SPROusing IMG pathSAP Portfolio and Project Management → Portfolio Management → Global Customizing → Portfolio-Independent Settings → Define Portfolio Item Types

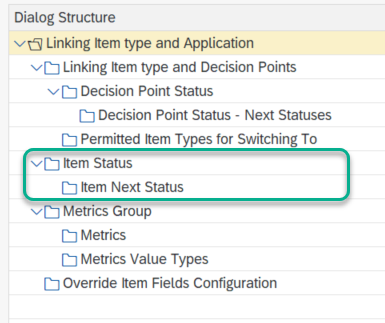
- Maintain decision points, statuses, and transitions
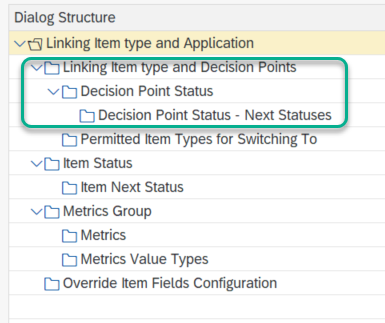
* Define its item status and its next status for the above item type.
- If there is any existing template PS project or existing PS project already defined for the current respective item type, then define it as a template in path
SAP Portfolio and Project Management → Portfolio Management → Global Customizing → Portfolio-Independent Settings → Map Item Type to Project or PS. - Choose ‘
Item Type to PS Project’ and maintain the item type, object type, and project ID. For example, you can check the sample customization below; similarly, you can provide the same for the newly created item type above.

- Activate project system integration. To do this, navigate to the path
SAP Portfolio and Project Management → Portfolio Management → Base System Interfaces → Portfolio-Management-Specific Settings for Project Management Systems Integration → Enable Project Management System Integrationand enable theSAPPSactive checkbox.

- Maintain Synchronization scenarios. To do this, navigate to path
SAP Portfolio and Project Management → Common Functions → Decision Flow Management Settings → Attribute Synchronization → Maintain Attributes for Synchronization Scenariosand ensure that the below scenarios are available. Also, in case you need additional scenarios to be enabled for your business cases, you can add those scenarios as well in addition to the below.

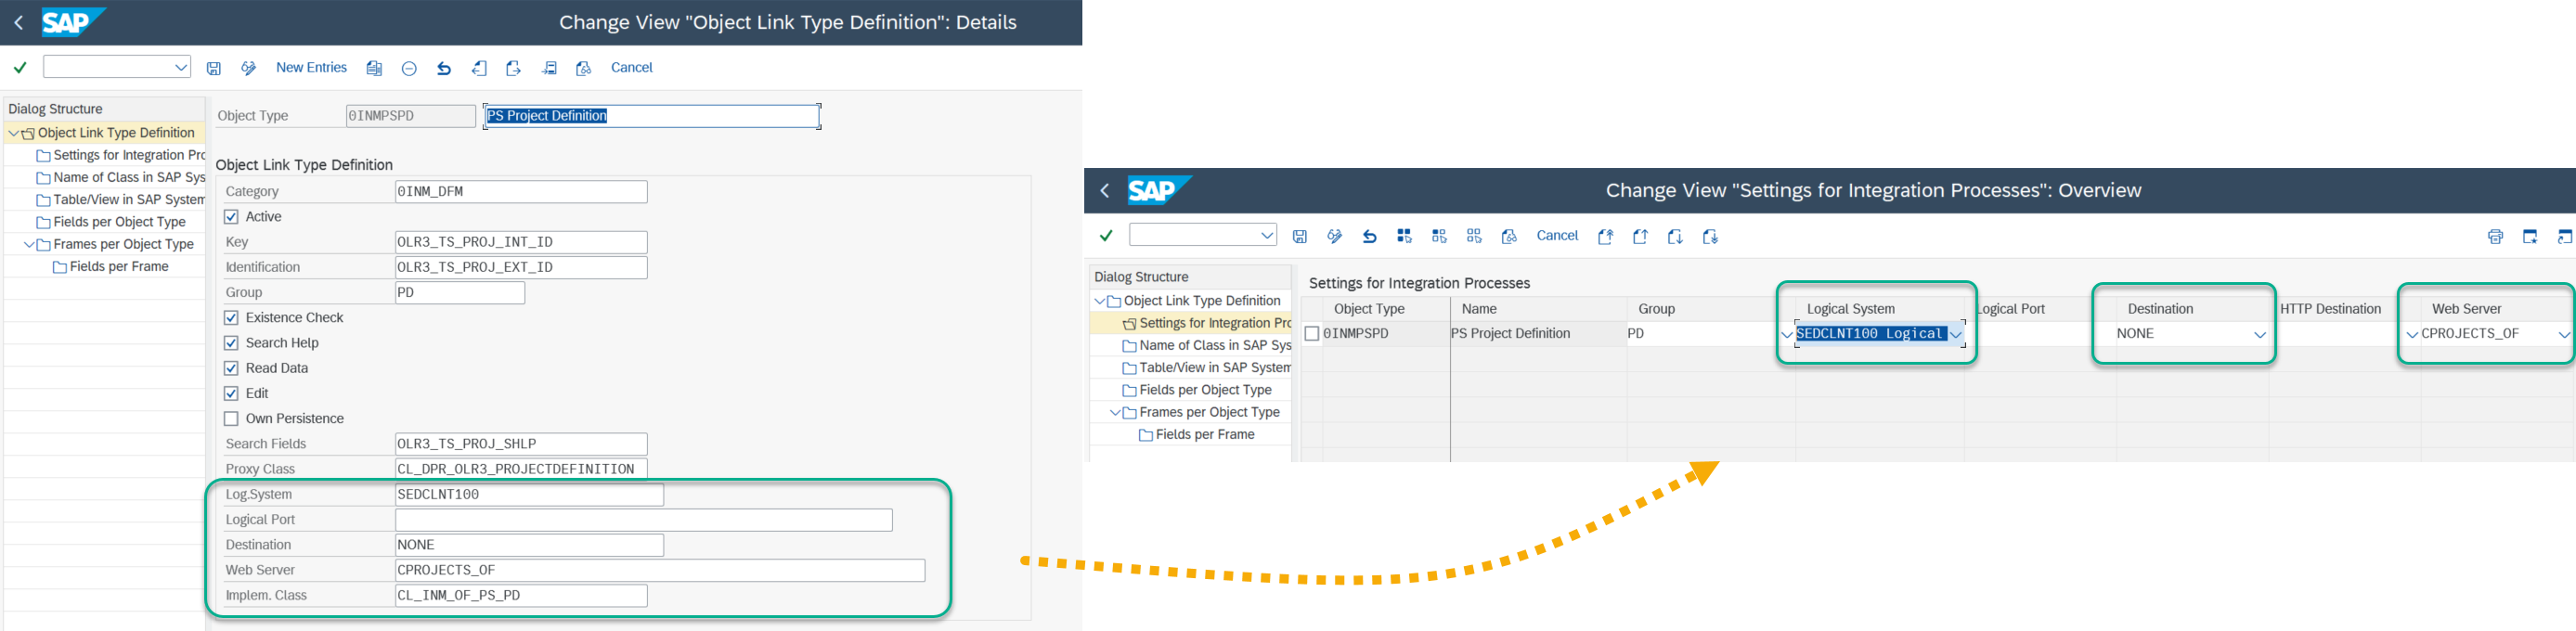
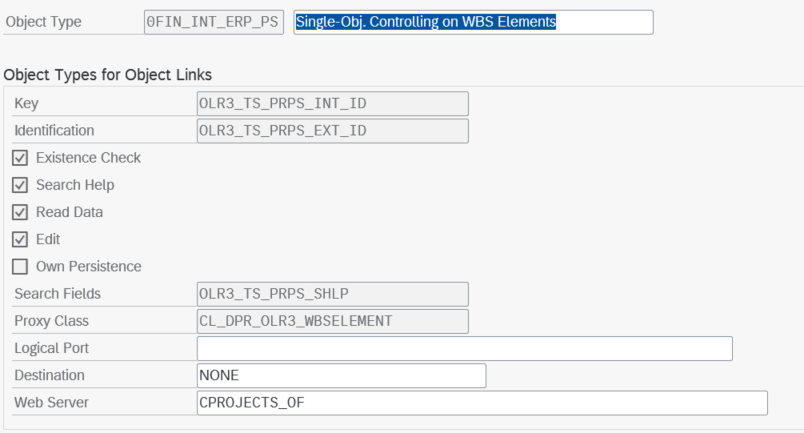
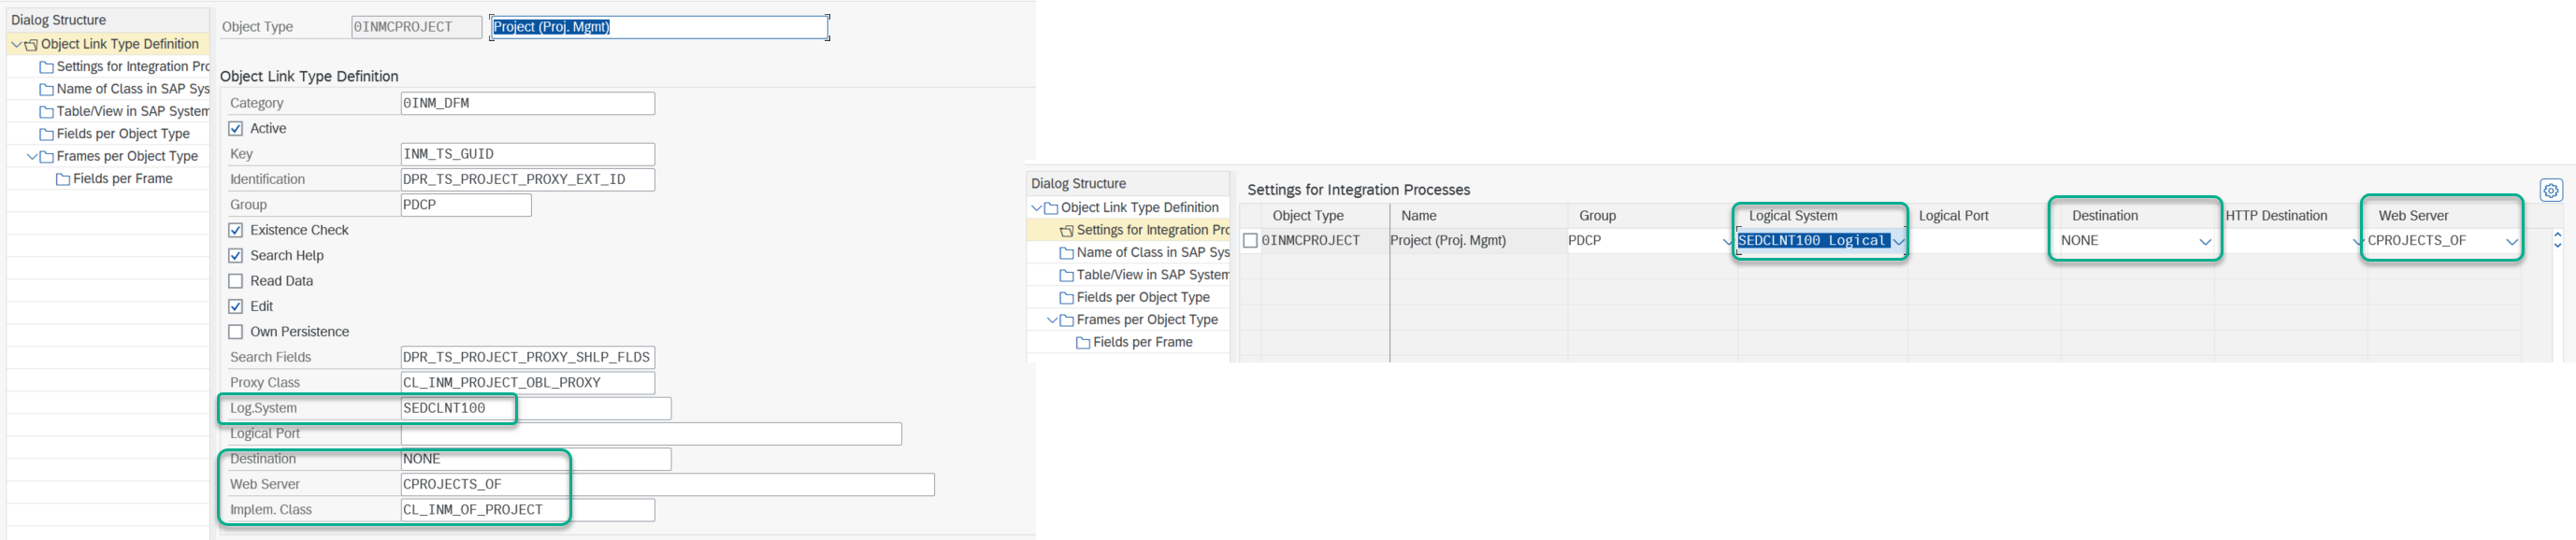
- Maintain the settings for object links where this is essential to create a PS project and where you define the Logical System, Destination, and Web Servers for each relevant object type. This ensures that the PS project will be created in the system maintained here.
- To do this, navigate to path
SAP Portfolio and Project Management → Common Functions → Decision Flow Management Settings → Define DFM Object Link Typesand maintain the Logical System, Destination, and Webserver. For example, you can check the screenshot below and maintain settings similar to that. Also, if the ERP system is different, then create an ABAP type RFC connection and create an SM59 destination to perform a remote login using an RFC user. So that we can define that RFC destination as the destination here. Similarly, we can update all other relevant object types like PS WBS Element, PS Network Activity, etc.
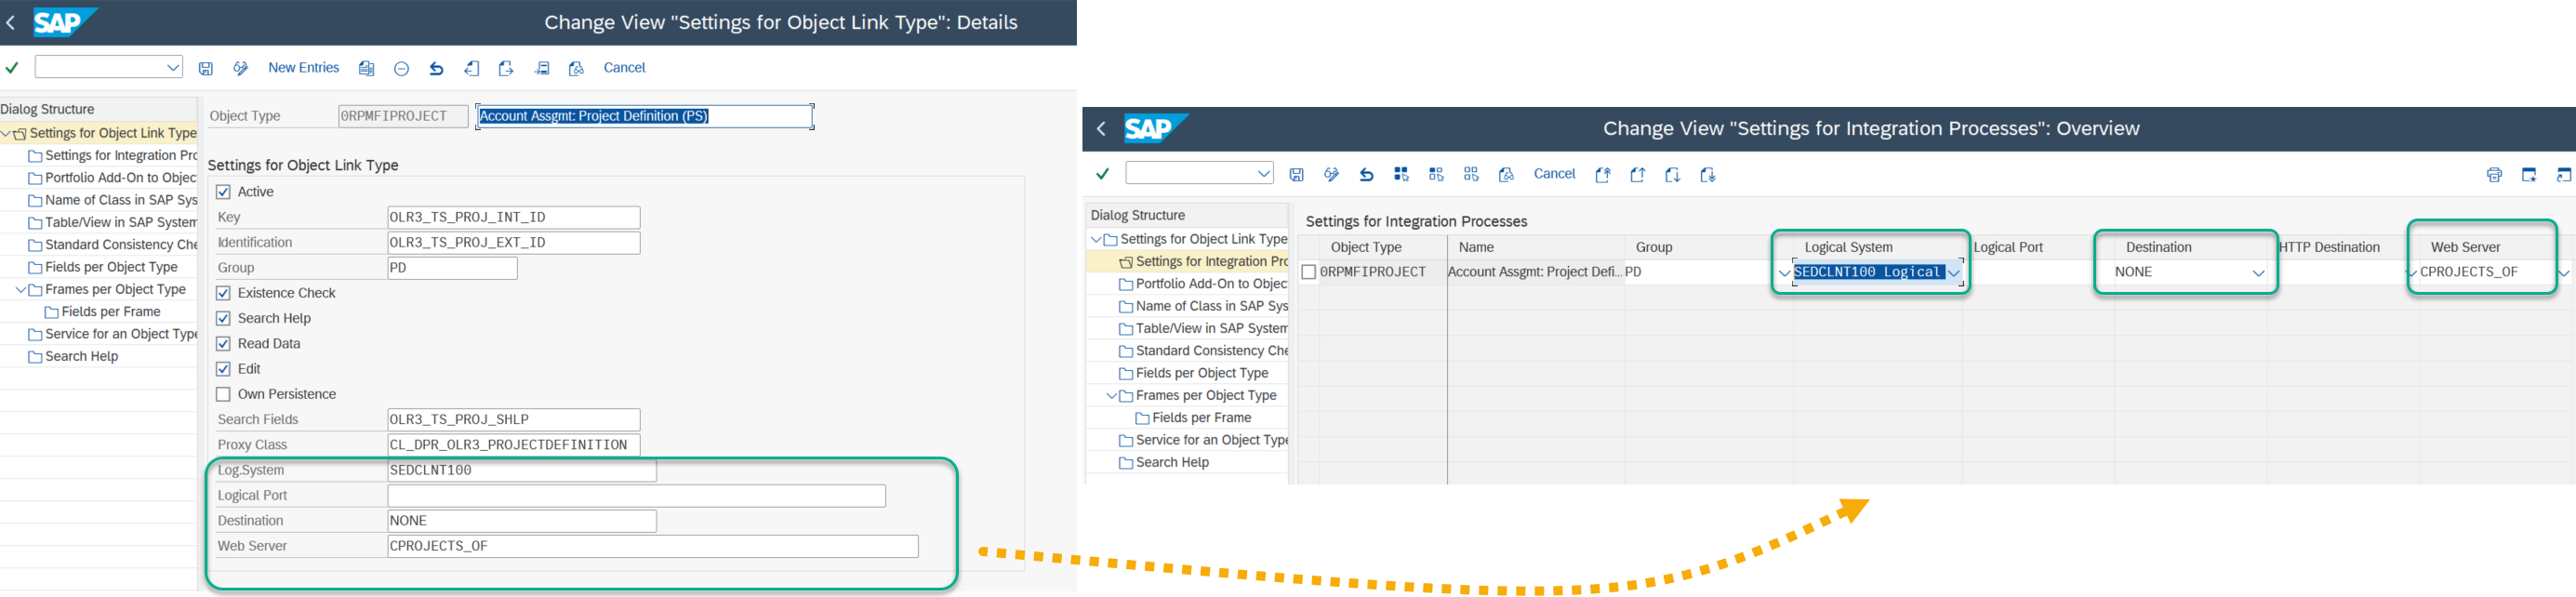
- Maintain the object link types on the RPM side. To do this, navigate to path
SAP Portfolio and Project Management → Portfolio Management → Base System Interfaces → Application Object Settings → Define Object Link Typesand maintain the Logical System, Destination, and Web Servers for each relevant object type. - Similarly, it is possible to update all other relevant object types like WBS Element (PS), Network (PS), etc.
Scenario 2: Create cProject and PS Project automatically
- Go to transaction code
SPROand navigate to IMG pathSAP Portfolio and Project Management → Portfolio Management → Global Customizing → Portfolio-Independent Settings → Define Portfolio Item Typesand create a new item type withPortfolio and Project Managementas the link to Project System.

*   Maintain its decision points as required and define its status and its next statuses for the above item type.
*   Define its item status and its next status for the above item type.
- Create a project type. To do this, navigate to path
SAP Portfolio and Project Management → Project Management → Structure → Define Project Typesand create your own project type. - According to your business requirements, you can configure the settings. For example, please refer to the screenshot below and make the necessary settings as shown.
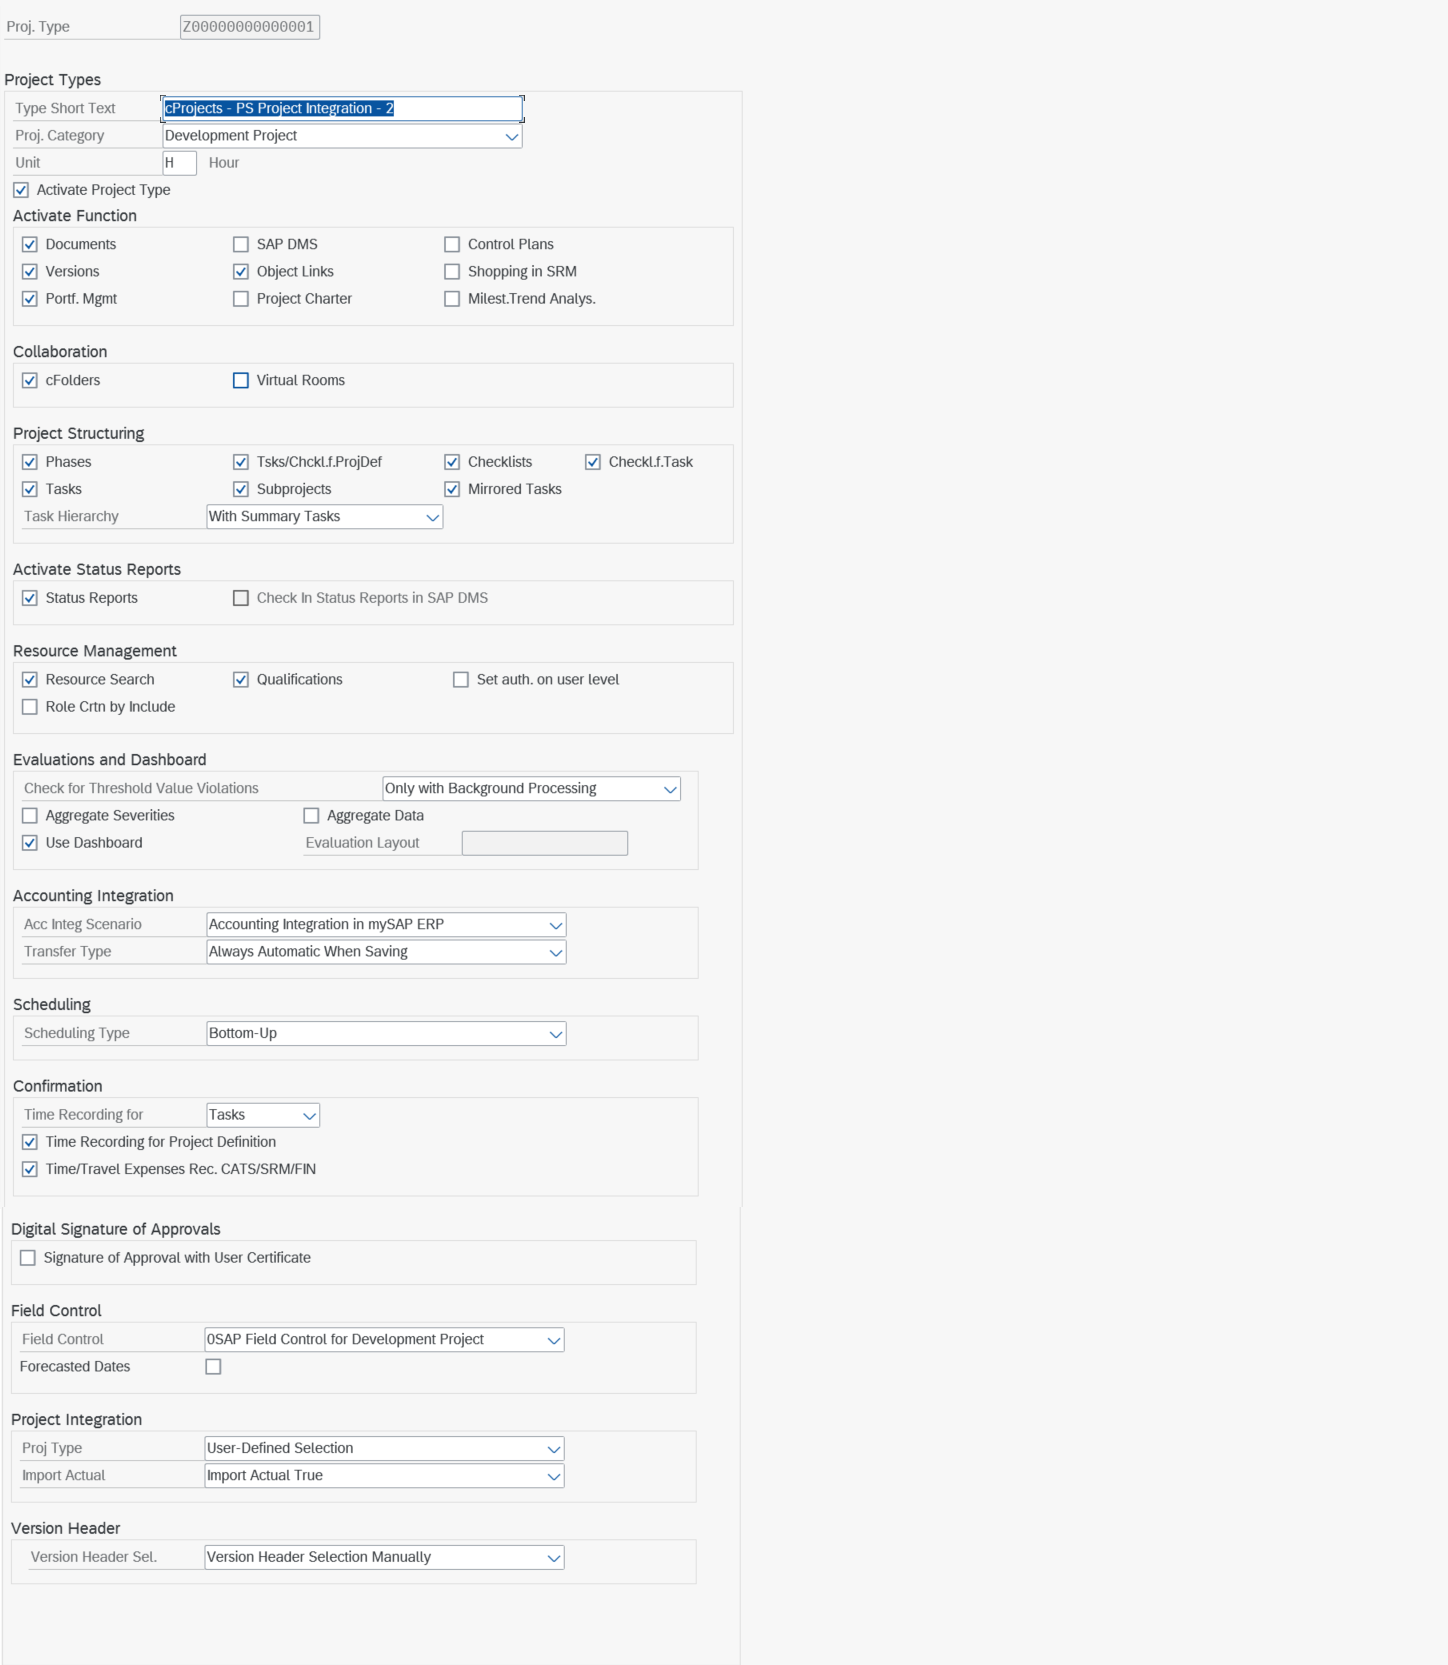
*   For the automatic creation of a PS project from Project Management in PPM, the critical configuration is "Accounting Integration". In this section, "Acc Integ Scenario" must be set to "Accounting Integration in mySAP ERP" and the Transfer Type should be selected from one of the three options given below.

    *   If "Always Automatic When Saving" is selected, the PS Project will be created automatically upon the creation of the cProject.
    *   If "Automatic As of 'Flagged for Transfer / To Assign'" is selected, then the user has to select the "Flag for Transfer" option in Status to get the PS Project created automatically from cProject.
    *   If "Automatic As of Release of Project" option is selected, then the PS project will be created automatically once cProject status is set to Released.
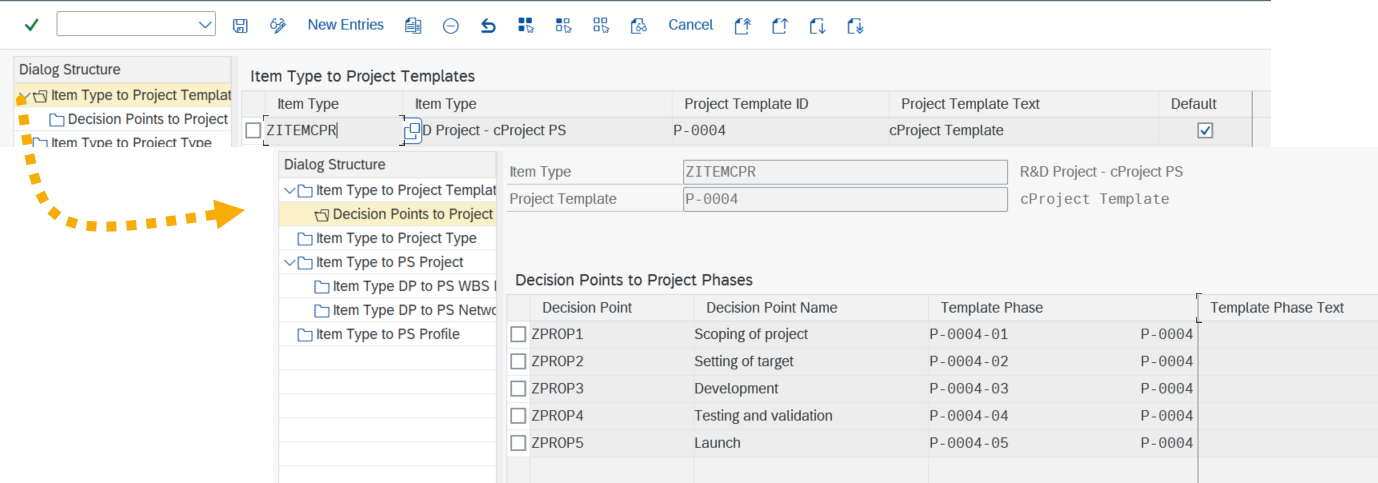
- Create a project template with the project type as defined above and provide it in path
SAP Portfolio and Project Management → Portfolio Management → Global Customizing → Portfolio-Independent Settings → Map Item Type to Project or PS, and provide the project template for the item type. Also assign the RPM item decision points to the template phase.
- Set up the accounting integration. To do this, navigate to path
SAP Portfolio and Project Management → Project Management → Connection to External Systems → Accounting Integration → Activate Integrationand activate the scenario.

- Define object links for accounting integration. To do this, navigate to path
SAP Portfolio and Project Management → Project Management → Connection to External Systems → Accounting Integration → Define Object Links for Accounting Integrationand define the destination and web server.
- Setup general settings. To do this, to path:
SAP Portfolio and Project Management → Project Management → Connection to External Systems → Accounting Integration → Make General Settings.

- Define the cost/revenue rates. To do this, navigate to path:
SAP Portfolio and Project Management → Project Management → Connection to External Systems → Accounting Integration → Define Cost/Revenue Rates.

-
Optional if ERP and PPM systems are the same. If the ERP system is different, carry out the steps below. Otherwise, this can be skipped.
- Go to path
SAP Portfolio and Project Management → Project Management → Connection to External Systems → Accounting Integration → Replicate Cost/Revenue Ratesand provide the ERP destination, then run the execution without test mode. This will replicate the Cost/Revenue Rates defined in the PPM system to the ERP system. - Go to path
SAP Portfolio and Project Management → Project Management → Connection to External Systems → Accounting Integration → Replicate Accounting-Relevant Characteristicsand provide the ERP destination. Then run the execution by marking both Project Type and Reason for Project. This will replicate the Project Type and Reason for Project defined in the PPM system to the ERP system.
- Go to path
-
Define settings in ERP system. To do this, navigate to path
SAP Portfolio and Project Management → Project Management → Connection to External Systems → Accounting Integration → Make Settings in ERP Systemand provide the destination (if no destination exists, meaning both PPM and ERP are the same system, then provide the value as NONE) and click the execute button. After executing this, you will be taken to another configuration node for Collaboration Projects Controlling Integrations.- Go to path
Collaboration Projects → Controlling → Create and Change Controlling Scenarioand provide the settings shown below.
- Go to path
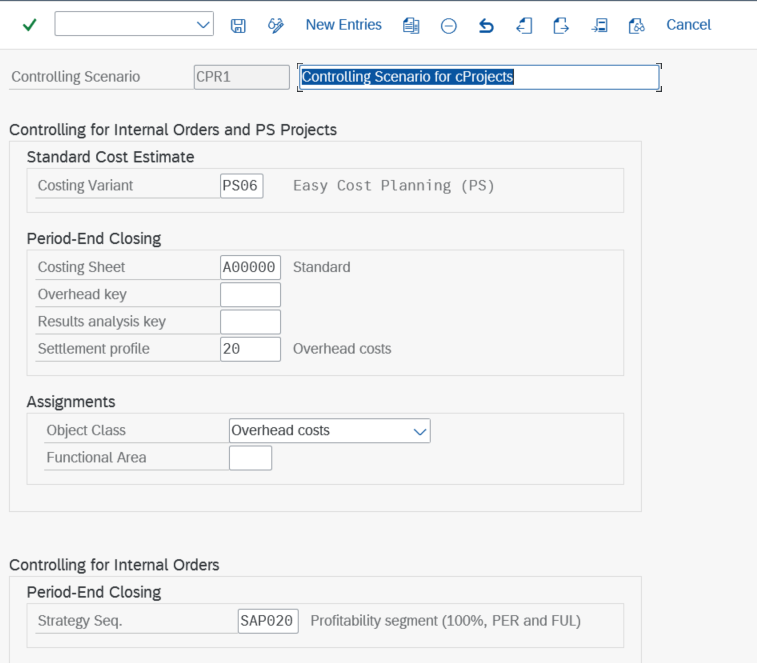
* Go to path `Collaboration Projects → Controlling → Define Controlling Scenario` and provide the settings shown below.

* Note: In the screenshot above, the controlling level indicates the maximum level of WBS that will be created in the PS project from the cProject. For instance, if you have a cProject with tasks and sub-tasks up to level 4, but you select 2 as the controlling level, the PS Project will be created with the lowest WBS level set to 2.
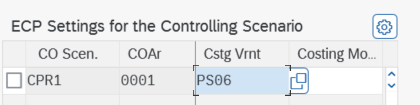
* Go to path `Collaboration Projects → Controlling → Settings for Easy Cost Planning` and maintain the entry as shown below. Define your controlling scenario, controlling area, and costing variant as PS06 by default. For example, please see the reference below.
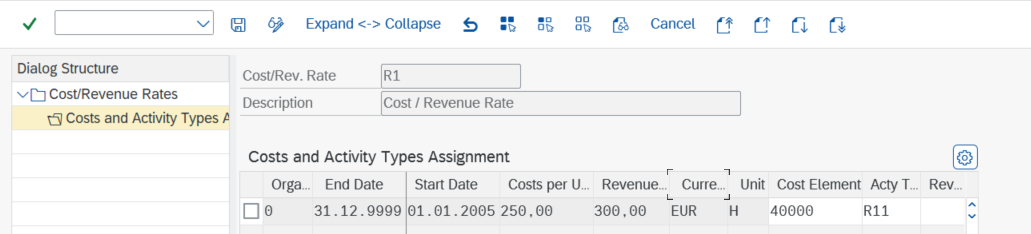
* Go to path `Collaboration Projects → Controlling → Assign Cost Elements and Activity Types` and provide the below details. Provide correct cost element, activity type, and Revenue element if any. For example, please see the reference below.
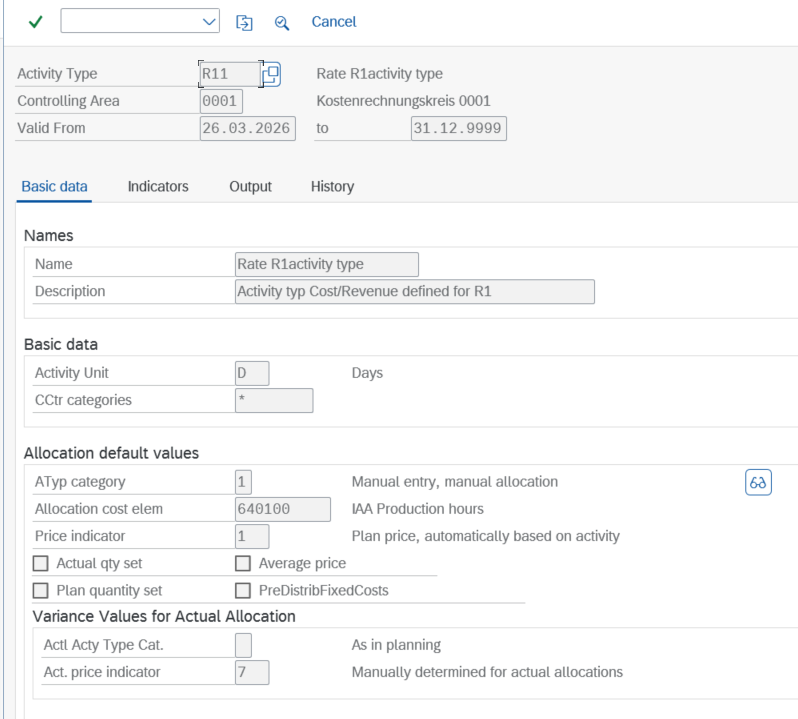
* To create a activity type you can use transaction `KL03` and create it under your defined controlling area.
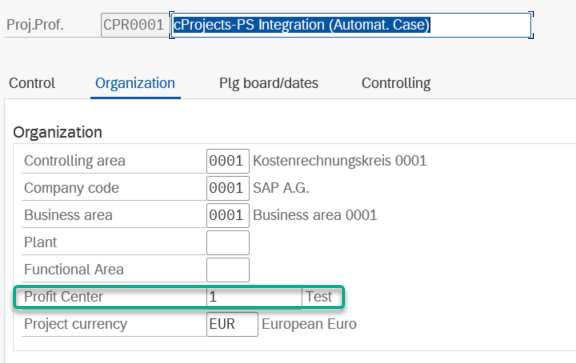
* Also, maintaining the profit center in the ERP system for the master data while creating a WBS element is important, as without maintaining the profit center, the WBS element will not be created. To do this, go to transaction code `SPRO` and navigate to the following path in the ERP system: `Project Systems → Structures → Operative Structures → Work Breakdown Structure (WBS) → Create Project Profile`. Then, navigate to the Organization tab for the default project profile `CPR0001` and maintain the profit center value there.
- Maintain DFM common functions scenarios. To do this, navigate to path
SAP Portfolio and Project Management → Common Functions → Decision Flow Management Settings → Attribute Synchronization → Maintain Attributes for Synchronization Scenariosand define the below scenarios.

- Maintain field mappings. To do this, navigate to path
SAP Portfolio and Project Management → Common Functions → Decision Flow Management Settings → Attribute Synchronization → Maintain Field Mappingsand define the fields to be mapped as shown below.

- Define DFM object link types. To do this, navigate to path
SAP Portfolio and Project Management → Common Functions → Decision Flow Management Settings → Define DFM Object Link Typesand define the logical system, destination, and web server. Similarly, we can update all other relevant object types, such as Phase (Proj. Mgmt) and Task (Proj. Mgmt).
2. Configure Workflow (BRF+) for Background PS Project Creation
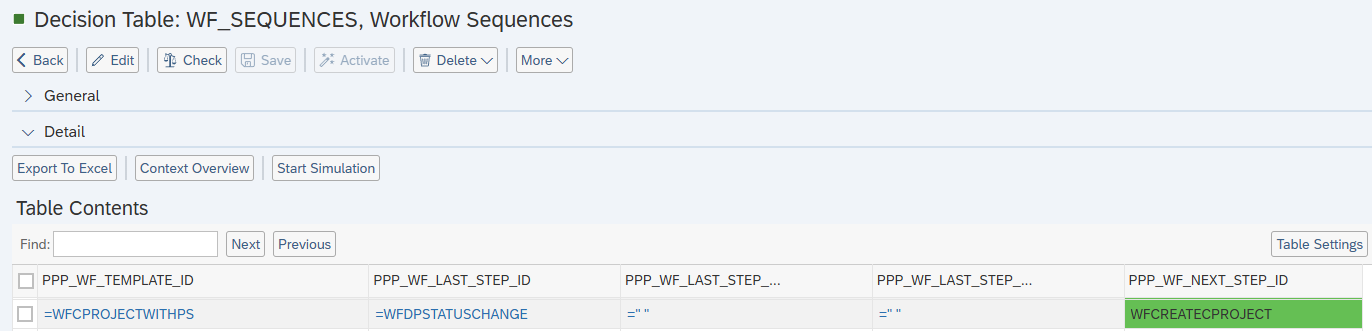
- Define workflow sequence in
WF_SEQUENCES
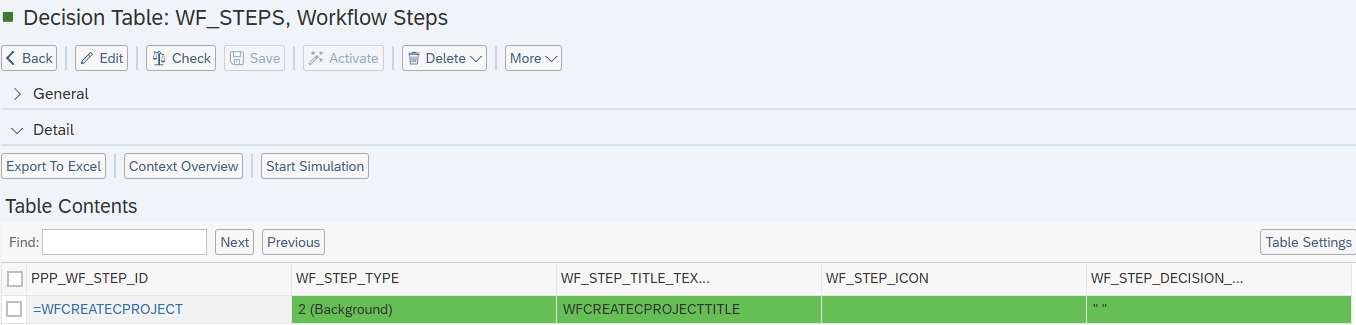
- Create workflow step in
WF_STEPSand mark as background step
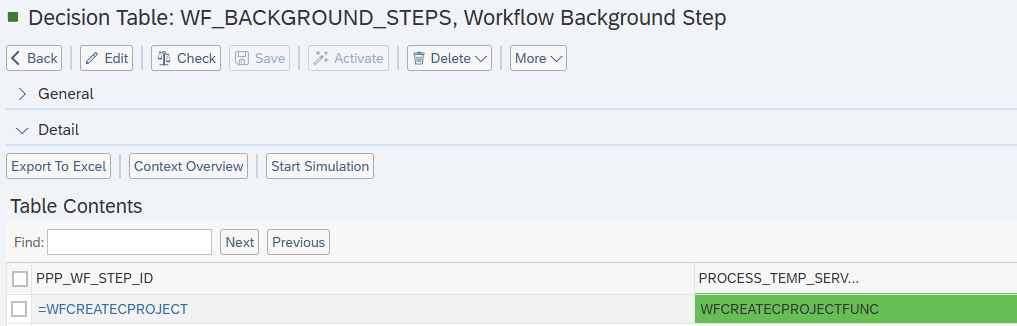
- Assign step in
WF_BACKGROUND_STEPSand provide the corresponding service function details.
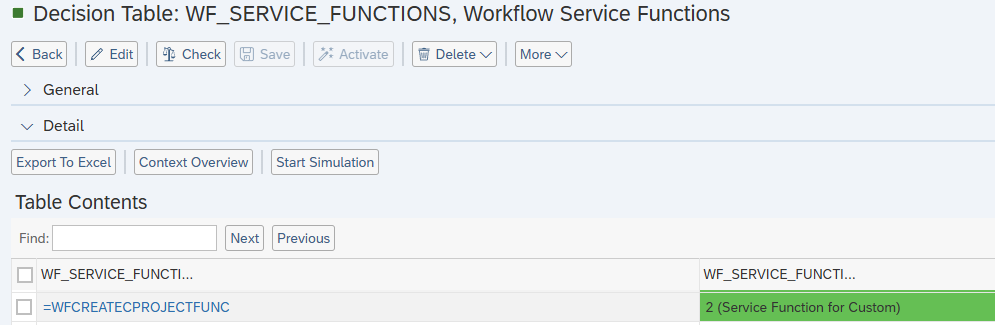
- Configure service function in
WF_SERVICE_FUNCTIONSwith type =2 (Custom Service Function)
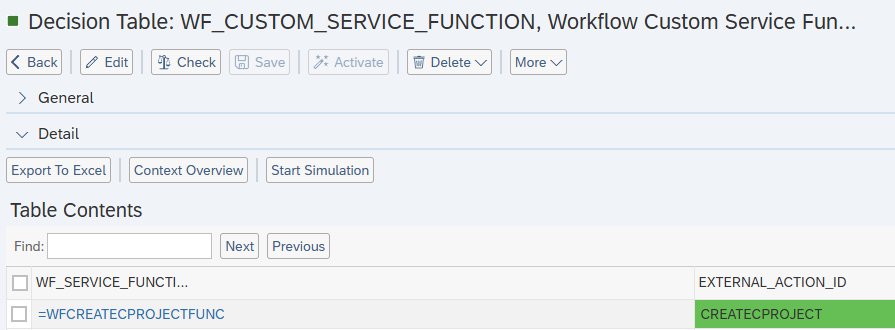
- Maintain custom service function in
WF_CUSTOM_SERVICE_FUNCTION
-
Assign external action ID in
WF_EXTERNAL_ACTIONS-
Class Assignment:
- For PS Project (Item):
/STX/SOL_PPP_CL_CRE_PS_FOR_ITEM - For PS Project (cProject):
/STX/SOL_PPP_CL_CRE_PS_FOR_PRJ
- For PS Project (Item):
-
See Also
- SAP PPM – Project System Integration documentation
- SAP Workflow and BRF+ configuration guides
Keywords
PS Project creation, workflow automation, PPM, cProject, RPM item, BRF+, SPRO customizing, accounting integration, DFM, SAP PS integration