
Workflow Configuration
1. Workflow Start Conditions
To configure a workflow, the first and most important step is defining its start conditions. Start conditions determine when a workflow should be triggered.
A workflow will only begin if the defined conditions for a specific object are fulfilled.
Supported Objects
Currently, workflows are supported for the following eight objects:
- Item
- Decision Point
- Project
- Phase
- Task
- Checklist
- Checklist Item
- Checklist Item Reference
Configure PPP Workflow Start Conditions
Open your BRF+ application and navigate to any expression table as listed below to specify the trigger conditions for the workflow
- Workflow Start Conditions Item (Technical Name: WF_START_COND_ITEM)
- Workflow Start Conditions Decision Point (Technical Name: WF_START_COND_DECISION_POINT)
- Workflow Start Conditions Project (Technical Name: WF_START_COND_PROJECT)
- Workflow Start Conditions Phase (Technical Name: WF_START_COND_PHASE)
- Workflow Start Conditions Task (Technical Name: WF_START_COND_TASK)
- Workflow Start Conditions Checklist (Technical Name: WF_START_COND_CHECKLIST)
- Workflow Start Conditions Checklist Item (Technical Name: WF_START_COND_CHECKLIST_ITEM)
- WF Start Condition Checklist Reference (Technical Name: WF_START_COND_CHECKLIST_REFER)
Here, you can configure which workflow template is triggered under which condition.
For each supported object, you define:
- The criteria (Condition Columns: Project Template ID, Task Category, Active Item Decision Point ID etc.) that must be met (for example, status, field value, or attribute change)
- The workflow template that should start once those criteria are fulfilled
Condition Columns available for Start Conditions:
- Project Template ID: Enter any Project Template from the standard PPM Customizing.
- Task Category: Select Task Category (e.g. Milestone, Normal Task, Subproject)
- Active Item Decision Point ID: Enter the ID of a Decision Point which should be active to start the customized workflow template.
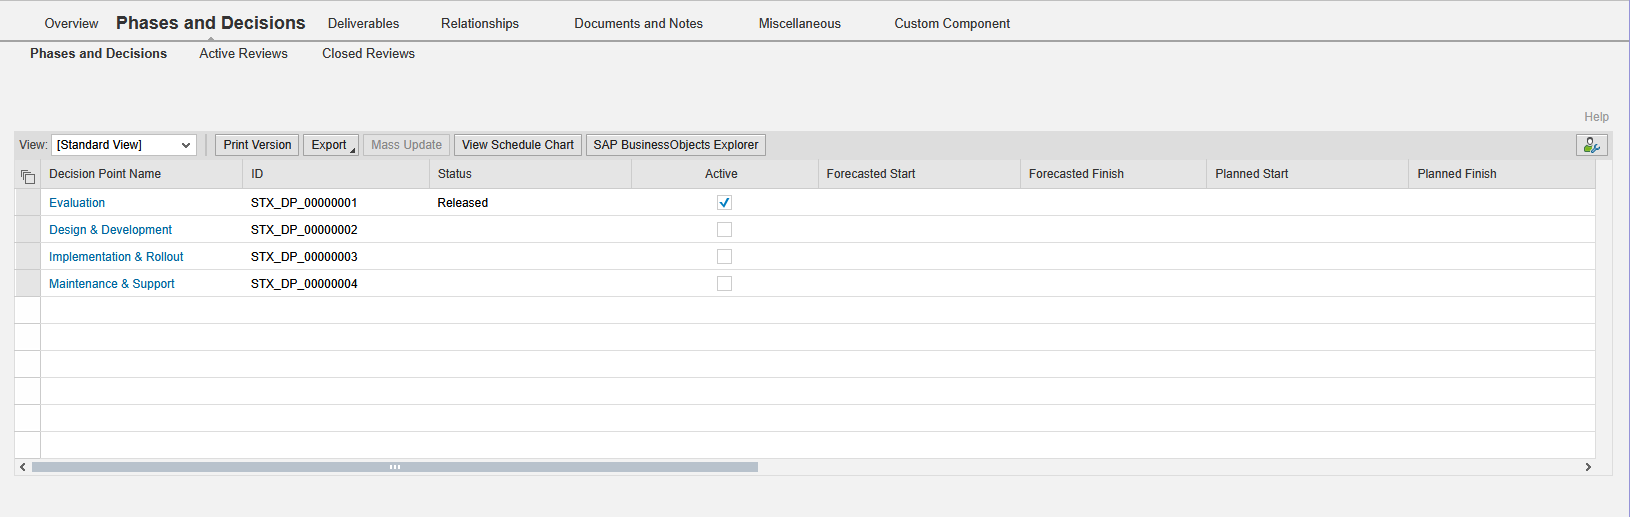
- Active Item Decision Point Status: Select a status of the Decision Point which will activate the customized workflow template
- Phase ID linked to active DP: Enter the ID of a Phase linked to an active Decision Point which activates the customized workflow template.
Result Column of Workflow Start Conditions tables is always the same:
- Workflow Template ID: Enter any Workflow Template ID which will be used in all the following decision tables to set up this particular workflow.
You can configure:
- Multiple workflows for the same object type
- Different workflows for different scenarios
- Complex conditional logic
This ensures workflows start automatically and consistently based on business rules.
Using Custom Fields in Start Conditions
In addition to standard fields, you can also use Custom Input fields as part of your start conditions.
This allows you to:
- Include organization-specific fields
- Trigger workflows based on custom attributes
- Create highly tailored approval logic
For example:
- Start workflow only if a custom risk field = “High”
- Trigger additional approvals if a custom budget threshold is exceeded
This flexibility ensures the workflow setup aligns precisely with your company’s requirements.
You can configure multiple templates for different workflow scenarios with any conditions, and you can also use Custom Input. For the output field, you can provide the workflow template ID as a meaningful ID name.
2. PPP Workflow Templates (Workflows)
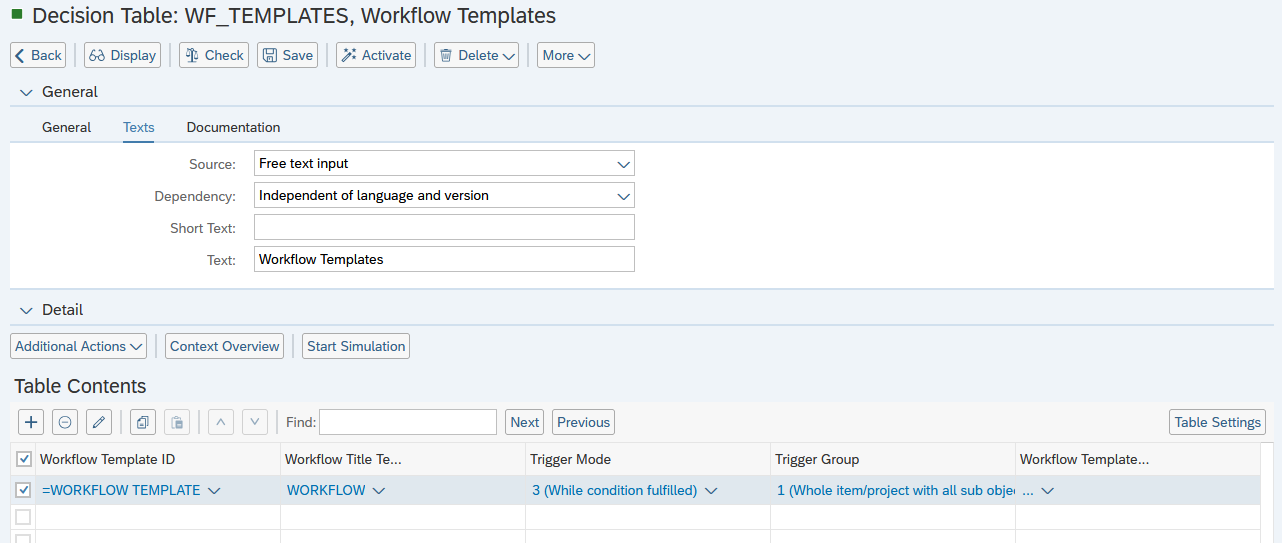
Navigate to the Decision Table Workflow Templates (Technical Name: WF_TEMPLATES):
-
Workflow Template ID: Insert Workflow template ID mentioned in one of the Workflow Start Conditions tables (see part 1 of the current Remark).
-
Workflow Title Text ID: Enter any Text ID (Used in “Translatable Texts”, Technical Name: TEXTS). The Text of the Text ID will be used as the Title of this Workflow.
-
Trigger Mode: Define how often the workflow is started when the defined condition is met.
-
1. Once per object
-
The workflow is triggered the first time the condition is fulfilled.
-
It will not start again for the same object, even if the condition becomes true again later.
-
Use case:
- Final approval processes that should only happen once.
-
-
2. On condition fulfilled (again)
-
The workflow is triggered whenever the condition becomes true again.
-
The condition must first become false before it can trigger again.
-
Use case:
- When re-approval is required after changes.
-
-
3. While condition fulfilled
-
The workflow is triggered on every save as long as the condition remains true.
-
Use case:
- Ongoing monitoring or repeated checks while a specific status or value is active.
-
-
-
Trigger Group: Define the scope of the workflow — whether it applies to a single object or a larger structure.
-
1. Whole Project (with all sub-objects)
-
The workflow applies to the entire project.
-
Includes all related objects (tasks, phases, etc.).
-
Use case:
- Project-wide approvals or milestone governance.
-
-
2. Single Object
-
The workflow applies only to the specific object.
-
Example: a single task or decision point.
-
Use case:
- Task-level or item-level approvals.
-
-
Example Scenario
If a project reaches a specific decision point:
- Trigger Group: Whole Project
- Trigger Mode: Once per object
This ensures the approval workflow runs one time for the entire project when the condition is first met.
If a task budget changes repeatedly:
- Trigger Group: Single Object
- Trigger Mode: On condition fulfilled (again)
This ensures the task is re-approved whenever necessary.
Important Note
The trigger works based on saved object states.
If multiple changes happen before saving, the system evaluates the condition only after the save action.
3. Workflow Sequences
A workflow is essentially a sequence of steps.
The Workflow Sequences configuration defines how the workflow moves from one step to the next based on decisions taken by users or system actions.
This is one of the most important parts of workflow setup.
What Is a Workflow Sequence?
A workflow sequence determines:
- Which step starts first
- What happens after a decision (Approve / Reject / etc.)
- Which step comes next
- When the workflow ends
Each workflow template can have its own sequence of steps.
The system evaluates:
Based on the previous step and the decision made, what is the next step?
How the Sequence Logic Works
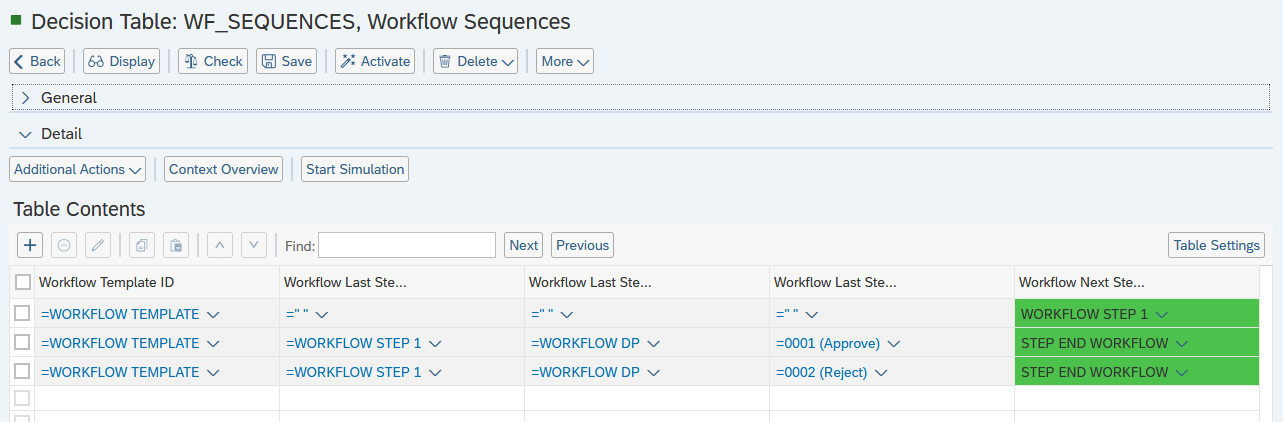
Navigate to the Decision Table Workflow Sequences (Technical Name: WF_SEQUENCES):
-
Workflow Template ID: Insert Workflow template ID mentioned in one of the Workflow Start Conditions tables (see part 1 of the current Remark).
-
Last Step ID: Enter a Previous Step ID of the customized workflow
-
If the Last Step ID is empty, it means:
- There is no previous step
- This is the first step of the workflow
- The workflow starts here
-
Empty “Last Step ID” = Workflow starting point (Step 0)
-
-
Workflow Last Step Decision Profile: Enter any Last Step Decision Profile which will be used in all the following decision tables to set up this particular workflow.
-
Decision taken in the last step: Select type of the decision which will lead to the next step.
-
Next Step ID: Enter an ID of the next step of the customized workflow
Key Concept
Workflow Sequences answer this question:
For this template, after this step and this decision, where should the workflow go next?
It is a structured decision map:
- Template
- Previous step
- Decision
- Next step
This configuration controls:
- Approval hierarchy
- Parallel or sequential flow
- Rejection paths
- Workflow completion
- Complex routing logic
4. Workflow Steps
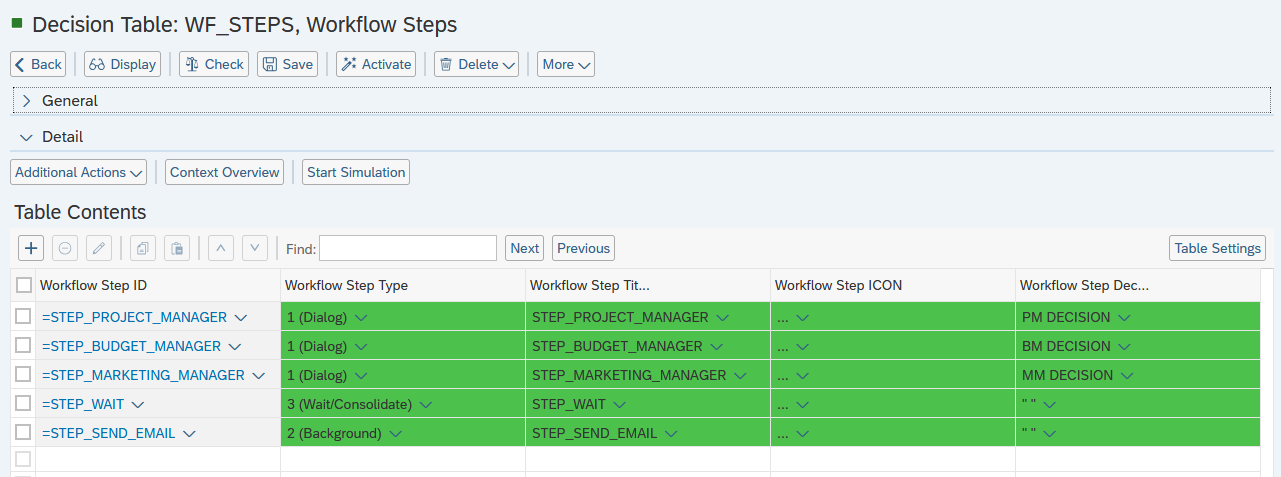
Each Workflow Step must be liste in the decision table Workflow Steps (Technical name: WF_STEPS) where it is assigned a Step Type.
The step type determines how the system executes that step and how the workflow progresses.
There are three available step types:
- Dialog
- Background
- Wait / Consolidate
Navigate to the decision table Workflow Steps (Technical name: WF_STEPS):
- Workflow Step ID: Enter a Step ID mentioned in the Decision Table Workflow Sequences (see previous part of this note)
- Workflow Step Type: Select whether the step type is Dialog, Background or Wait/Consolidate. (See more details about each type below)
- Workflow Step Title Text ID: Enter any Text ID (Used in “Translatable Texts”, Technical Name: TEXTS). The Text of the Text ID will be used as the Title of this step of the workflow.
- Workflow Step ICON: Select an icon for the customized step (currently not supported).
- Workflow Step Decision Profile ID: Enter the Step Decision Profile ID which is used in the decision table Workflow Sequences.
- Workflow Step Long Text: Enter any ID for the description Text Field for the customized step.
Step Types
| Step Type | Requires Agent | Purpose |
| Dialog | Yes | Manual approval or decision |
| Background | No | Automatic system execution |
| Wait / Consolidate | No | Synchronizes parallel workflow branches |
- Use Dialog when a human decision is required.
- Use Background for automated system actions.
- Use Wait / Consolidate to merge parallel branches safely.
- Ensure parallel branches always reconnect through a Wait step when full completion is required.
4.1. Dialog Step
Configuration
To set p a Dialog step navigate to decision table Workflow Dialog Steps (Technical Name: WF_DIALOG_STEPS):
- PPP Workflow Step ID: Enter a step ID of the dialog step which has been set up in decision table Workflow Steps.
- WF Agent Function: Select weather the agent is a user or a business partner.
- WF Agent: Enter a User or Business Partner ID of the agent of the customized step.
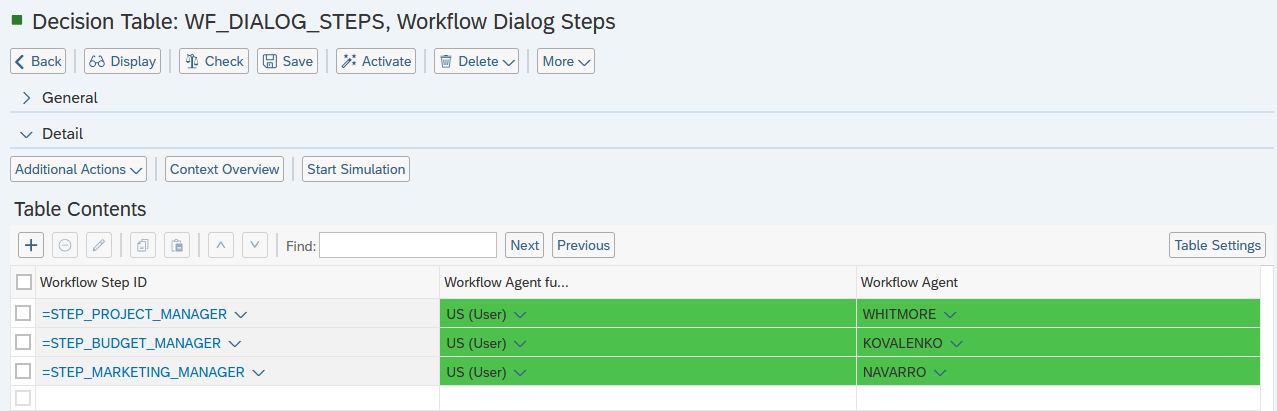
A Dialog step requires manual interaction by a user (Agent).
Use a Dialog step when:
- A decision is required
- An approval or rejection must be provided
- A user must review and take action
- A task must be assigned to a responsible person
If a workflow step includes decision options (Approve / Reject / Return / etc.), it must be configured as a Dialog step.
Administrator Step – Step ID 9999 (Error Handling)
In addition to regular dialog steps, you must configure Step ID 9999 as an Administrator dialog step in decision table WF_DIALOG_STEPS.
Purpose:
If any error occurs during background processing or due to missing/incorrect BRF+ customization, the system automatically:
- Creates a dialog task
- Assigns it to the Admin user
- Routes the workflow to Step ID 9999
Configuration:
- PPP Workflow Step ID: 9999
- WF Agent Function: US (User)
- WF Agent: Enter an Admin User
- Then assign the appropriate Decision Profile for this step like it is described above.
Define decisions in BRF+ so that:
- Buttons appear in the UI
- Admin can take a Positive Decision after fixing the issue
Agent
Every Dialog step must have an Agent assigned.
The Agent is:
- The decision maker
- The task owner
- The person who approves, rejects, or forwards the request
Workflow Deadline Monitoring
Deadline monitoring is a built-in mechanism to handle situations where a workflow step (typically a Dialog step) remains pending for too long — for example, when a responsible person does not approve, reject, or take any action within an expected timeframe.
It automatically sends reminder emails to the current agent(s) to prompt action and prevent workflows from being stuck indefinitely.
Purpose
- Notify users that a task/decision has been waiting too long.
- Escalate attention (e.g., “This item has been pending with you for 30 days”).
- Reduce delays in approval processes, projects, phases, tasks, etc.
Configuration
Deadline monitoring settings are defined per Workflow Deadline Monitoring decision table (Technical name: WF_DEADLINE_MONITORING).
-
Object Type: Select the Object type for which you would like to set a reminder. Use the following abbreviations:
- RIH (Item)
- DPO (Project)
- EPO (Decision Point)
- PPO (Phase)
- TTO (Task)
- CTO (Checklist)
- ITO (Checklist Item)
- RAG (Checklist Reference)
-
Priority: Set a Priority of the reminders.
- Determines the urgency / importance level of the reminder email (not the workflow itself).
- Uses standard SAP Workflow priority values (1–9):
-
Workflow First Reminder (in Days): Number of calendar days after which the first reminder email is sent
-
Workflow Task Number of Reminders: Define how many times you want to send the reminder.
-
Workflow Task Reminder Frequency: Define the frequency of the reminder emails.
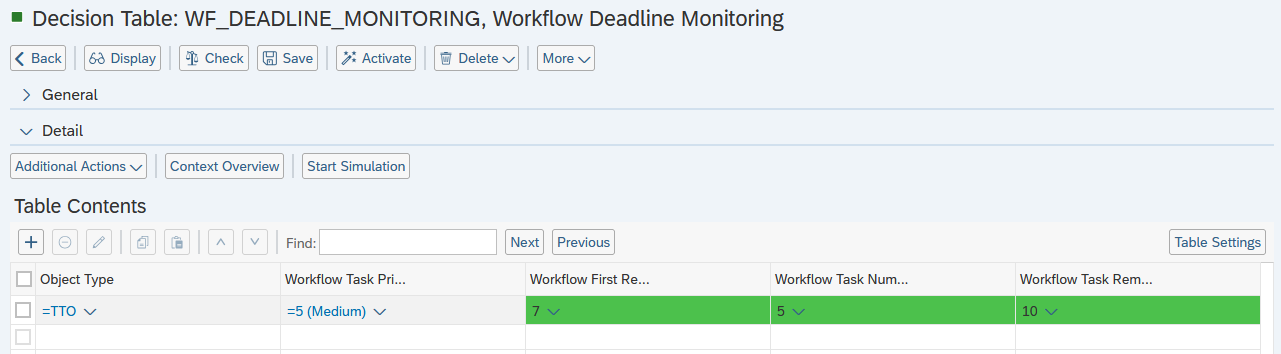
4.2. Background Step
A Background step is executed automatically by the system.
No user interaction or agent is required.
Use a Background step for system-controlled logic and automation.
Typical use cases:
- Updating status (e.g., “In Approval” → “Approved”)
- Sending email notifications
- Triggering integrations
- Moving an object to another workflow stage
- Executing custom logic
- Creating snapshots or versions
Background steps:
- Run automatically
- Do not create tasks
- Do not wait for user input
If no manual decision is required, the step must be configured as a Background step.
Examples
- Automatically set status to “Approved”
- Send notification email after final approval
Technical Execution User
All Background steps are executed by a predefined SAP technical user: WF-BATCH
This is:
- A system (technical) SAP user
- Automatically configured by SAP
- Used exclusively to process background workflow steps
- Not changeable to another custom user
Important Rules
- The system always uses the predefined workflow batch user.
- Customers cannot replace this user with another SAP user.
- It acts as a technical processing user, not a business user.
- It executes all background logic, code, and service functions.
There is no agent assignment in a Background step because execution is handled entirely by this technical user.
Configuration
To set a background step navigate to the decision table Workflow Background Step (Technical name: WF_BACKGROUND_STEPS):
- Workflow Step ID: Enter a step ID of the dialog step which has been set up in decision table Workflow Steps.
- Process Template Service Function ID: Enter an ID of the needed function which will be triggered by the customized step.
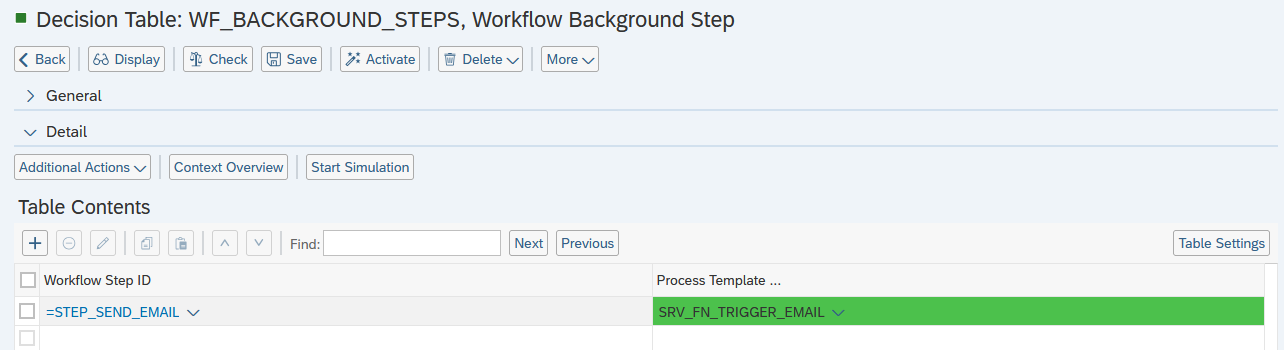
Background Step Example
Send Email → This must be configured as a Background Step.
- No human decision is required.
- The system automatically triggers the email.
WF-BATCHexecutes the logic.
Service Functions in Background Steps
Every Background step must reference a Service Function.
The Service Function defines what the system should execute.
To configure that navigate to decision table Workflow Service Functions (Technicall name: WF_SERVICE_FUNCTIONS):
-
Process Template Service Function ID: Enter an ID of the needed function which will be triggered by the customized step. It should be the ID you used in Workflow Background Step decision table.
-
Workflow Service Function Type: Select one of two main types:
- Status Transition (see more details below)
- Custom / External Action (see more details below)
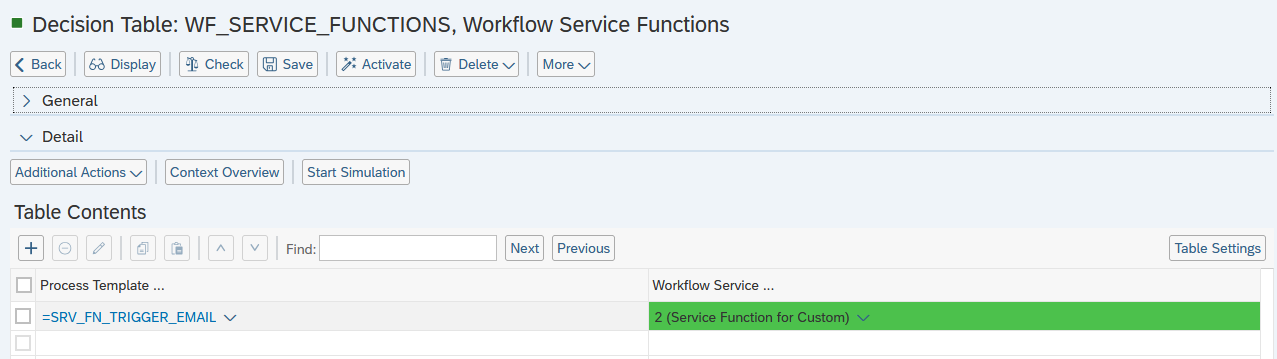
Status Transition Service Function
Use this when the Background step is only responsible for changing the status of an object.
Navigate to the decision table Workflow Status Transition (Technical Name: WF_STATUS_TRANSITION):
- Object Type: Select the Object type for which the status has to be changed.
- Current Status: Select the status of the object which defines when the function will be triggered.
- New Status: Select the new status of the selected object which should be result of the function.
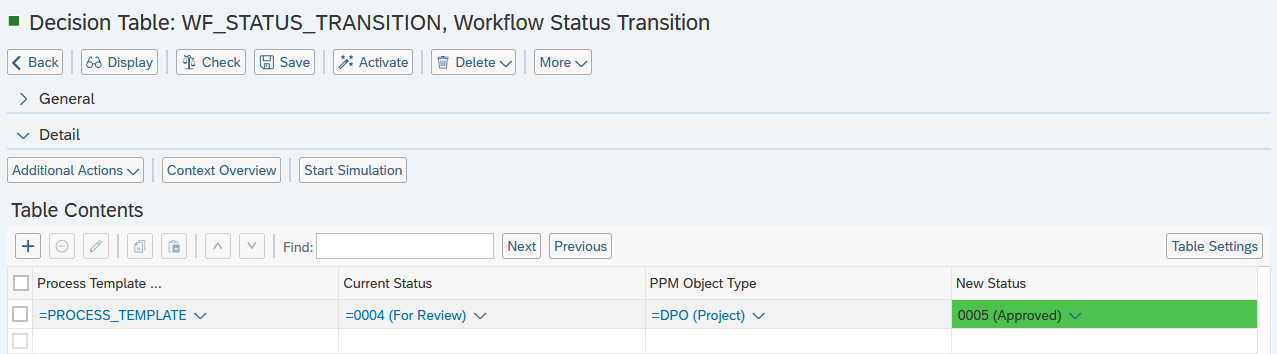 Example:
- Object Type: Project
- Current Status: “Foe Review”
- New Status: “Approved”
When triggered:
- The system calls the workflow service function
- It executes the status transition
- The object moves from the defined current status to the new status
This is handled via a predefined class.
No custom coding is required if it is purely a status change.
Custom / External Action Service Function
Use this when:
- You need custom logic
- You need logic beyond simple status change
In this case:
- A custom class is implemented
- The developer writes the required code inside this method
Whatever is implemented inside that method:
- Will be executed automatically
- Will run under the
WF-BATCHuser - Will behave as a Background task
How It Works Technically
-
Workflow reaches a Background step.
-
System triggers the assigned Service Function.
-
WF-BATCHuser executes the logic. -
Depending on configuration:
- Status is changed
- OR custom code runs
-
Workflow continues to the next step.
After configuring Process Template Service Function ID (external action IDs) using decision table Workflow Background Step, navigate the expression table “Workflow External actions” (Technical Name: WF_EXTERNAL_ACTIONS):
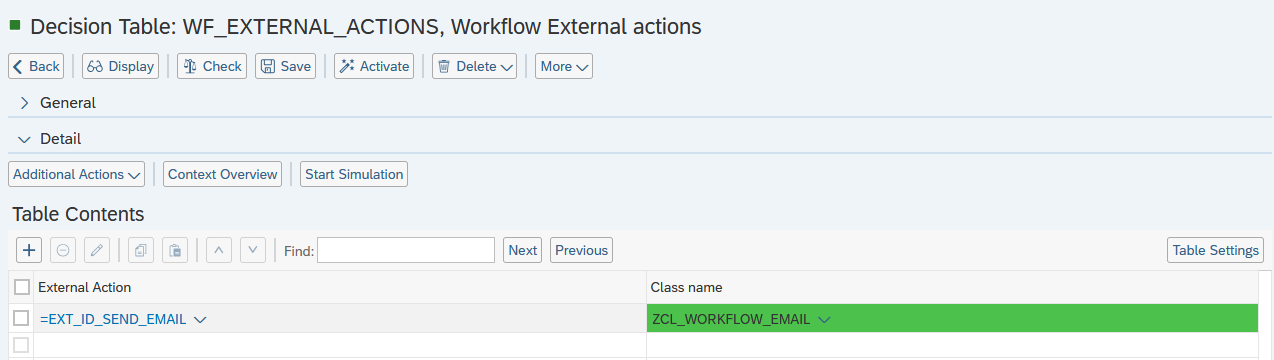
-
External Action: Enter external action IDs (Process Template Service Function ID) which was used in the decision table Workflow Background Step
-
Class Name: Enter the name of any class here that implements the interface
/STX/SOL_PPP_IF_CUSTOM_ACTION. That interface defines the methodEXECUTE_ACTION, where the business logic should be implemented. By default, the PPP Standard provides three classes (shown below) that serve as the default implementation and create a version and a snapshot whose names start withSNP*. You can use these classes immediately for customization, or you can create your own class and provide it here. The class should implement the interface/STX/SOL_PPP_IF_CUSTOM_ACTION, and the business logic should be written in theEXECUTE_ACTIONmethod./STX/SOL_PPP_CL_CREAT_ITEM_VER→ Creates only an Item object version./STX/SOL_PPP_CL_CREAT_PROJ_VER→ Creates only a Project Snapshot that starts withSNP*./STX/SOL_PPP_CL_CREATE_VERSION→ Creates both an Item version and a Project Snapshot that starts withSNP*.
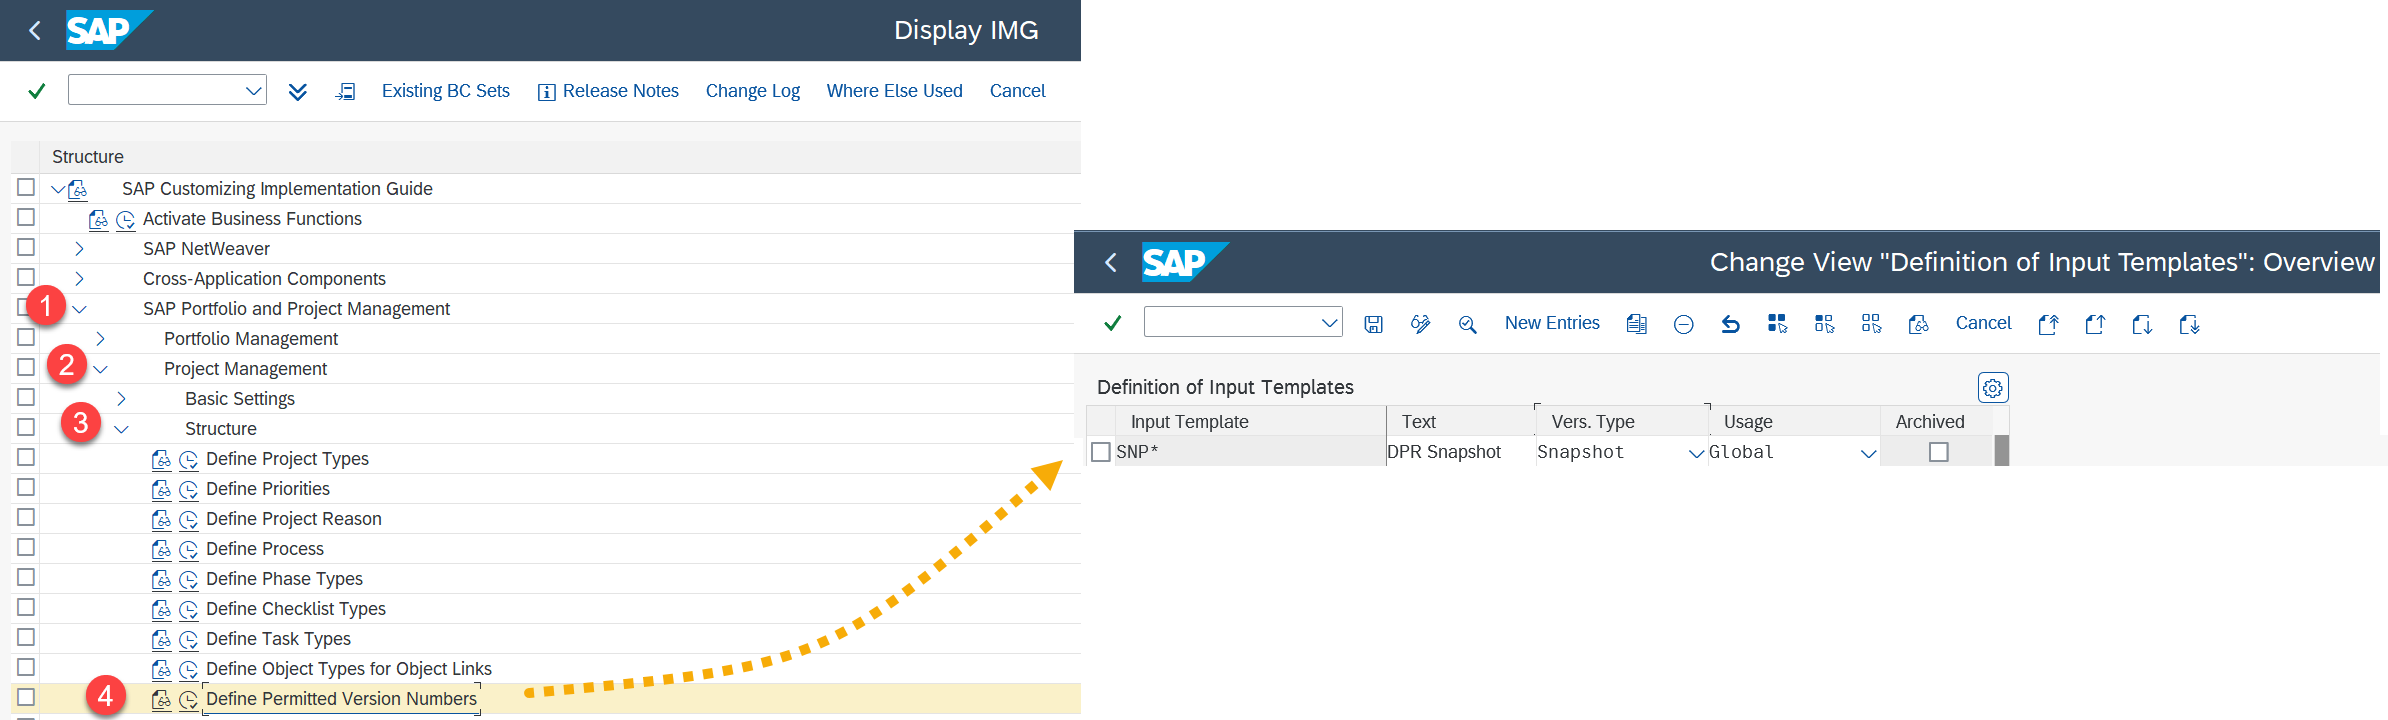
Create the permitted version number SNP* here in SPRO customization
4.3. Wait / Consolidate Step
A Wait / Consolidate step is used in parallel workflow scenarios.
It acts as a synchronization point that ensures multiple parallel branches are completed before the workflow continues.
This step does not require an agent.
Parallel Workflow Logic
Parallel processing occurs when multiple steps share the same previous step or when multiple steps are configured without a defined “Last Step ID.”
In this case:
- Multiple steps start simultaneously
- Tasks are sent to multiple agents at the same time
- Each branch progresses independently
Why a Wait Step is Required
Without a Wait step, the workflow may continue after only one parallel branch finishes.
The Wait step ensures that:
- The workflow pauses
- All required parallel steps are completed
- Only then does the workflow proceed to the next step
Example: Parallel Approval Scenario
-
Two approval steps start in parallel:
- Budget Manager
- Project Manager
-
Both managers receive tasks simultaneously.
-
Each approval flows into a Wait step.
-
The Wait step ensures:
- Both approvals are completed
- Only then does the workflow continue (e.g., to final processing)
This guarantees proper consolidation of parallel decisions.
Configuration
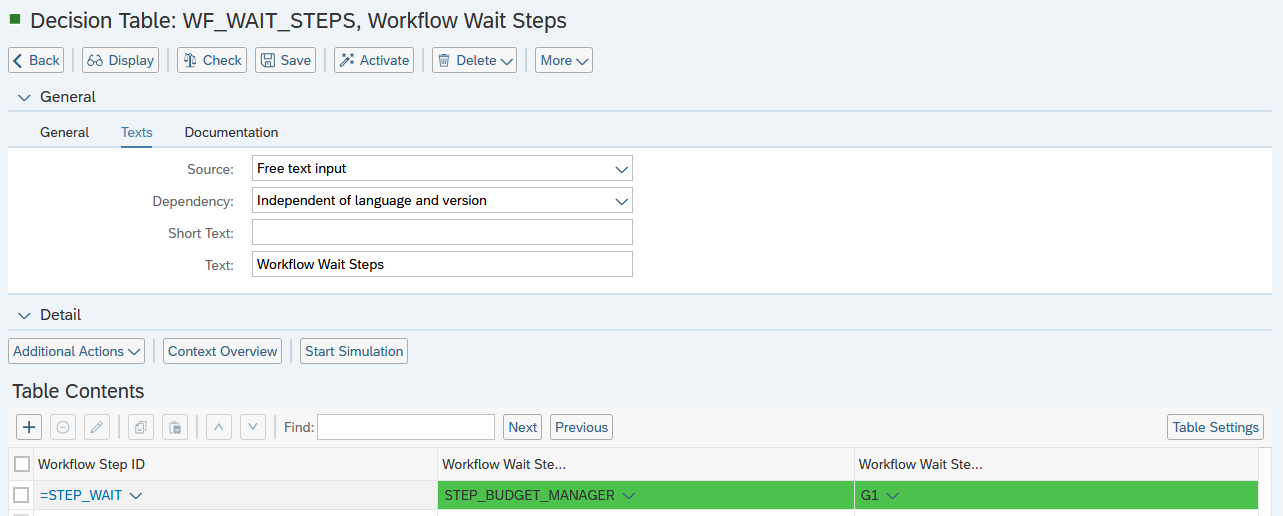
Navigate to the expression table “Workflow Wait Steps” (Technical Name: WF_WAIT_STEPS):
-
Workflow Step ID: Enter an ID of the wait step.
-
Workflow Wait Step ID: Enter the step ID for which the wait needs to be implemented. The workflow will not move forward until the wait step completes.
-
Workflow Wait Step Group ID: Enter any Wait Step Group ID
-
In case of multiple branches with conditions, it can appear that on design time, it is not clear, whether step A, B, or C will be the last one before the consolidation step.
-
The system waits until:
- All steps without group ID are completed
- And for each returned group ID, at least one step is completed
-
5. Workflow Step Decisions
Workflow Step Decisions table defines the possible actions (buttons/options) that an agent can take in a Dialog step. These decisions control how the workflow proceeds after a user interacts with a task.
Decisions are grouped into Decision Profiles. One profile can contain multiple decision options (e.g., Approve + Reject, or Approve + Reject + Conditional Approve).
Purpose
- Provide configurable choices in dialog tasks (e.g., Approve, Reject, Reject but Continue).
- Determine workflow routing: continue to next step(s) or abort (end) the entire workflow.
- Allow custom button text, icons, and behavior.
- Support special error-handling decisions (e.g., for BRFplus configuration issues).
Configuration
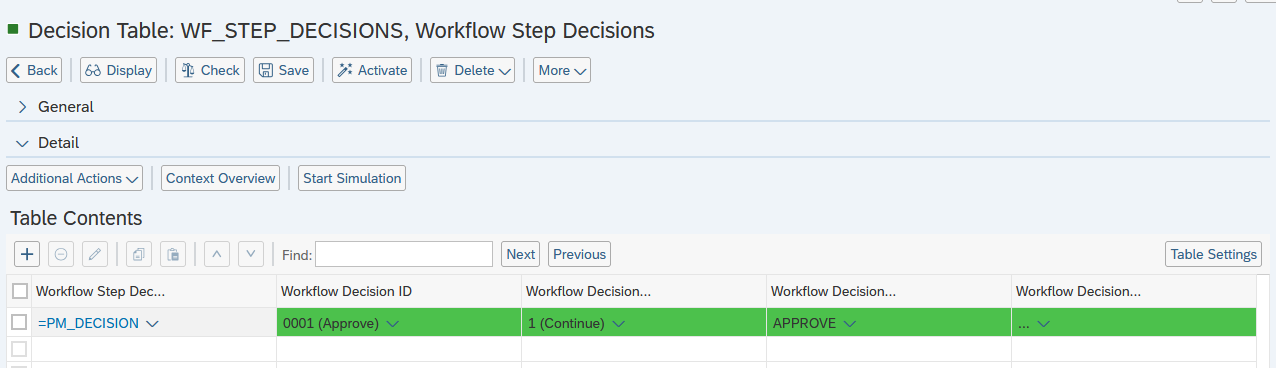
Navigate to the decision table Workflow Step Decisions (Technical Name: WF_STEP_DECISIONS):
-
Workflow Decision Profile ID: Enter Decision Profile ID which is used in the Decision Table Workflow Sequences (Technical Name: WF_SEQUENCES) to set up this particular decision part of the workflow.
-
Workflow Decision ID: Select a unique key for the decision option within the profile (Approve, Reject etc.)
-
Decision IDs:
0001- Positive Decision (Approve)0002- Negative Decision (Reject)0003- Conditional Decision (Reject & Continue → Conditional Approval)9998- Forward to self9999- Forward to others
-
Note: Decision IDs
9998and9999are admin decisions provided by default. If the user has PPP admin access and the work item is not delivered, they will have the options9998(Forward to self) and9999(Forward to others). Using these options, they can either forward the work item to themselves or to any other users to work on. You can also configure this so that only one of the buttons is required. Configure only that button, and the other will not be displayed in the UI.
-
-
Workflow Decision Type: Select workflow behaviour after selection: 1 = Continue Workflow, 2 = Abort Workflow
-
Workflow Decision Text ID: Enter a reference to customizable text (e.g., button label like “Approve”, “Reject”, “Customizing Adjusted”)
- You can also provide the decision text ID as a meaningful ID name. and you can configure the translatable text using Text. You can also use the BAdI
/STX/SOL_PPP_BA_WORKFLOWimplementation to modify the step details using the methodMODIFY_DECISION_STEP.
- You can also provide the decision text ID as a meaningful ID name. and you can configure the translatable text using Text. You can also use the BAdI
-
Workflow Decision Icon: Select an icon for the customized decision (currently not supported).
6. Configure Workflow Form Control
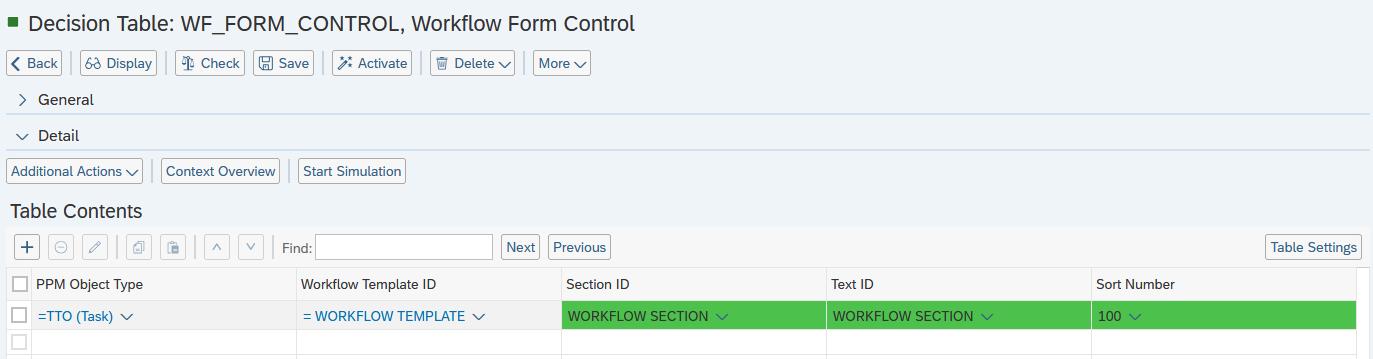
Configure the field sections for the workflow using the expression table “Workflow Form Control” (Technical Name: WF_FORM_CONTROL).
- PPM Object Type: Select the Object type for which you would like to set a section.
- Workflow Template ID: Enter the Workflow Template ID you want to configure the form for.
- Section ID: Enter any ID for your Section. This Section ID has to exist in the “Section Control” (Technical Name: SECTION_CONTROL) expression table.
- Text ID: Enter any Text ID (Used in “Translatable Texts”, Technical Name: TEXTS). The Text of the Text ID will be used as the Header of the Form.
- Sort Number: Enter a value to change the order of the Sections.
- Hide: Set to true, if you want to hide a section.
Use remark on Field Control to continue Section configuration, set the field groups and fields for any PPM object type available in Basic Field Configuration.
By default, the PPP standard provides a field origin WORKFLOW with origin field names NAME and DESCRIPTION. Configure these fields by default under any section in Basic Field Configuration, so that the workitem text and workitem description are displayed in the UI.