Column Control
Columns in PPP tables can be adjusted via BRF+ customizing to enhance usability. Adjustments include making a column mandatory, read-only, or hidden. You can also add new columns, rename them, and rearrange their order using the sort number.
If you would like to add a new column, make sure it is first added to Basic Field Configuration table, and only then use it in Column Control.
If the field is not part of the standard customizing (check Basic Field Configuration under Application: /STX/SOL_PPP_STANDARD), you can still add the field to Basic Field Configuration in your customer application by entering the appropriate Origin and Origin Field Name.
Authorizations
Open your BRF+ Application and navigate to the decision table “Column Control Authorization” (Technical Name: COLUMN_CONTROL_AUTHORIZATION).
- Object Type: Enter any Object Type from the standard PPM. (e.g. DPO for Project)
- Auth Section ID: Enter any Authorization Section ID (Field Auth Section ID from AUTHORIZATION_SECTIONS).
- Field ID: Enter the Field ID of the Field you want to have as an Authorization Column. This Field ID has to exist in the “Basic Field Config” (Technical Name: BASIC_FIELDCONFIGURATION) expression table.
- Column Label Text: Enter the Text ID which will be used as the label of the column. This Text ID has to exist in the “Translatable Texts” (Technical Name: TEXTS) expression table.
- Mandatory: Enter a value, if the column is supposed to be a mandatory input.
- Read Only: Enter a value, if the column is supposed to be in read only mode. In this mode the values can’t be edited.
- Sort Number: Enter a value to change the order of the columns.
- Hide: Set to true, if you want to hide the column.
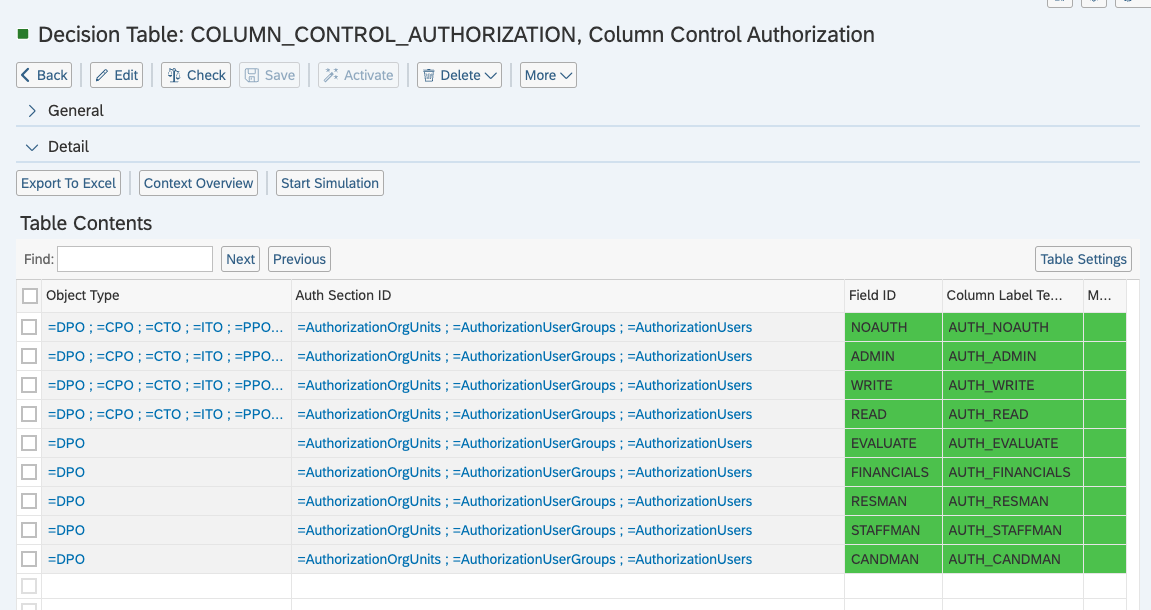
The PPP Standard Customizing provides these columns:
Object Links
Open your BRF+ Application and navigate to the decision table “Column Control Object Link” (Technical Name: COLUMN_CONTROL_OBJECT_LINK).
- Project Node Type: Select the Project Type Node from the list (e.g. Project, Task, Checklist). This determines which node this particular setting is for.
- Field ID: Enter the Field ID of the Field you want to have as an Object Link Column. This Field ID has to exist in the “Basic Field Config” (Technical Name: BASIC_FIELDCONFIGURATION) expression table.
- Column Label Text ID: Enter the Text ID which will be used as the label of the column. This Text ID has to exist in the “Translatable Texts” (Technical Name: TEXTS) expression table.
- Mandatory: Enter a value, if the column is supposed to be a mandatory input.
- Read Only: Enter a value, if the column is supposed to be in read only mode. In this mode the values can’t be edited.
- Sort Number: Enter a value to change the order of the columns. The sort number determines the display order; lower numbers appear before higher ones.
- Hide: Set to true, if you want to hide the column.
- Include in Default Variant: Set to true to display the column within the filter bar by default (without a preset value).
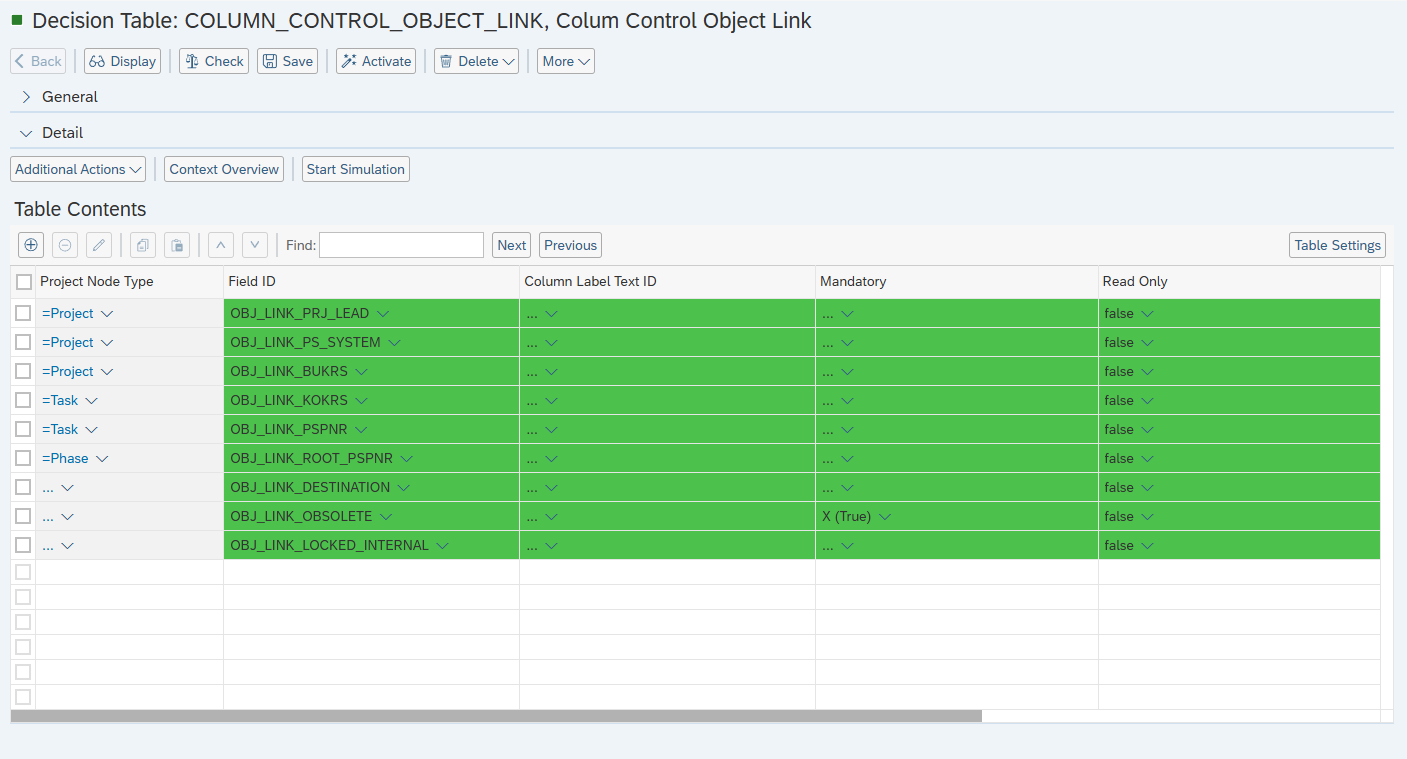
Here is an example of adding new columns to different Project Nodes. If a Project Node cell is left empty, it indicates that the respective field will be added to all Object Links tables across all Project Nodes. On the other hand, specific Project Nodes can have additional columns that are exclusively configured for them.
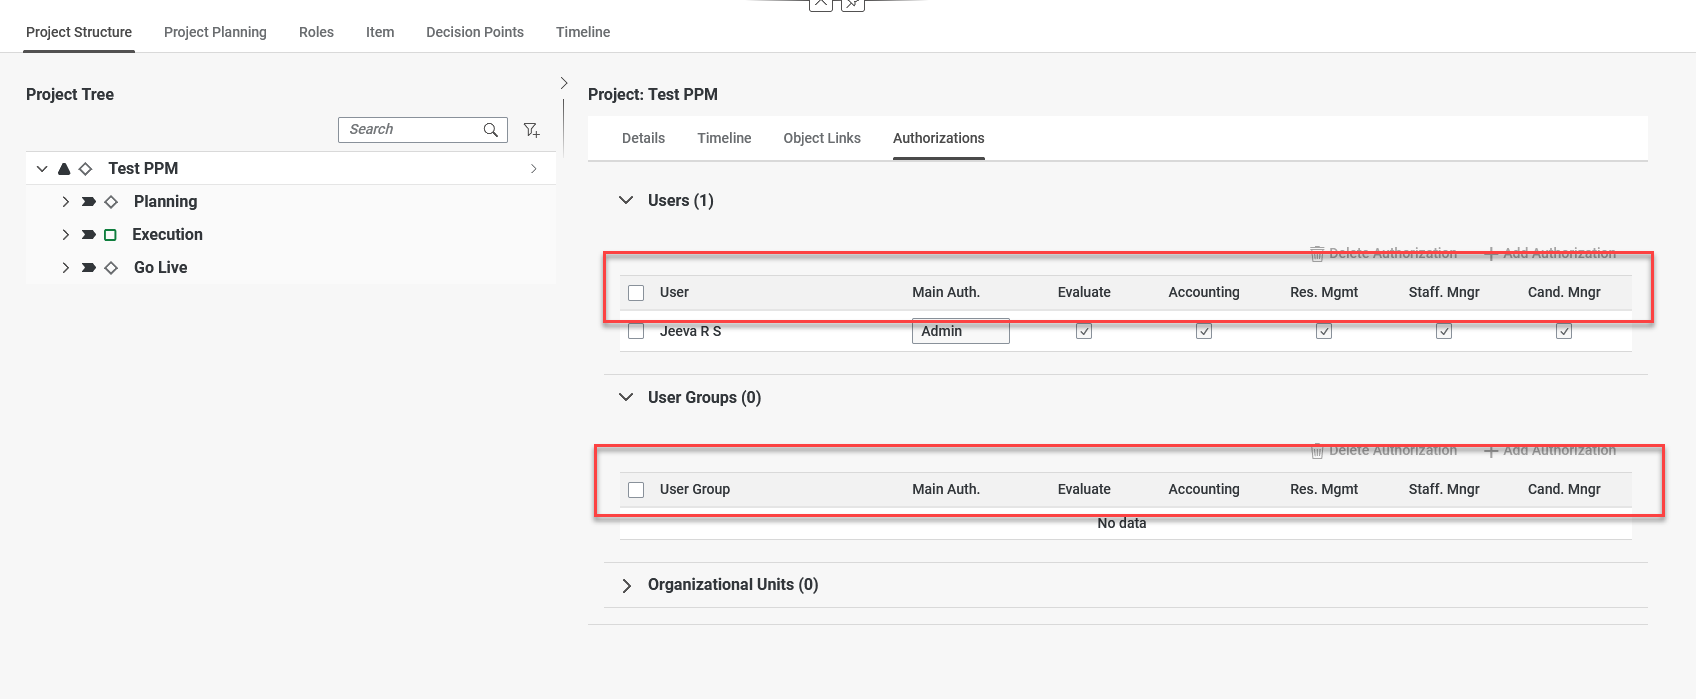
Here is an example of a Project with the above customizing:

Classification
Open your BRF+ Application and navigate to the decision table “Column Control Classification” (Technical Name: COLUMN_CONTROL_OBJECT_LINK).
- Entity Type: Select the Entity Type from the list (e.g. Project, Task, Checklist).
- Field ID: Enter the Field ID of the Field you want to have as an Object Link Column. This Field ID has to exist in the “Basic Field Config” (Technical Name: BASIC_FIELDCONFIGURATION) expression table.
- Text ID: Enter the Text ID which will be used as the label of the column. This Text ID has to exist in the “Translatable Texts” (Technical Name: TEXTS) expression table.
- Mandatory: Enter a value, if the column is supposed to be a mandatory input.
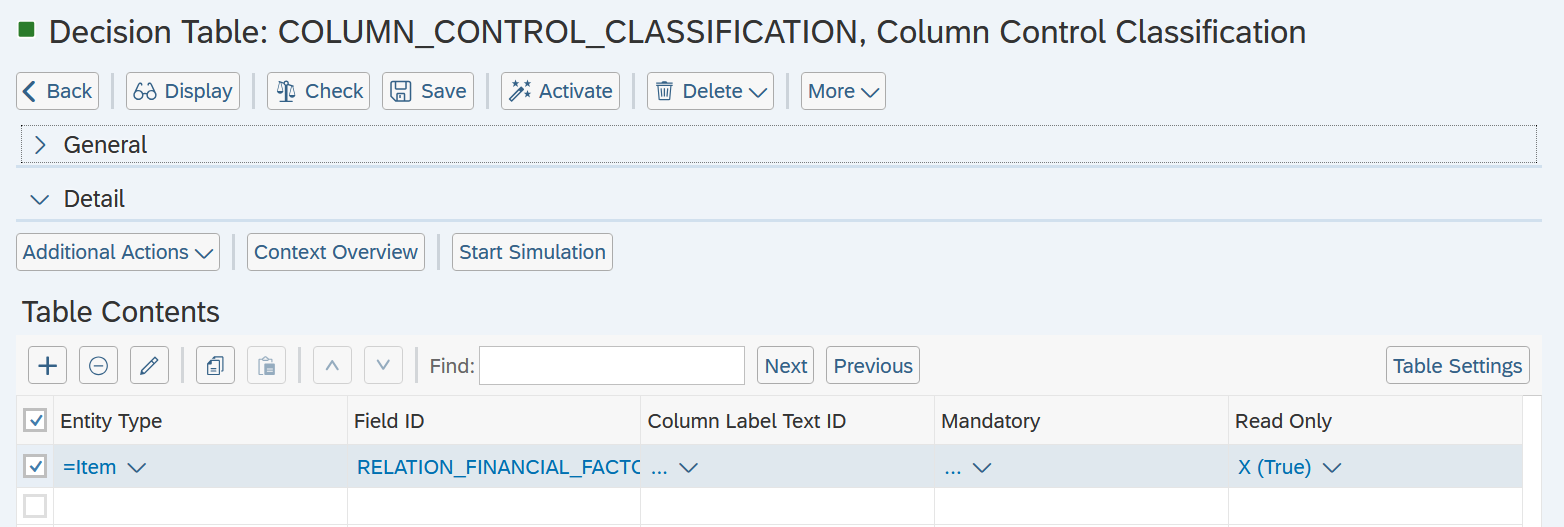
- Read Only: Enter a value, if the column is supposed to be in read only mode. In this mode the values can’t be edited.
- Sort Number: Enter a value to change the order of the columns. The sort number determines the display order; lower numbers appear before higher ones.
- Hide: Set to true, if you want to hide the column.
Here is an example of setting a column to Read Only mode.
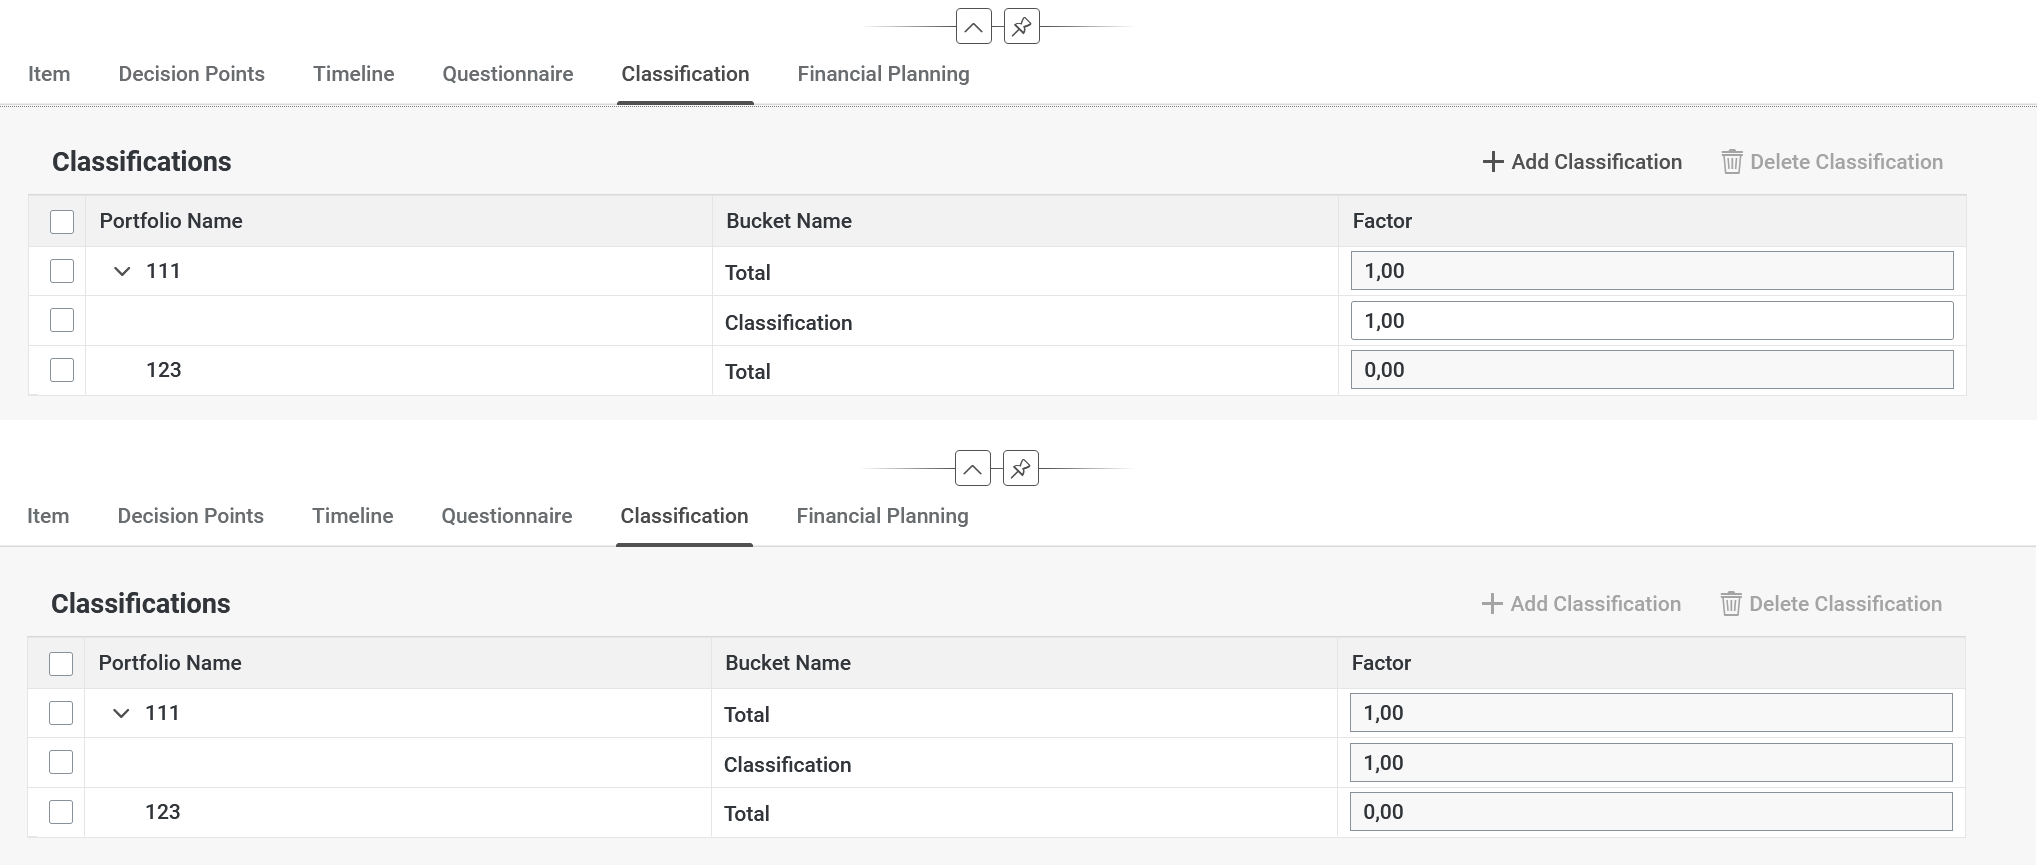
Here is an example of a Classification with the above customizing:
Fin.Planning
Open your BRF+ Application and navigate to the decision table “Column Control Financial Planning” (Technical Name: COLUMN_CONTROL_FINANCIAL_PLAN ).
- Entity Type: Select the Entity Type from the list (e.g. Bucket, Initiative, Item).
- Field ID: Enter the Field ID of the Field you want to have as an Authorization Column. This Field ID has to exist in the “Basic Field Config” (Technical Name: BASIC_FIELDCONFIGURATION) expression table.
- Text ID: Enter the Text ID which will be used as the label of the column. This Text ID has to exist in the “Translatable Texts” (Technical Name: TEXTS) expression table.
- Mandatory: Enter a value, if the column is supposed to be a mandatory input.
- Read Only: Enter a value, if the column is supposed to be in read only mode. In this mode the values can’t be edited.
- Sort Number: Enter a value to change the order of the columns.
- Hide: Set to true, if you want to hide the column.
- Include in Default Variant: Set to true to display the column within the filter bar by default (without a preset value).
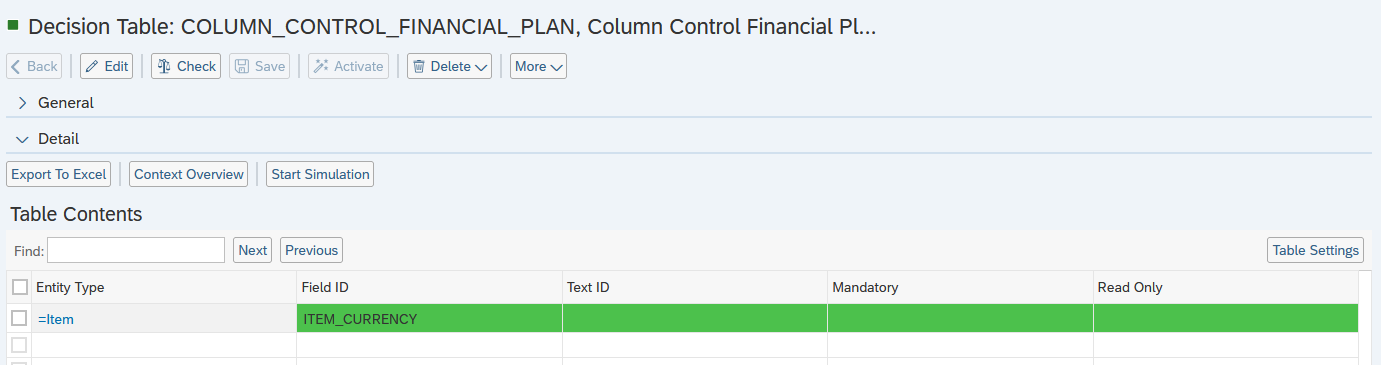
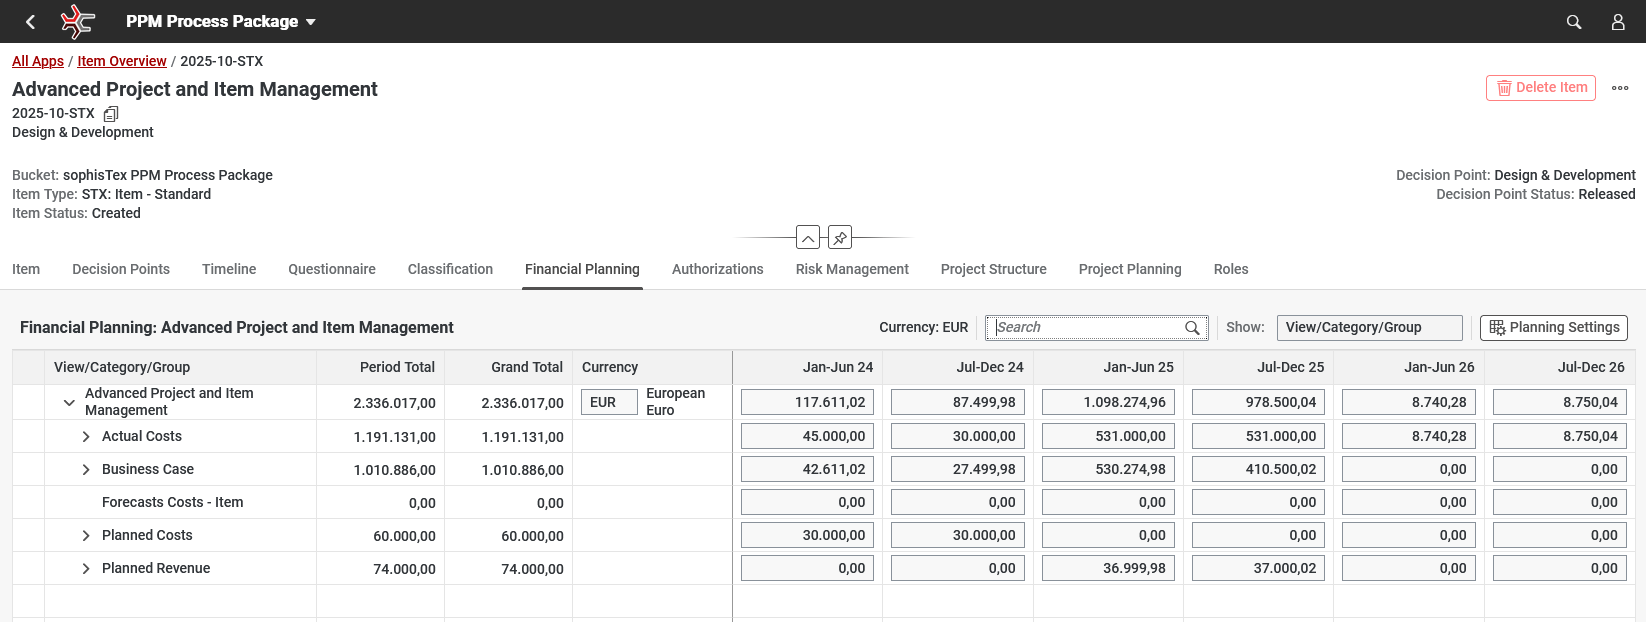
Here is an example of adding a column which shows currency in the Item Financial Planning table.
Here is an example of the Item Financial Planning table with the above customizing:
Risk Management
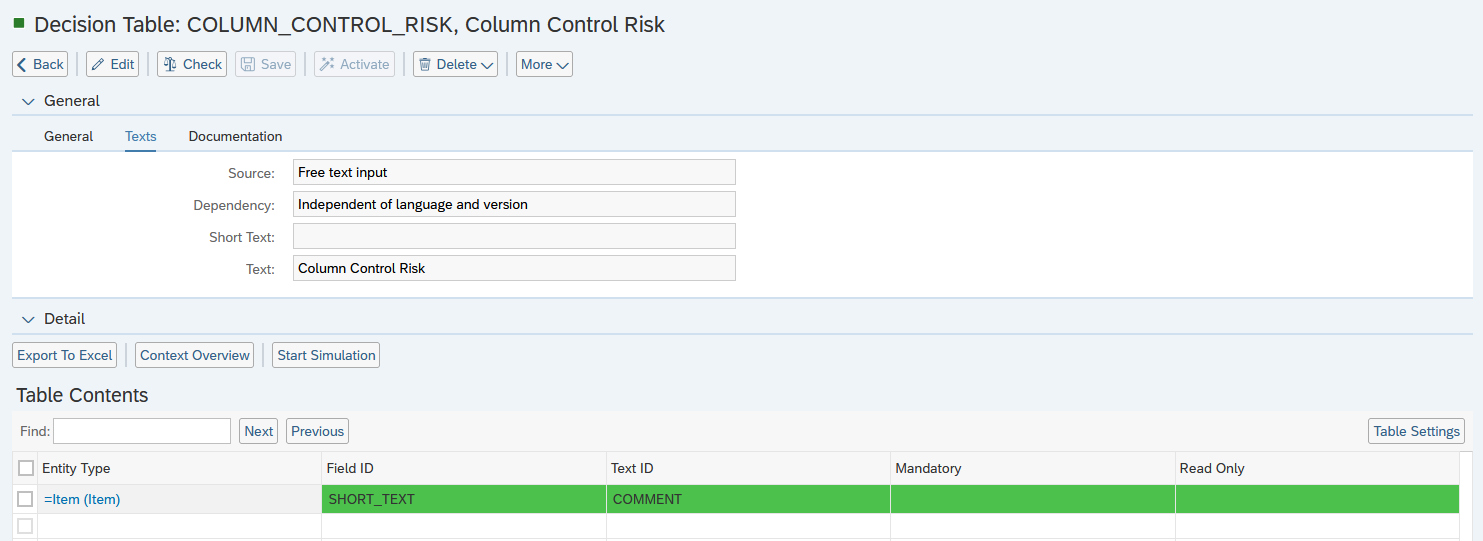
Open your BRF+ Application and navigate to the decision table “Column Control Risk” (Technical Name: COLUMN_CONTROL_RISK).
- Entity Type: Select the Entity Type from the list (e.g. Item or Project).
- Field ID: Enter the Field ID of the Field you want to have as an Authorization Column. This Field ID has to exist in the “Basic Field Config” (Technical Name: BASIC_FIELDCONFIGURATION) expression table.
- Text ID: Enter the Text ID which will be used as the label of the column. This Text ID has to exist in the “Translatable Texts” (Technical Name: TEXTS) expression table.
- Mandatory: Enter a value, if the column is supposed to be a mandatory input.
- Read Only: Enter a value, if the column is supposed to be in read only mode. In this mode the values can’t be edited.
- Sort Number: Enter a value to change the order of the columns.
- Hide: Set to true, if you want to hide the column.
- Include in Default Variant: Set to true to display the column within the filter bar by default (without a preset value).
Here is an example of adding a column which allows to add a comment when creating a new Risk or Opportunity.
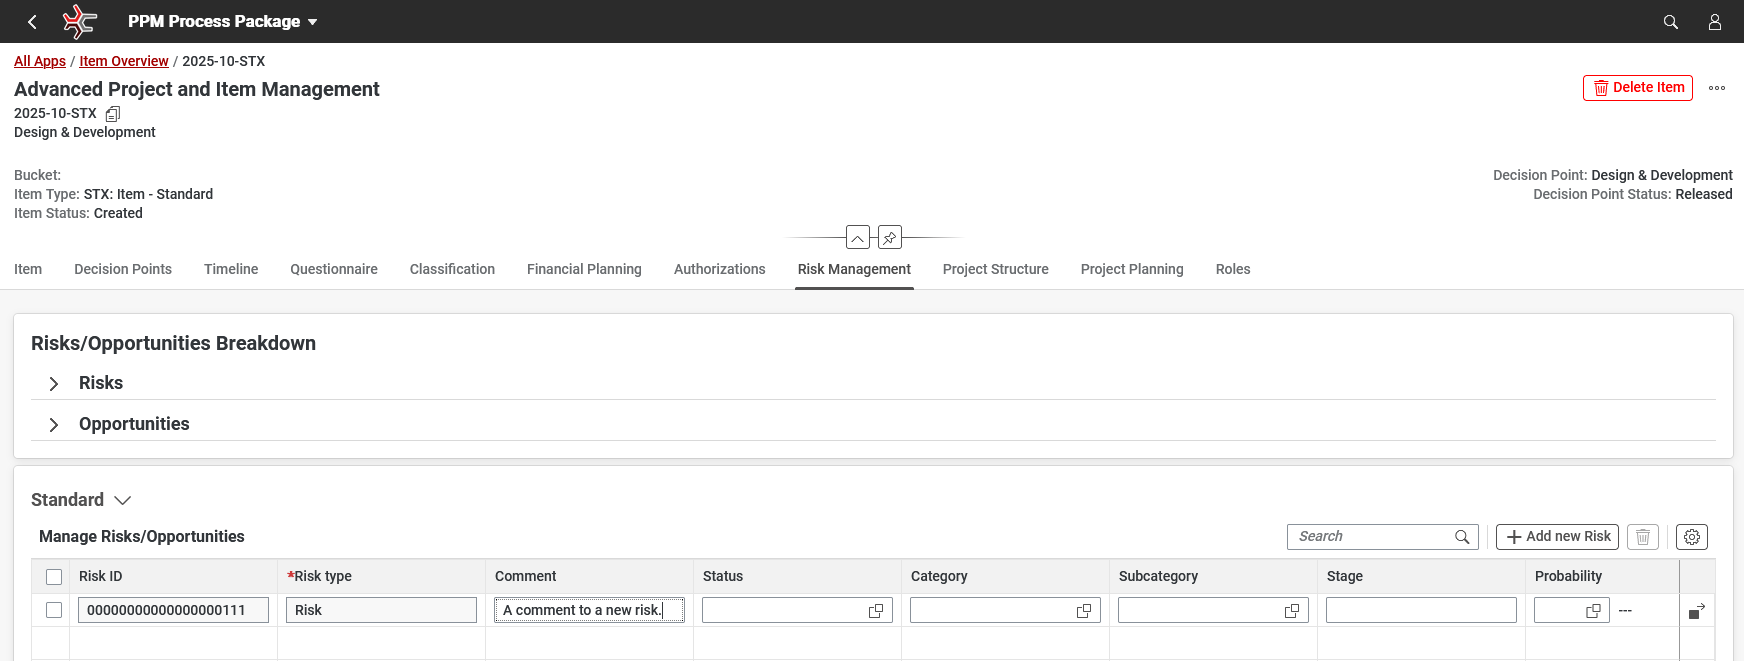
Here is an example of Comment column according to the above customizing:
Approvals and Reporting
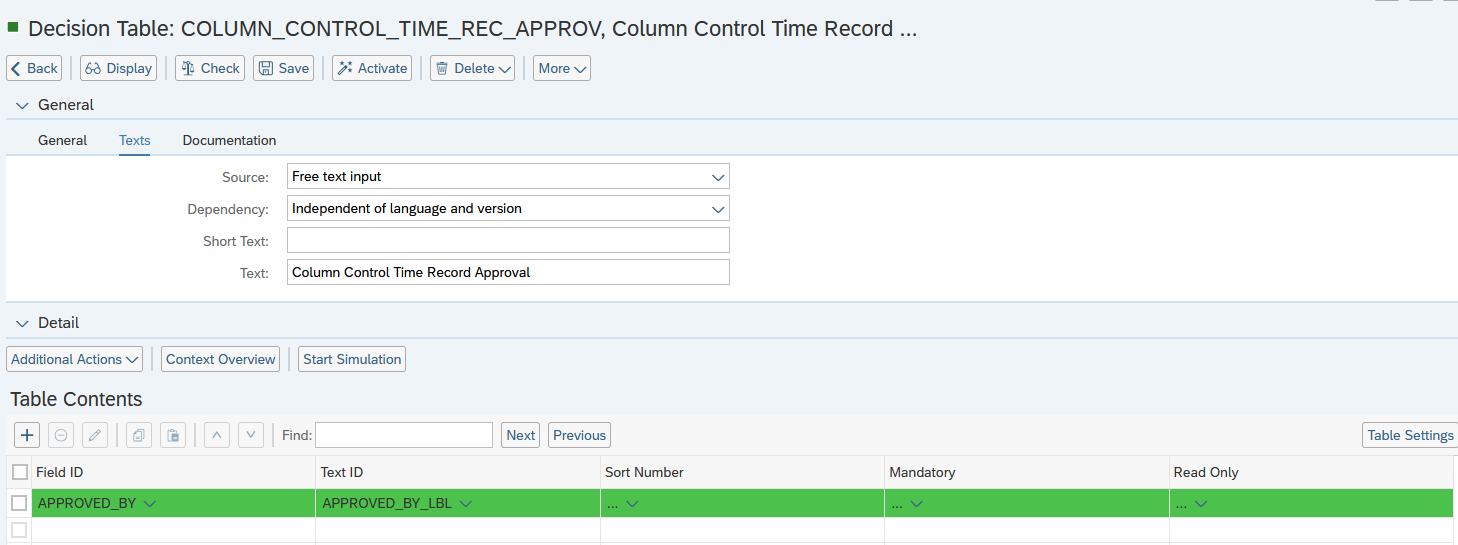
Open your BRF+ Application and navigate to the decision table “Column Control Time Record Approval” (Technical Name: COLUMN_CONTROL_TIME_REC_APPROV).
- Field ID: Enter the Field ID of the Field you want to have as an Authorization Column. This Field ID has to exist in the “Basic Field Config” (Technical Name: BASIC_FIELDCONFIGURATION) expression table.
- Text ID: Enter the Text ID which will be used as the label of the column. This Text ID has to exist in the “Translatable Texts” (Technical Name: TEXTS) expression table.
- Mandatory: Enter a value, if the column is supposed to be a mandatory input.
- Read Only: Enter a value, if the column is supposed to be in read only mode. In this mode the values can’t be edited.
- Sort Number: Enter a value to change the order of the columns.
- Hide: Set to true, if you want to hide the column.
- Include in Default Variant: Set to true to display the column within the filter bar by default (without a preset value).
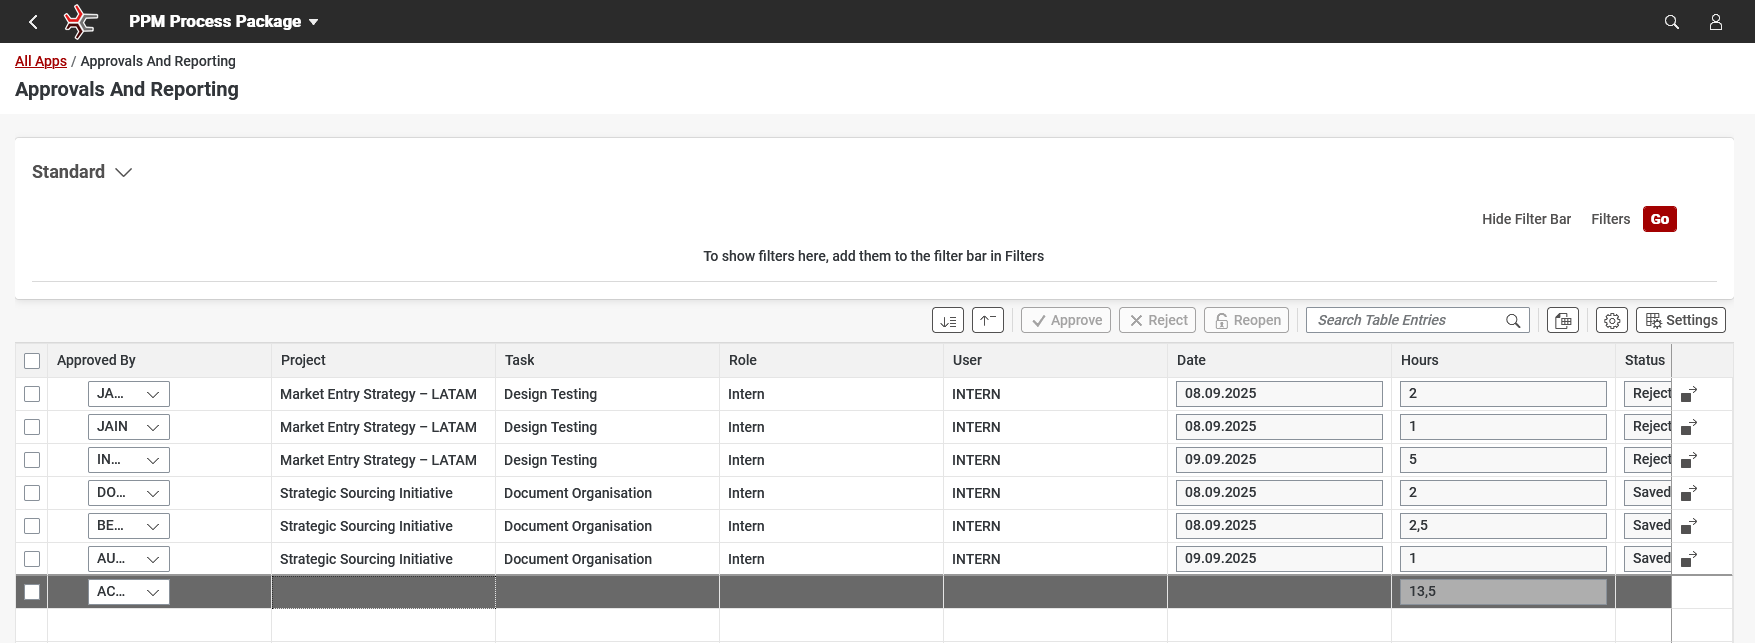
Here is an example of adding a column which allows you to see who is approving a time record in Approvals and Reporting table.
Here is an example of Approvals and Reporting table with the above customizing: