
Configure workflow BRF+ configuration settings
General Information
Step1: Configure Workflow Form Control
Configure the field sections for the workflow using the expression table “Workflow Form Control” (Technical Name: WF_FORM_CONTROL). Using the section configured here Customizing Fields - Forms, Sections and FieldGroups configure the field groups and fields for any PPM object type available in Customizing Fields - Basic Field Config.
By default, the PPP standard provides a field origin WORKFLOW with origin field names NAME and DESCRIPTION. Configure these fields by default under any section in Customizing Fields - Basic Field Config, so that the workitem text and workitem description are displayed in the UI.
Step 2: Configure PPP Workflow Start Conditions
Next, open your BRF+ application and navigate to any expression table as listed below to specify the trigger conditions for the workflow. Currently, the following PPM objects are supported for workflow cases: ITEM, DECISION_POINT, PROJECT, PHASE, TASK, CHECKLIST, CHECKLIST_ITEM, and CHECKLIST_REFERENCE.
- Workflow Start Conditions Item (Technical Name: WF_START_COND_ITEM)
- Workflow Start Conditions Decision Point (Technical Name: WF_START_COND_DECISION_POINT)
- Workflow Start Conditions Project (Technical Name: WF_START_COND_PROJECT)
- Workflow Start Conditions Phase (Technical Name: WF_START_COND_PHASE)
- Workflow Start Conditions Task (Technical Name: WF_START_COND_TASK)
- Workflow Start Conditions Checklist (Technical Name: WF_START_COND_CHECKLIST)
- Workflow Start Conditions Checklist Item (Technical Name: WF_START_COND_CHECKLIST_ITEM)
- WF Start Condition Checklist Reference (Technical Name: WF_START_COND_CHECKLIST_REFER)
Here, you can configure which workflow template is triggered under which condition. You can configure multiple templates for different workflow scenarios with any conditions, and you can also use Custom Input. For the output field, you can provide the workflow template ID as a meaningful ID name.
Note: We cannot use fields that are outside of a particular start condition entity. For example, triggering a project workflow using Workflow Start Conditions Project (Technical Name: WF_START_COND_PROJECT) when a value in an item field changes is not currently possible. Ideally, in this case, we need to use Workflow Start Conditions Item (Technical Name: WF_START_COND_ITEM) to trigger a project workflow. Therefore, choose the start conditions based on the available fields and trigger condition, and this becomes your entity.
Step 3: Configure PPP Workflow Templates
After you have configured all required workflow template IDs according to the trigger conditions, navigate to the expression table “Workflow Templates” (Technical Name: WF_TEMPLATES) and configure the output fields: workflow title text ID (configure the translatable text using Text, in general, this supports the variable placeholder, where we can display the object name like &PROJECT_NAME& real variables corresponding to particular start condition entity and their root entity variables), trigger mode, trigger group, and disabled property. Even you can mark the PPP workflow template ID as disabled, so it will not trigger this template until its gets enabled again.
Trigger Mode & Trigger Group:
Decide how the configured workflow trigger should behave when multiple saved states of an object match the trigger condition (e.g., the item fulfills the trigger condition and, after 10 other changes, still fulfills the condition). The condition can be applied to the whole item/project group, including all sub-objects, or to each object individually.
Trigger Groups
- Whole item/project with all sub objects
- Single objects (all tasks, phases, …)
Trigger Modes
- Once per object/group -> Triggered once on condition is fulfilled, but never again for this object
- On condition fulfilled (again) -> Condition needs to be not fulfilled and then fulfilled again to re-run
- While condition filfilled → Triggered on each save while condition fulfilled
Step 4: Configure Workflow Sequences
After configuring the workflow templates, navigate to the expression table “Workflow Sequences” (Technical Name: WF_SEQUENCES) and configure the workflow steps. This is a crucial step for us because our flexible workflow will move forward based on this configuration. Provide all the steps for the PPP workflow template IDs that should occur as either parallel or sequential task steps. You can configure the full workflow steps here, specifying what should happen next when one step is completed and to where it should prompt. You can also use Custom Input to define the next steps based on certain conditions. You can even configure the steps according to decisions made in previous steps. You can also use the BAdI /STX/SOL_PPP_BA_WORKFLOW implementation to modify the next step details using the method MODIFY_NEXT_STEPS.
Step 5: Configure Workflow Steps
After configuring the workflow sequences, which will contain all the steps necessary for each PPP workflow template ID, navigate to the expression table “Workflow Steps” (Technical Name: WF_STEPS) and configure each step with its details, specifying the step type—whether it is a dialog step, background step, or wait step—and set the step title text ID (configure the translatable text using Text, in general, this supports the variable placeholder, where we can display the object name like &PROJECT_NAME& real variables corresponding to particular start condition entity and their root entity variables). Provide its decision profile ID if it is only a dialog step.
Workflow step types:
- Dialog
- Background
- Wait / Consolidate
Configure step ID 9999 as a dialog step. This dialog step ID will be used for an admin step and will create a dialog task for an admin user. In case any error occurs during background activity or if any BRF+ customization is incorrect or missing, the system will automatically create a dialog task and assign it to an admin user. Assign the decision profile as well so buttons appear in the UI by configuring the decisions as provided in the BRF+ decision step below. Once the customization is adjusted, the admin can perform the positive decision and the system will automatically reroute to where it encountered an error in the previous step.
Also configure the step title text ID, which displays the work item text. You can configure the translatable text using Text. Also configure the workflow step long text, which shows the work item description. As this is a long text, it will be configured using SO10, and the SO10 text ID can be provided directly here. It also supports translatable SO10 text. In general, this supports the variable placeholder, where we can display the object name like &PROJECT_NAME& real variables corresponding to particular start condition entity and their root entity variables. Finally, configure its decision profile IDs (which determine which buttons appear in the UI) by configuring the decisions as provided in the BRF+ decision step below.
Step 6: Configure Workflow Step Decisions
After configuring the workflow decision profile ID using the above BRF+ workflow steps, we now have all the decision profiles that we can configure in the expression table “Workflow Step Decisions” (Technical Name: WF_STEP_DECISIONS).
Decision IDs:
0001- Positive Decision (Approve)0002- Negative Decision (Reject)0003- Conditional Decision (Reject & Continue → Conditional Approval)9998- Forward to self9999- Forward to others
Note: Decision IDs 9998 and 9999 are admin decisions provided by default. If the user has PPP admin access and the work item is not delivered, they will have the options 9998 (Forward to self) and 9999 (Forward to others). Using these options, they can either forward the work item to themselves or to any other users to work on. You can also configure this so that only one of the buttons is required. Configure only that button, and the other will not be displayed in the UI.
Decision Type:
- Continue
- Abort workflow
You can also provide the decision text ID as a meaningful ID name. and you can configure the translatable text using Text. You can also use the BAdI /STX/SOL_PPP_BA_WORKFLOW implementation to modify the step details using the method MODIFY_DECISION_STEP.
Step 7: Configure Wait/Consolidation Steps
After configuring the workflow decision step type 3 for all step IDs using the BRF+ workflow steps above, we now have all the wait steps that we can configure in the expression table “Workflow Wait Steps” (Technical Name: WF_WAIT_STEPS).
Mention the step ID for which the wait needs to be implemented. The workflow will not move forward until the wait step completes.
Waiting Group ID:
In case of multiple branches with conditions, it may be unclear at design time whether step A, B, or C will be the last one before the consolidation step. The system waits until all steps without a group ID are completed, and for each returned group ID at least one step has been completed.
Step 8: Configure Dialog Steps
After configuring the workflow decision step type 1 for all step IDs using the BRF+ workflow steps above, we now have all the dialog steps that we can configure in the expression table “Workflow Dialog Steps” (Technical Name: WF_DIALOG_STEPS). Provide the agent as the user ID or as their business partner, based on the chosen agent type.
Below 2 Agent functions are possible to configure at this moment.
- US → User
- BP → Business Partner
Configure an Admin user with the step ID always set to 9999. This ensures the system recognizes the user as an admin and automatically creates a task, assigning it by default to the user specified here if any issues are found in the BRF+ customization. If the workflow fails due to missing customizations, it will not return to an error state; instead, it will create a dialog task and assign it to the user specified under step ID 9999. If this user is not maintained, the workflow will return to an error state. You can also use the BAdI /STX/SOL_PPP_BA_WORKFLOW implementation to modify the step details using the method MODIFY_DIALOG_STEP.
Step 9: Configure Background Steps
After configuring the workflow decision step type 2 for all the step IDs using the above BRF+ workflow steps, we now have all the background steps that we can configure in the expression table “Workflow Background Step” (Technical Name: WF_BACKGROUND_STEPS). You can also use the BAdI /STX/SOL_PPP_BA_WORKFLOW implementation to modify the step details using the method MODIFY_BACKGROUND_STEP. Provide the service function IDs that the background task should perform. If you still need to perform any activities after completing the background step, there is a BAdI provision /STX/SOL_PPP_BA_WORKFLOW that uses the method AFTER_BACKGROUND_FUNCTION.
Step 10: Configure Service Functions
After configuring the service functions using the BRF+ background steps above, we now have all the service functions available to configure in the expression table “Workflow Service Functions” (Technical Name: WF_SERVICE_FUNCTIONS).
Service Function Type
- Service Function for Status Transition
- Service Function for Custom
Step 11: Configure Status Transition
After configuring service function type 1 using the BRF+ service functions above, we now have all the service function IDs that can be configured in the expression table “Workflow Status Transition” (Technical Name: WF_STATUS_TRANSITION). Provide the service functions and their object types for which the status has to be changed, and specify the current status and the new status for each.
Note: For all DPR-related objects, please provide the input current status with the internal status (e.g., I1701), and for new status, provide it with business transactions (e.g., DX01).

Step 12: Configure Custom Service Function
After configuring service function type 2 using the BRF+ service functions above, we now have all the service function IDs available to configure in the expression table “Workflow Custom Service Function” (Technical Name: WF_CUSTOM_SERVICE_FUNCTION). Provide an external action ID with a meaningful name for each service function.
Step 13: Configure External Actions
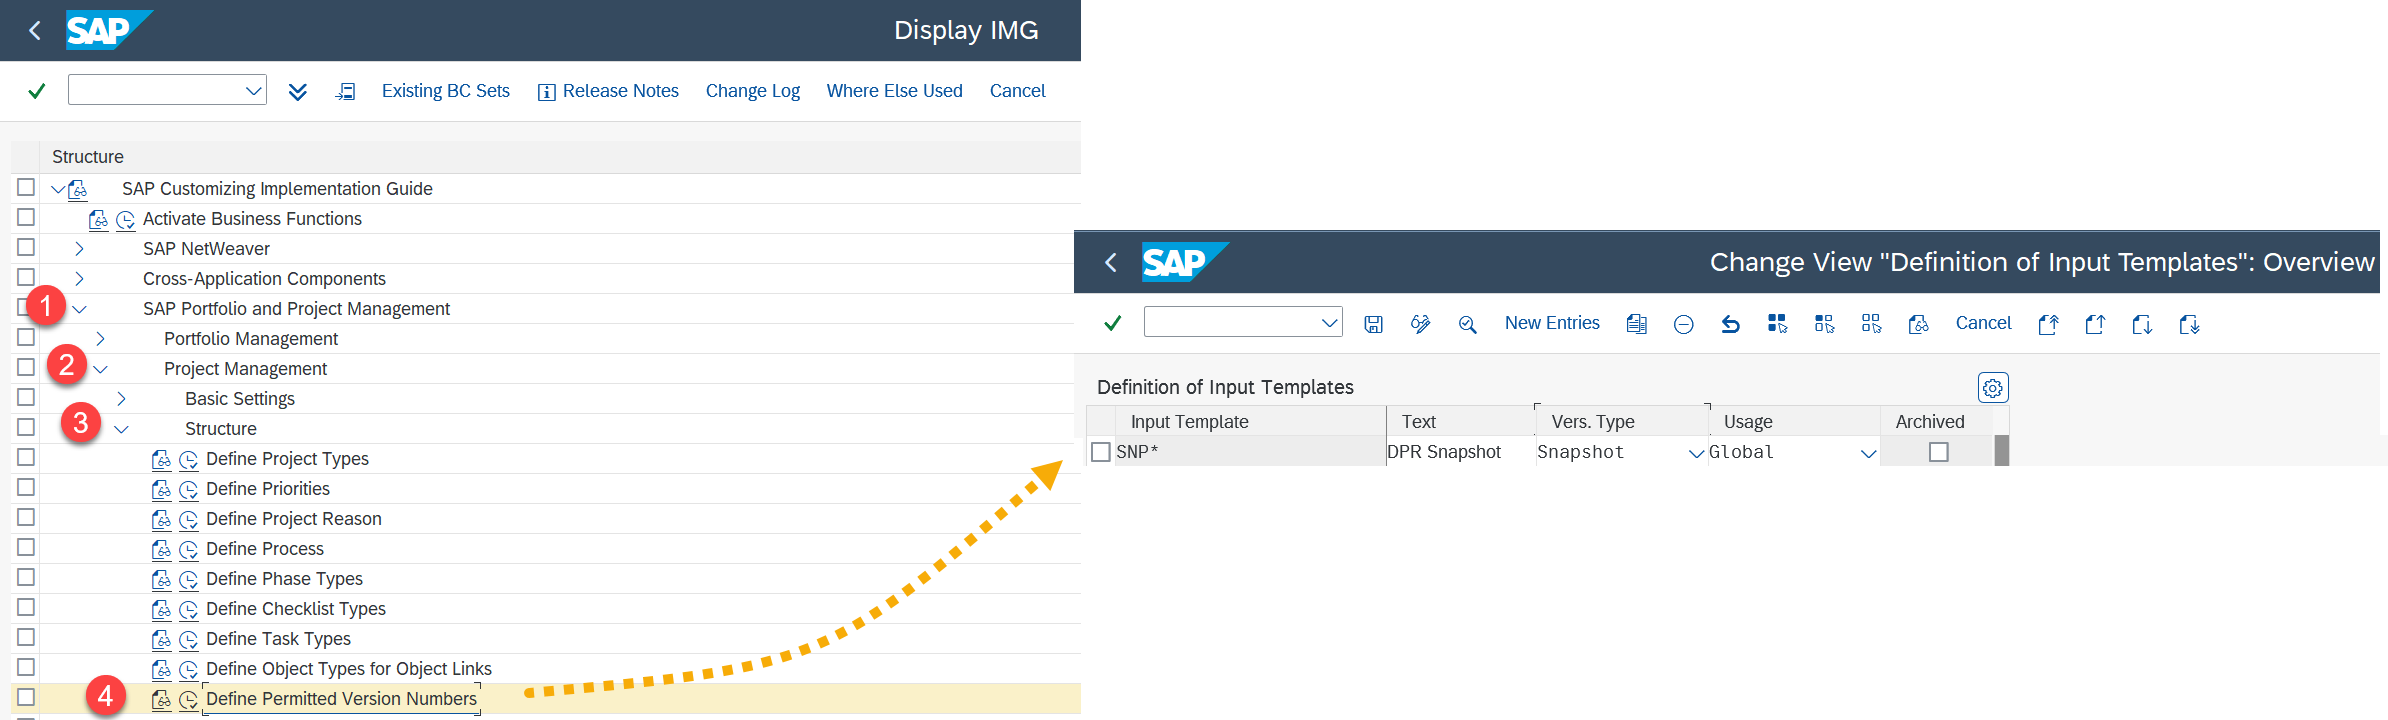
After configuring the external action IDs using the BRF+ custom service function above, you now have all the external action IDs available to configure in the expression table “Workflow External actions” (Technical Name: WF_EXTERNAL_ACTIONS). Enter the name of any class here that implements the interface /STX/SOL_PPP_IF_CUSTOM_ACTION. That interface defines the method EXECUTE_ACTION, where the business logic should be implemented. By default, the PPP Standard provides three classes (shown below) that serve as the default implementation and create a version and a snapshot whose names start with SNP*. You can use these classes immediately for customization, or you can create your own class and provide it here. The class should implement the interface /STX/SOL_PPP_IF_CUSTOM_ACTION, and the business logic should be written in the EXECUTE_ACTION method.
/STX/SOL_PPP_CL_CREAT_ITEM_VER→ Creates only an Item object version./STX/SOL_PPP_CL_CREAT_PROJ_VER→ Creates only a Project Snapshot that starts withSNP*./STX/SOL_PPP_CL_CREATE_VERSION→ Creates both an Item version and a Project Snapshot that starts withSNP*.
Create the permitted version number SNP* here in SPRO customization
Step 14: Configure Deadline Monitoring
Finally, you can configure deadline monitoring as an optional step customization in the expression table “WF Deadline Monitor” (Technical Name: WF_DEADLINE_MONITORING). It is required for cases where reminders must be sent for a work item that remains with the approver for a long time without action; you can use this customization to send an email to the approver. You can send the number of reminders based on the customization and set the workflow priority.
You can provide object type and workflow priority as inputs. Based on those inputs, you can configure in the output fields how many days before you want to send an email reminder; configure that in First reminder in no.of.days. Then specify the maximum number of reminders to be sent and set the interval between reminders in no.of.days using frequency. Once everything is set, the workflow will automatically trigger the reminder workflow to the approver who did not respond until the deadline is reached. If the reminder limit is reached and the maximum number of reminders has been sent and still there is no response from the approver, then the workflow will automatically be cancelled.
The system will send an email using the standard email content template; however, you can still modify the email’s subject, content, recipients, and importance using the BAdI implementation /STX/SOL_PPP_BA_WORKFLOW with the MODIFY_EMAIL_CONTENT method.
General Notes
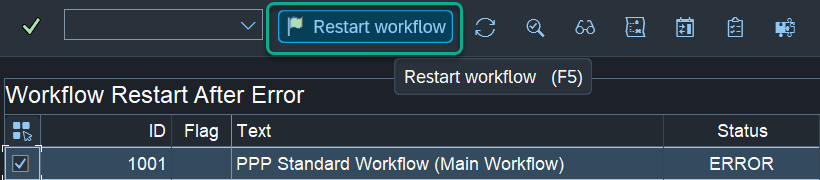
If a workflow encounters an error and needs to be restarted, you can use the transaction code SWPR to reprocess the workflow. By clicking the restart workflow button, you will be able to restart the workflow from the point of error. If you have already configured step ID 9999 in WF_STEPS, the workflow will not result in an error. Instead, it will create a dialog task and deliver it to an agent maintained for step ID 9999. Once the agent makes a positive decision (as configured in WF_STEP_DECISIONS for step ID 9999), the workflow will be restarted from the point of error.
Keywords
BRF+ Workflow Setup, PPP Workflow BRF+, SAP Workflow Configuration, PPP Workflow Customization