
Customizing the Creation Wizard - Forms
Problem
You are not satisfied with the default PPP customizing and would like to change the Creation Wizard Form Steps.
Prerequisites
A new BRF+ application according to Creation of Customer BRF+ Application has been created and a Text for various cases according to Translation of BRF+ Text Values has been added.
Environment
PPP BRF+ Customizing
Solution
Step 1: Creation of new Creation Steps
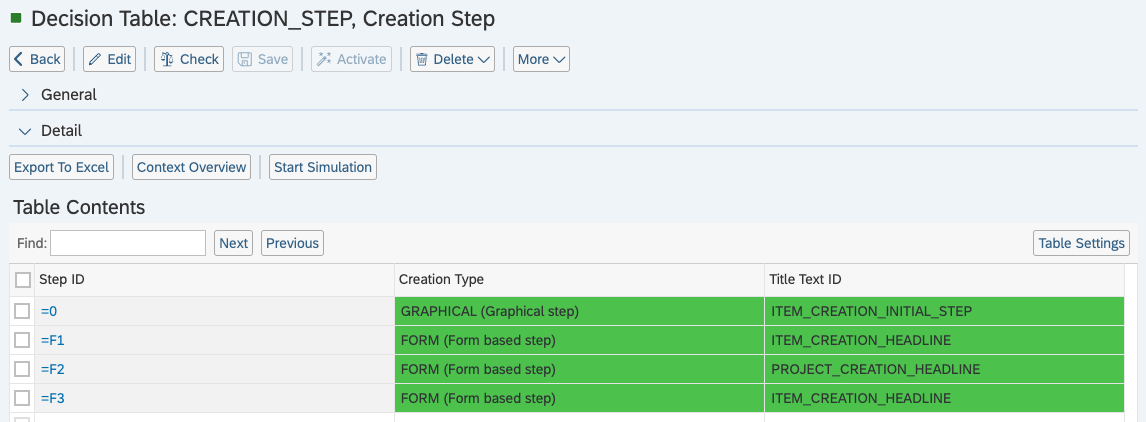
Open your BRF+ Application and navigate to the expression table “Creation Step” (Technical Name: CREATION_STEP).
Disclaimer: You always need at least one Step Id with the value “0”. This Step will then always be the initial Step and can be either a Form or Graphical Step!
-
Step ID: Enter any ID for your Step. This is later used to define, which fields are shown for this Step and which Steps are before and after.
-
Creation Type: Choose FORM (F4 Help). This determines, which expression tables are used later on by PPP.
-
Title Text ID: Enter any Text ID (Used in “Translatable Texts”, Technical Name: TEXTS). The Text of the Text ID will be used as the Title of the Creation Step.
Example of one Graphical Step and three Form Based Steps:
Step 2: Defining prior and following Steps
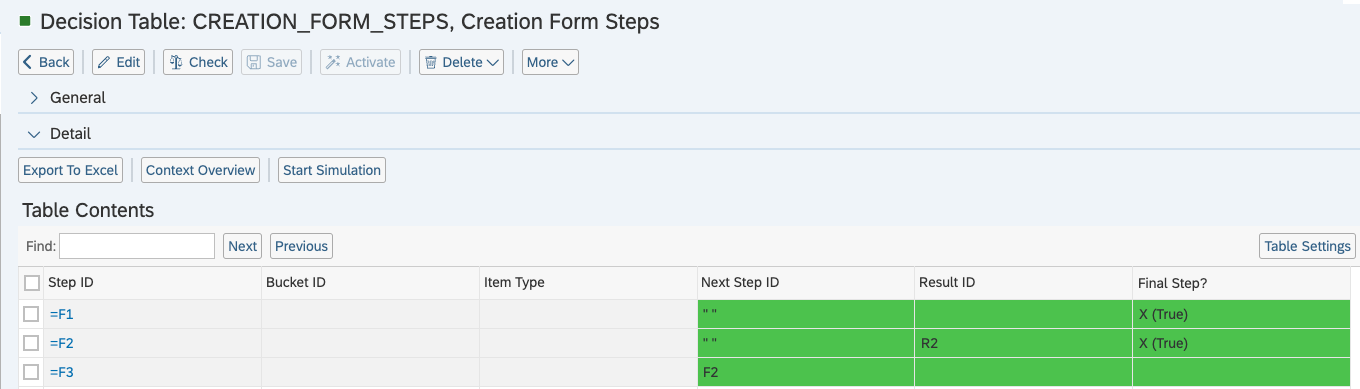
Open your BRF+ Application and navigate to the expression table “Creation Form Steps” (Technical Name: CREATION_FORM_STEPS).
-
Step ID: Enter the STEP_ID from the expression table “Creation Step” (Technical Name: CREATION_STEP).
-
Bucket ID (Optional): Enter a Bucket ID, if the creation is supposed to be narrowed down, depending on the already entered input.
-
Item Type (Optional): Enter an Item Type, if the creation is supposed to be narrowed down, depending on the already entered input.
-
Next Step ID: Enter any STEP_ID from the expression table “Creation Step” (Technical Name: CREATION_STEP). This Step is then shown after completing the current Step.
-
Result ID: Enter any Result ID (Used in “Creation Result Buckets”, Technical Name: CREATION_RESULT_BUCKETS; “Creation Result Datasets”, Technical Name: CREATION_RESULT_DATASETS; “Creation Result Item Types”, Technical Name: CREATION_RESULT_ITEM_TYPES; “Creation Result Project Templates”, Technical Name: CREATION_RESULT_PROJECT_TEMPLA). This ID will be used for predefined Resultsets to choose from. More Info in: Customizing the Creation Wizard - Results
Example of three different Steps with their according following Step:
Step 3: Adding Form Controls to Steps
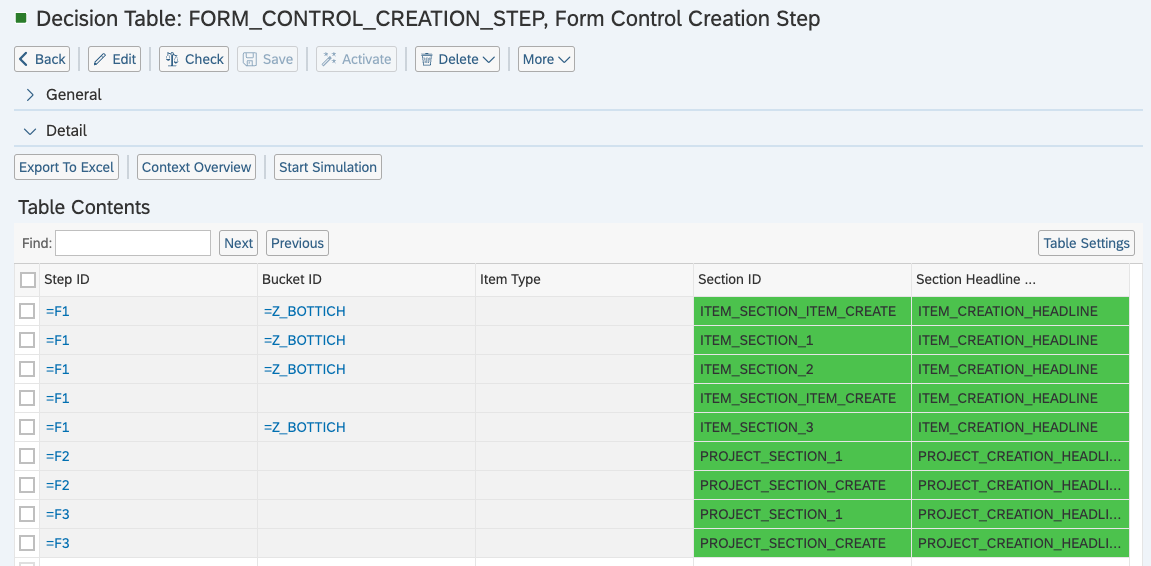
Open your BRF+ Application and navigate to the expression table “Form Control Creation Step” (Technical Name: FORM_CONTROL_CREATION_STEP).
-
Step ID: Enter the STEP_ID from the expression table “Creation Step” (Technical Name: CREATION_STEP).
-
Bucket ID (Optional): Enter a Bucket ID, if the creation is supposed to be narrowed down, depending on the already entered input.
-
Item Type (Optional): Enter an Item Type, if the creation is supposed to be narrowed down, depending on the already entered input.
-
Section ID: Enter any ID for your Section. This Section ID has to exist in the “Section Control” (Technical Name: SECTION_CONTROL) expression table.
-
Section Headline Text ID: Enter any Text ID (Used in “Translatable Texts”, Technical Name: TEXTS). The Text of the Text ID will be used as the Header of the Form.
Example of multiple Sections being linked to Steps:
Step 4: Creating Sections
Follow this guide: Customizing Fields - Forms, Sections and FieldGroups and ignore Step 3: Assigning Sections to a Form.
See Also
- Customizing Fields - Basic Field Config
- Translation of BRF+ Text Values
- Customizing the Creation Wizard - Graphics
- Customizing the Creation Wizard - Results
- Customizing Fields - Forms, Sections and FieldGroups
Keywords
brf+, add, form, creation