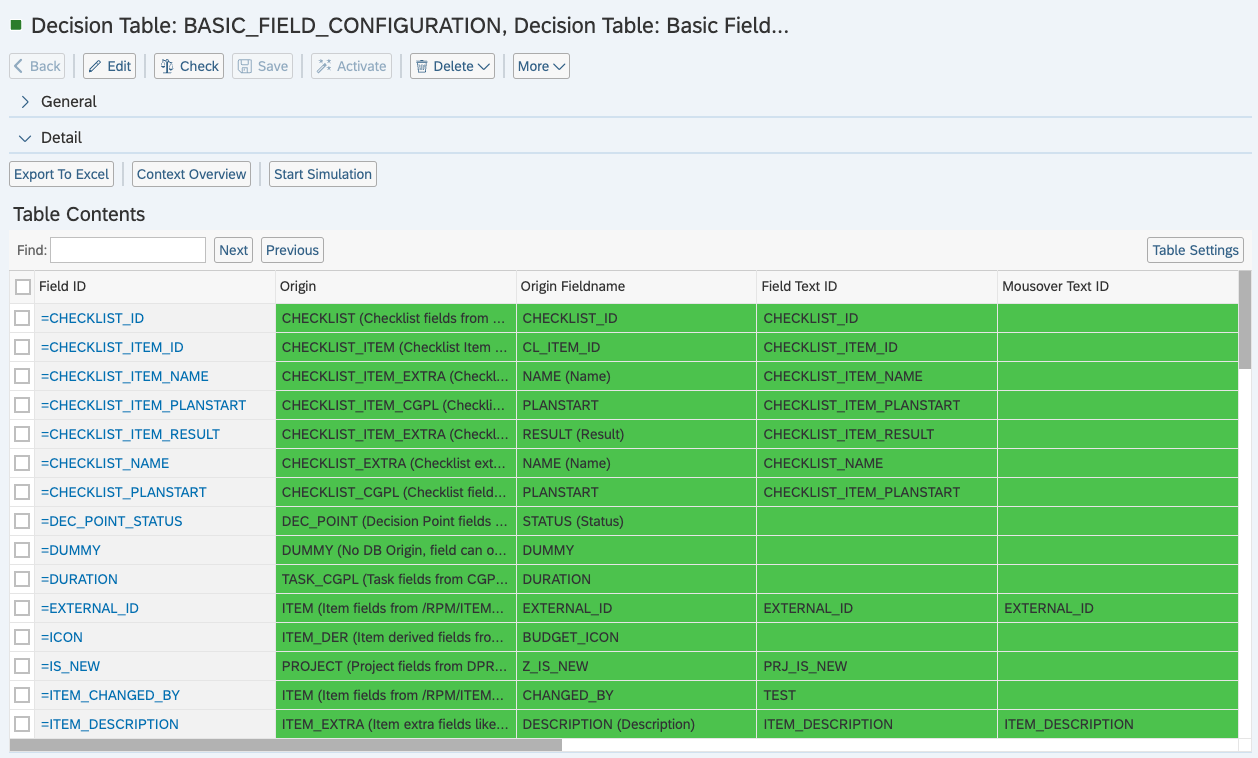
Basic Field Configuration
If you’re not satisfied with the default PPP customizing and want to add or remove fields to Overview Lists and/or Items/Projects/Tasks/etc, you can customize it using BRF+ Customizing.
Open your BRF+ Application and navigate to the expression table “Basic Field Config” (Technical Name: BASIC_FIELD_CONFIGURATION).
-
Field ID: The ID is later used for other expression tables. This is like a “key” for the given field inside the BRF+. Enter any Field ID of your choice with a maximum length of 29.
-
Origin: The Origin determines, where data is read from or written to. Choose between any of the given Origin Types (F4 Help).
-
Origin Fieldname: The Origin Fieldname determines, which field is read from or written to. Enter any name of a field of the previously chosen Origin. This field must exist in the given Origin. You also can create new customer Origin Fieldnames. (How to add them to the Origin will be explained in the last part of this guide.) For using Origin Fieldnames ending with *EXTRA please refer to this note - Allowed Origin Field Names per *_EXTRA Origin
-
Field Text ID: The Text of the Text ID will be used everywhere in the UI, where the Field is shown. Enter any Text ID (Used in “Translatable Texts”, Technical Name: TEXTS).
-
Mouseover Text ID: The Text of the Text ID will be used everywhere whenever you hover over the Field in the UI. Enter any Text ID (Used in “Translatable Texts”, Technical Name: TEXTS).
-
Display Type: Display types change the type of the field in the frontend (e.g. INPUT_ONE_LINE for a single line input field, CHOICE_SELECT for a dropdown, etc.). Choose between any of the given Display Types (F4 Help).
| Display Type | Functionality | Description |
| CHOICE_BOOLEAN | Choice between yes and no | The field will have two possible values - yes or no |
| CHOICE_SELECT | Choose one from predefined values | The field will have a limited number of values for the user choice |
| INPUT_MULTI_LINE | Multiple Input Lines | The filed will have several lines for a text value (used for description) |
| INPUT_ONE_LINE | One Input Line | The filed will have one line for a text value (used for several words) |
-
Dis. Field Opt.: Set this to true, to enable the “Disable Field Optimisation” feature. This disables all extra optimisations done by the STXUI5 framework. (e.g. A CHOICE_SELECT is normally rendered as a single Dropdown field. When a multi table is added, the expected behaviour would be to have multiple Dropdown for each entry of the multi table. Instead of multiple Dropdown fields, only one single field will be shown. This field is a Dropdown, where multiple entries can be selected. To disable this optimisation, the Dis. Field Opt. can be set accordingly.)
-
Multi Table ID: If set, the field automatically becomes a Multi Table field, which allows multiple entries to be stored. Enter any Multi Table ID (Used in “Multi Tables”, Technical Name: MULTI_TABLES).
-
Multi Tab Field Name: This field will be used to read / write data from / into. Enter any technical name (Must exist in the DDIC-MultiTable-FieldList) of a field inside the given Multi Table.
-
Value Table ID: If set, the field automatically uses the given Value Table as an F4 Help. Enter any Value Table ID (Used in “Value Tables”, Technical Name: VALUE_TABLES).
-
Is String Table?: Choose, if the field is stored in a separate String table.
-
From Mirrored Task: Choose whether the field is synchronized with a field from another project. If you set the value to true, the data will be retrieved and updated from the mirrored task. If the flag is set to false, the data will be retrieved and updated from the original task.
An example for multiple fields:
How to Add Fields to Basic Field Configuration Table
There are two ways of customizing basic Fields:
- Customizing existing fields which already are shown in PPP.
- Adding new Fields using backend system
Customizing Existing Fields
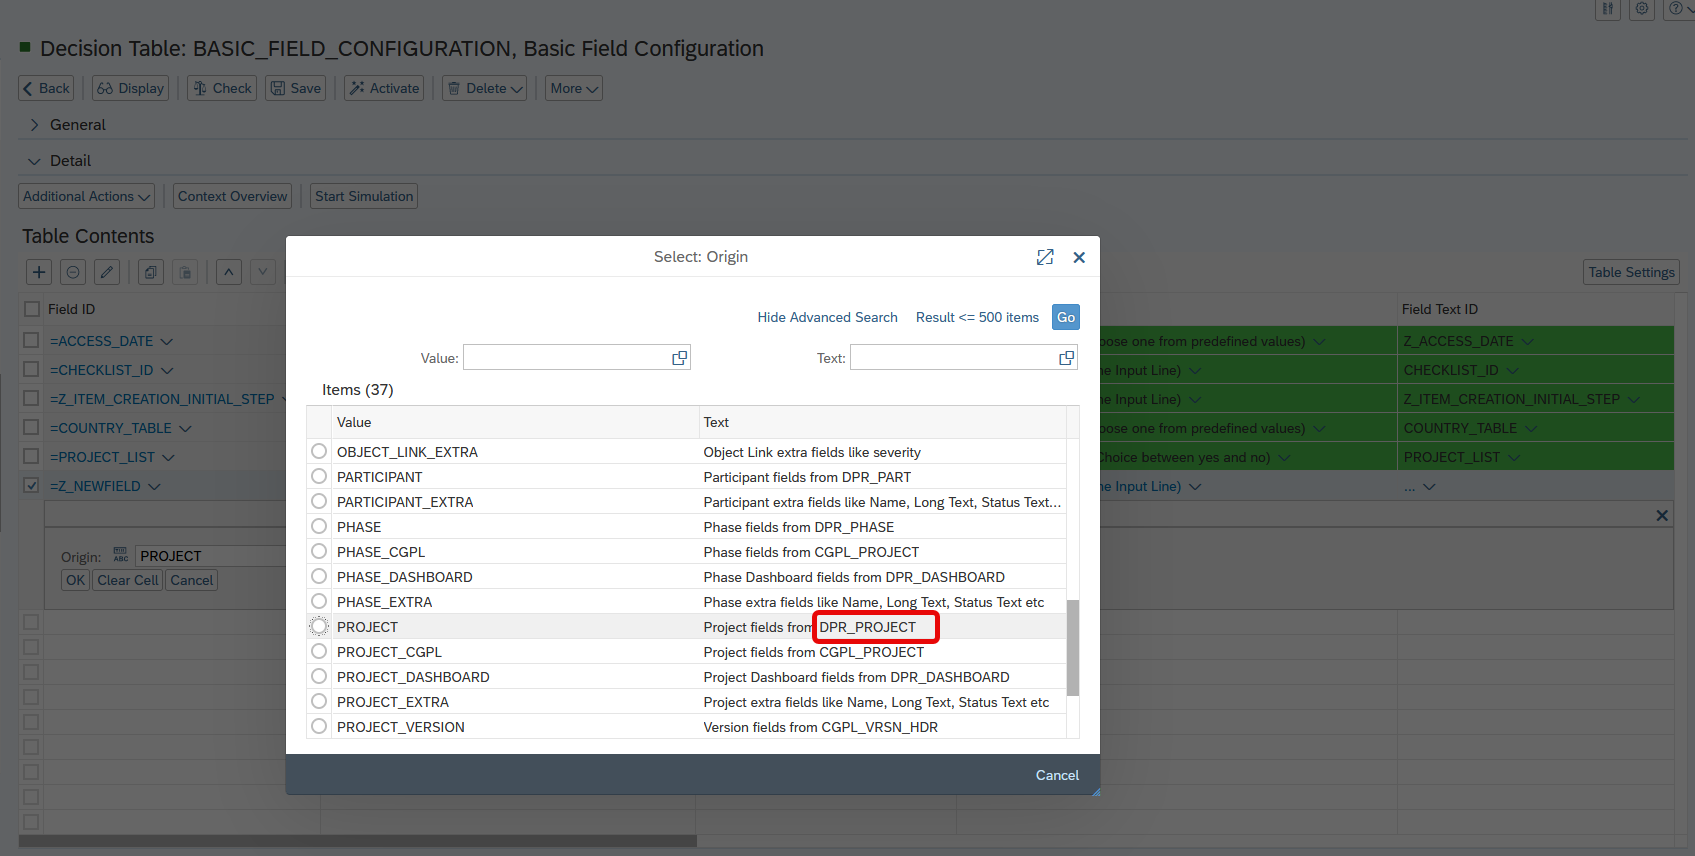
Step 1: Identify Field Origin
- Open BRF+ Application and navigate to
BASIC_FIELD_CONFIGURATION. - Enter Edit mode and select the
Origincolumn to identify the database table (e.g., DPR_PROJECT).
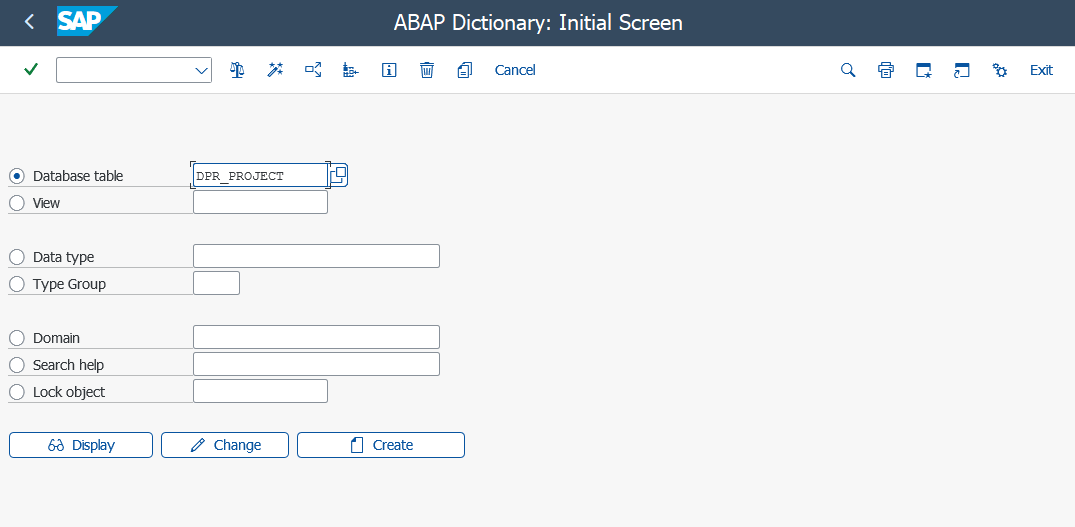
Step 2: Check Origin Fieldname
- Run transaction
SE11in SAP. - Enter the identified table name and click
Display.
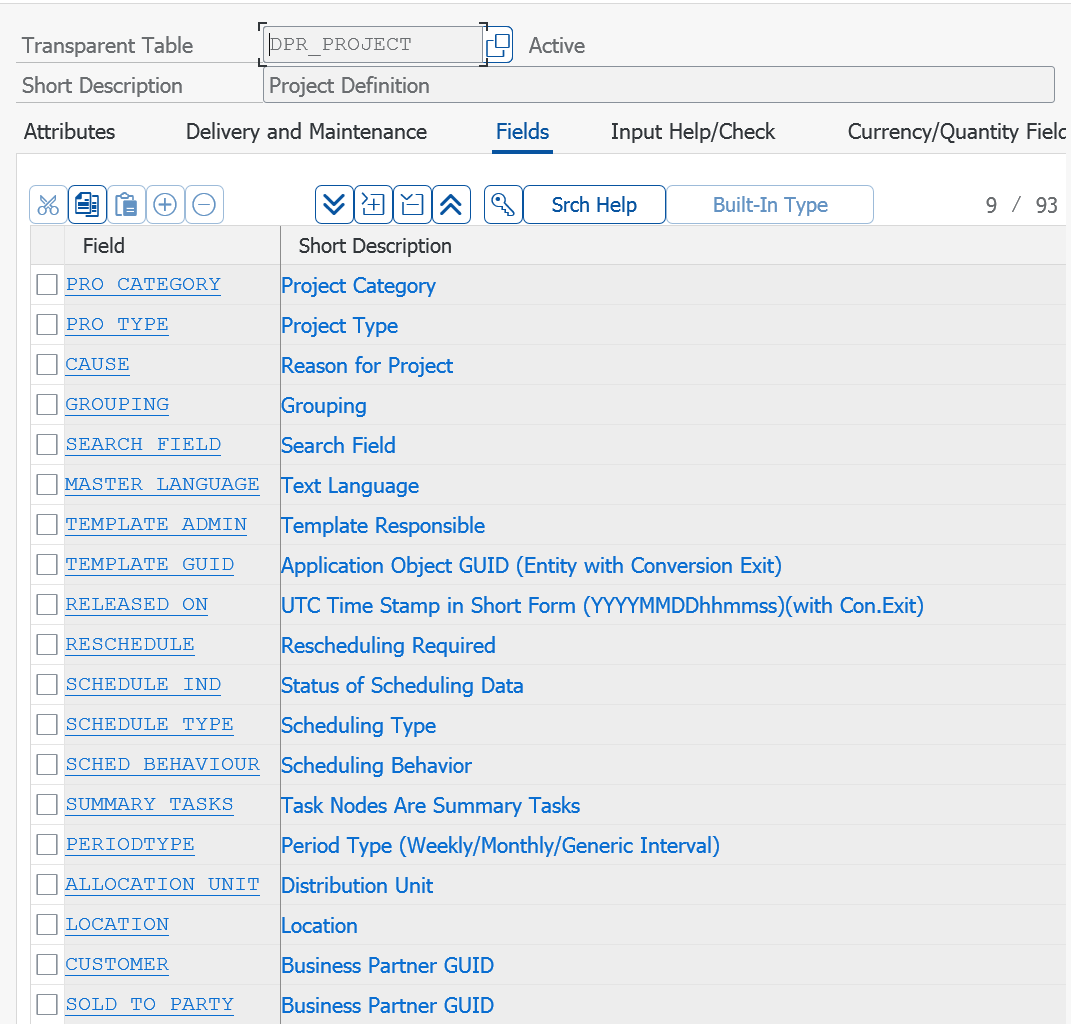
- In the Fields tab, locate and copy the
Origin Fieldnamewhich is located in the Field table.
Step 3: Customize Field
- Return to BRF+ and update the Decision Table
BASIC_FIELD_CONFIGURATIONwith theOriginandOrigin Fieldname. - Customize other columns as needed.
- Save and activate the Basic Field Configuration table.
Adding New Fields Using Backend System
Step 1: Identify Field Origin as described above
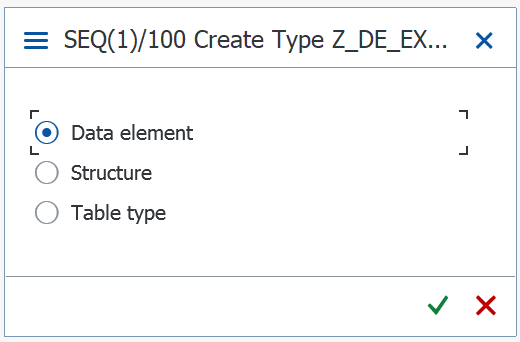
Step 2: Create Data Element
- In SE11, create a new Data Element (start with ‘Z’ or ‘Y’).
- Select
Data type, enter a Name, chooseData Elementand finish the creation of a Data Element.
Step 3: Update Database Table
- Run SE11 and open the relevant database table.
- Add new fields under the customer include (e.g.
CI_DPR_PROJECT).

- In the customer include (
_CI_DPR_PROJECT_in our example) enter the edit mode so first three columns become available for change.
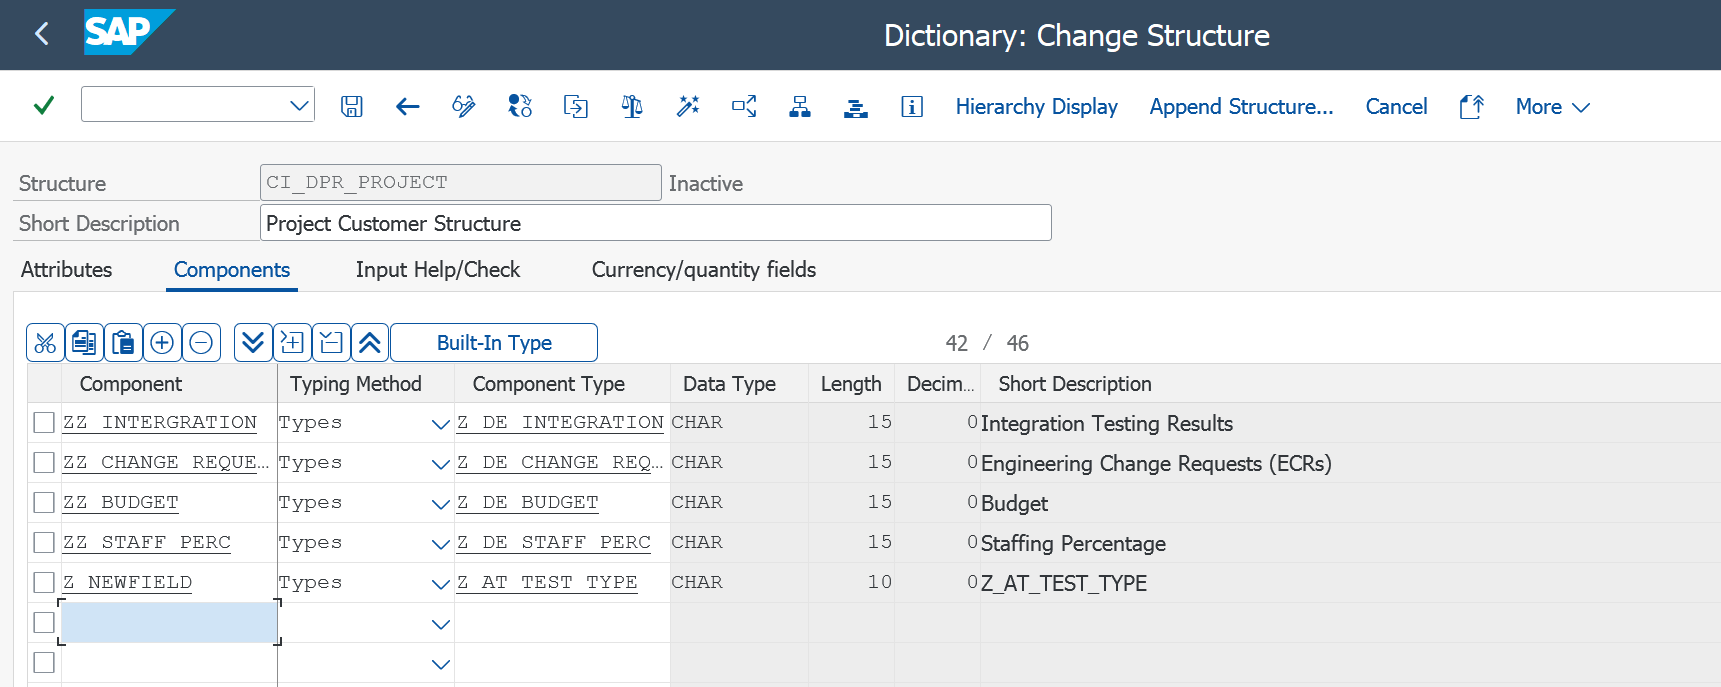
- Insert the new field Name, Type, and Component Type (Data Element from step 2).
Step 4: Save and Activate
- Save and activate the customer include.
Step 5: Update BRF+ Application
- Navigate to
BASIC_FIELD_CONFIGURATIONin BRF+. - Add the new field’s Origin (the database table name) and Origin Fieldname (name of the Field you just created).
- Customize other columns as needed.
- Save and activate the Basic Field Configuration table.
For adding the newly created field to an Overview List, please follow Overview List Fields. For adding the newly created field to an Item / Project / Task / etc., please follow Forms, Sections and FieldGroups. Mind that given entries should be presented in both BasicFieldConfig table and in other BRF+ decision tables for a correct customizing of the PPP elements.
See also
- Basic Field Configuration Overview
- Create a BRF+ App
- Text
- Creation of Customer BRF+ Application
- Translation of BRF+ Text Values
Keywords
brf+, field, config, add, fields, new