
Mass Creation & Update of Teams Hierarchy via Fiori App
Overview
XCM delivered a new Fiori app for creating and maintaining teams and their hierarchies for Change Record. It supports mass creation of team structures by allowing users to download and update an Excel template, then upload it to the application
Authorization check to perform the upload
- For Create action check if the user has auth for
/XCM/TRwithACTVT= 01 - For Clear History action check if the user has auth for
/XCM/TRwithACTVT= V4
Steps to Create Teams Hierarchy in XCM
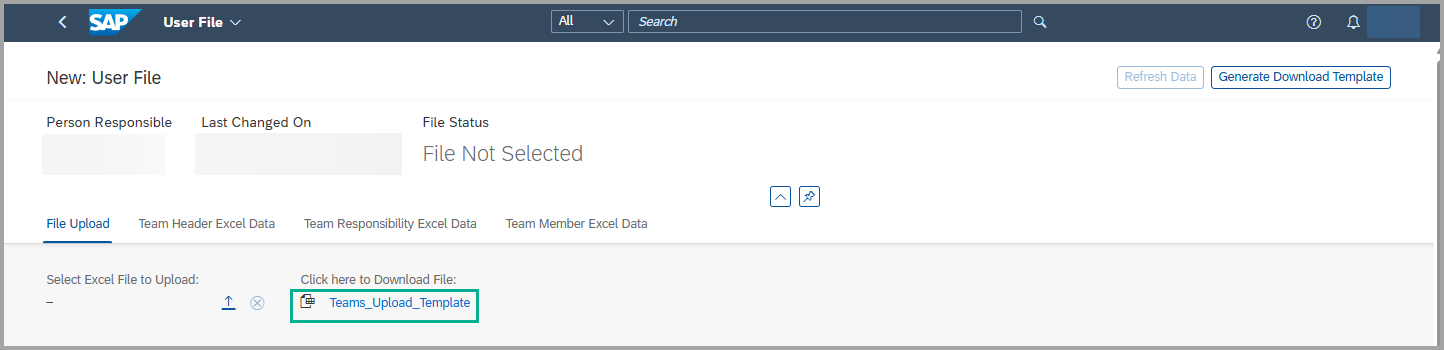
- Open the “Mass Upload of Teams and Responsibilities” tile in XCM.
- Click on the Create button located on the right-hand side of the screen.
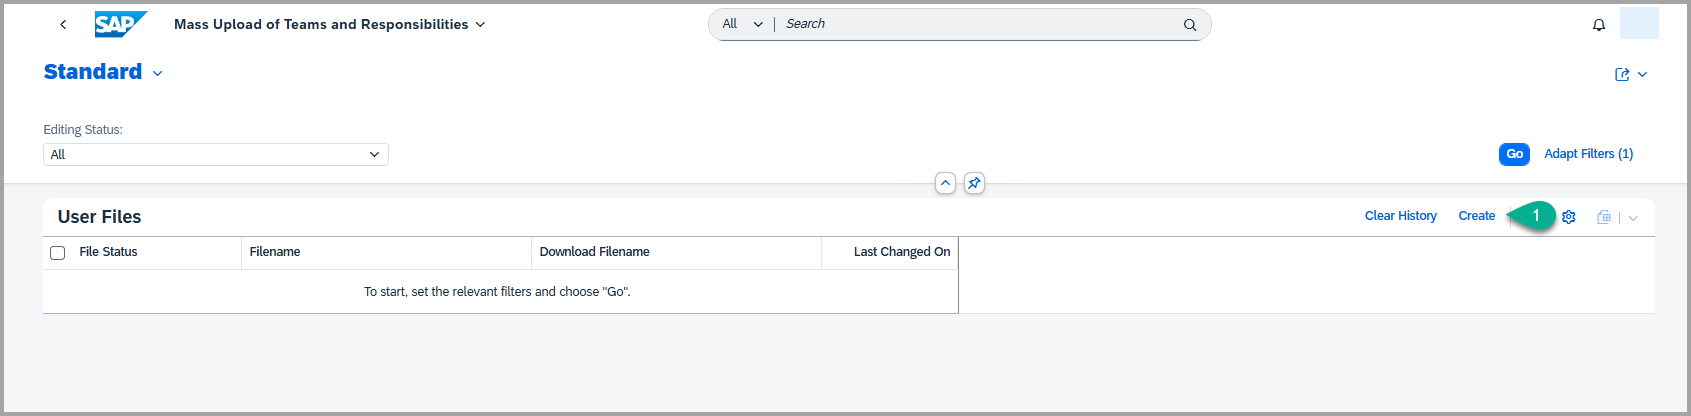
- Click on the Upload File icon and select the required file from your file explorer.

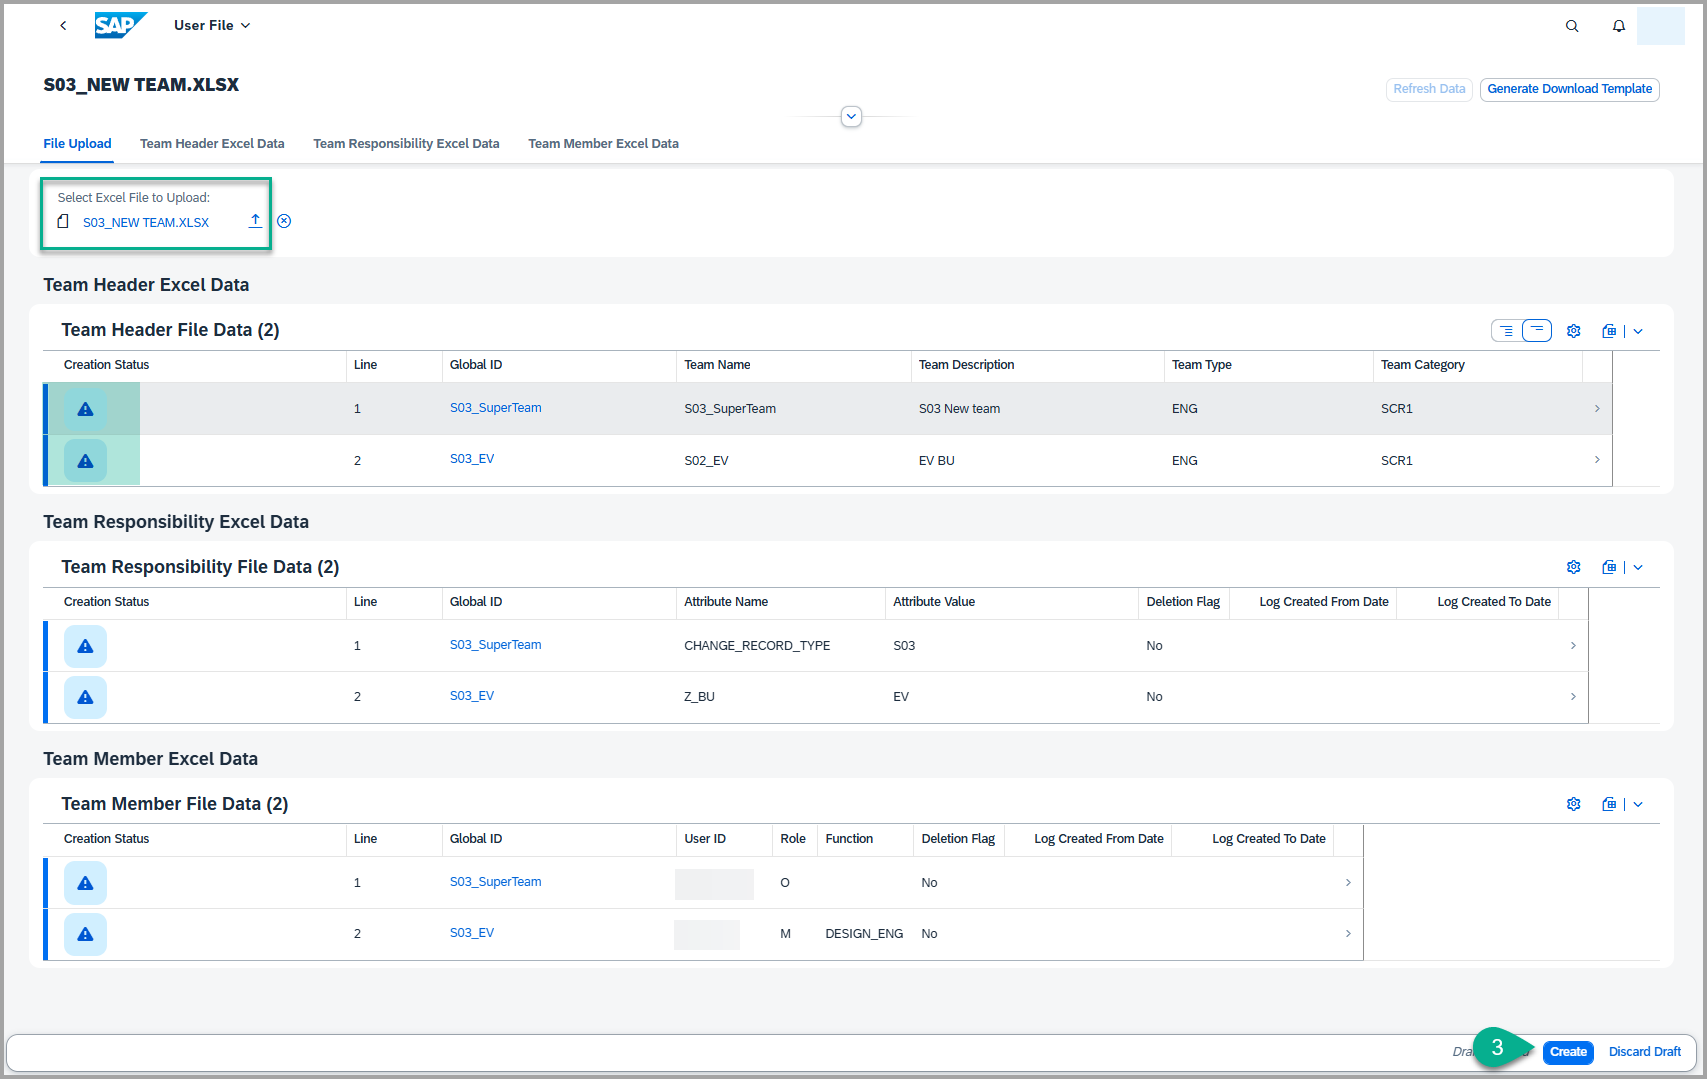
- Once the file is successfully uploaded, the team details will be displayed under the corresponding tabs in the application, and the creation status will show an alert icon until the team is created.
- Verify that the details in the application match the information you maintained in the Excel file.
- After verification, click the Create button at the bottom-right corner of the screen.
-
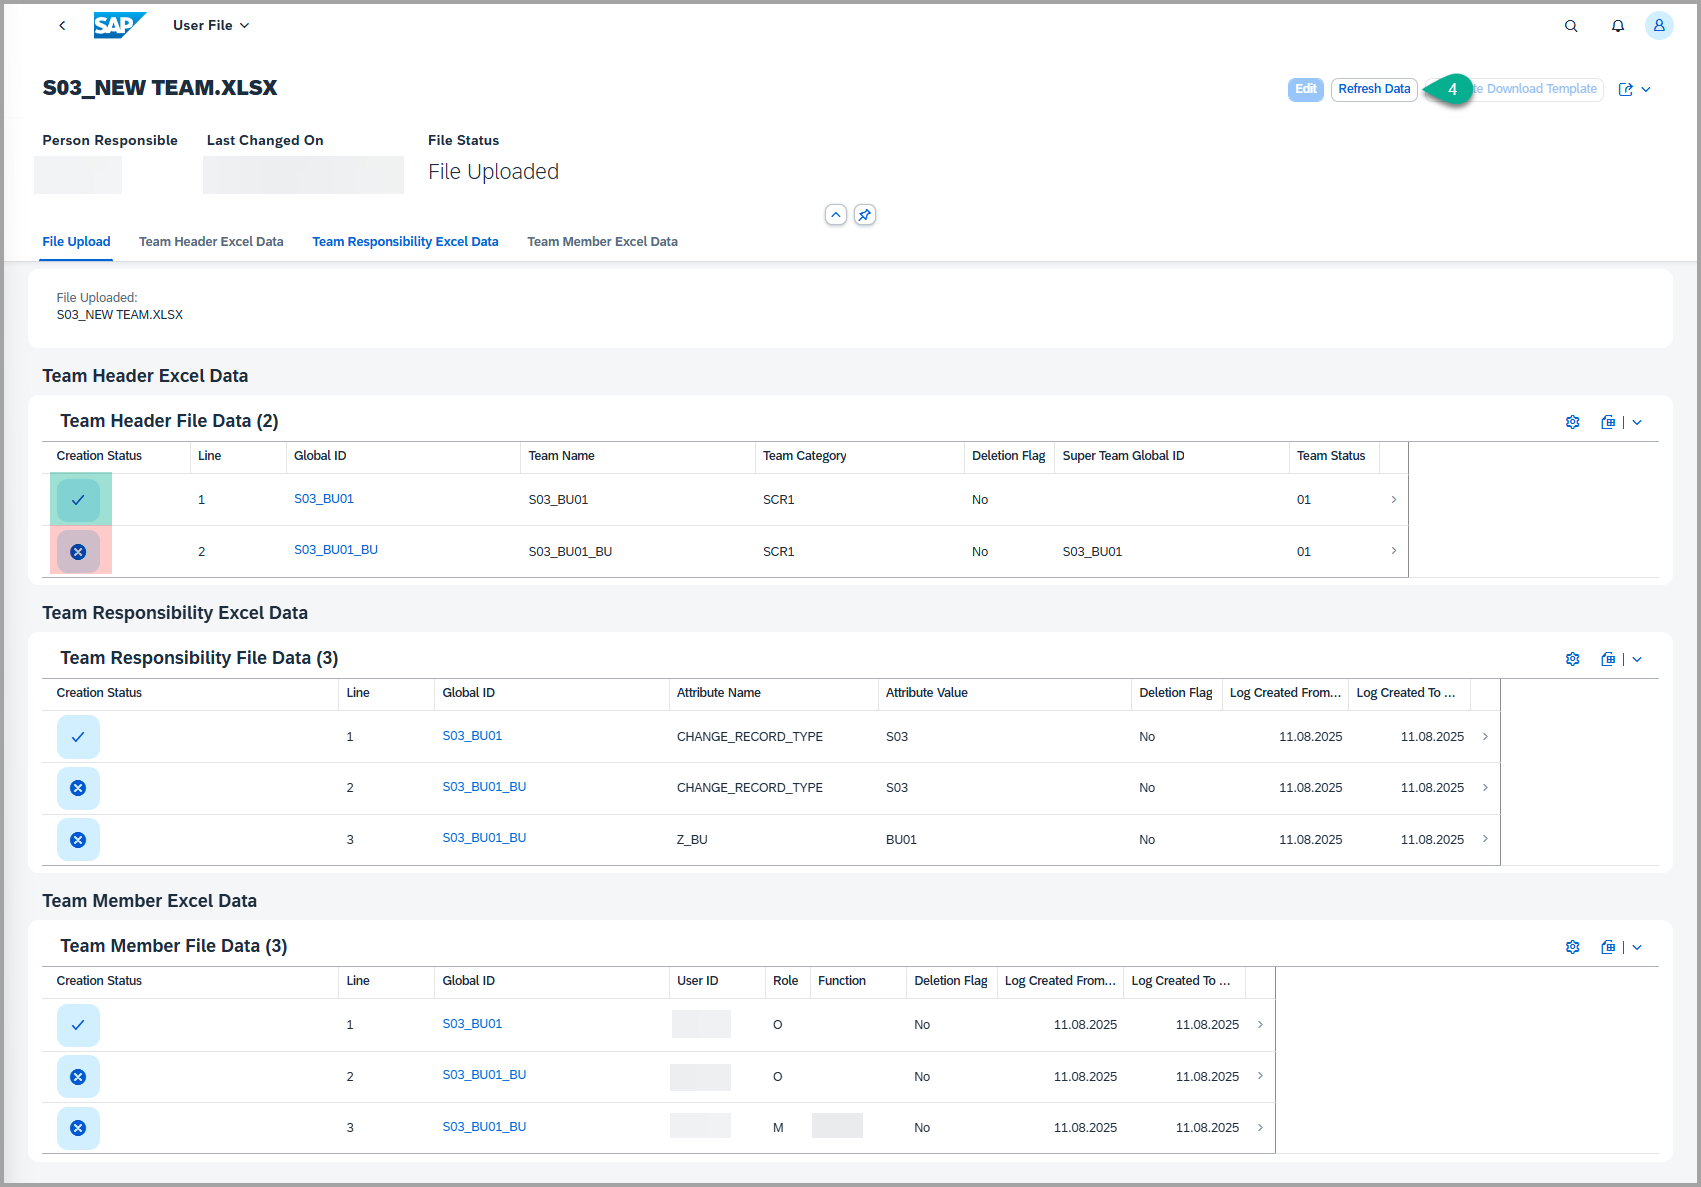
Click the Refresh data button in the top-right corner to update the view. Once the Refresh is done, the creation status icon will change accordingly.
-
Check the Creation Status column:
- check mark → The team was created successfully.
- cross mark → The creation failed.
-
-
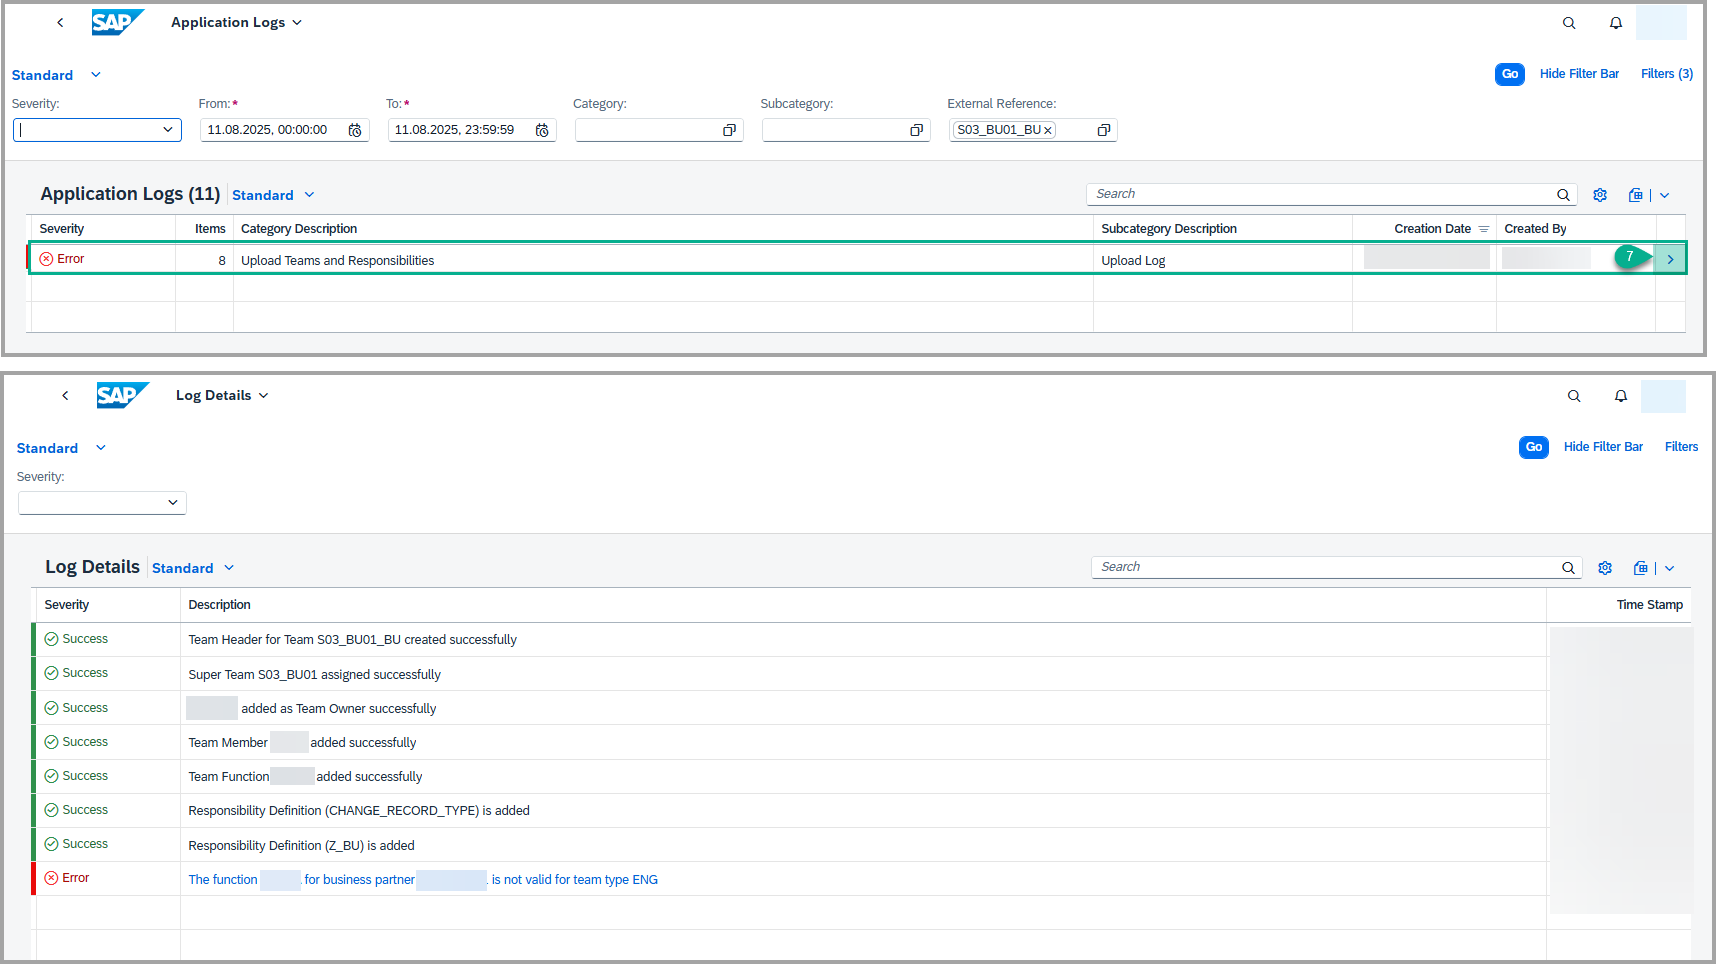
If creation was unsuccessful, click on the Global ID link for the respective entry. Then select Application Log Messages.
- This will navigate you to the application log where you can review detailed log messages to identify the issue.
Note:
- Ensure that the Excel file follows the correct format before uploading. Incorrect formats can result in failed creation.
- Always ensure to provide ‘M’ for Member and ‘O’ for Owner in the Role column when creating or updating teams
Steps to Update Teams Hierarchy in XCM
The update process follows the same steps as documented for Creating Teams Hierarchy.
The only difference is that the upload file should contain only the values that need to be updated.
Important Notes for Updating Teams Hierarchy:
- The Team Header sheet (1st sheet) must always be filled with the respective team, global ID, and related details of the specific team being updated.
- Always ensure that column headings are present in all three sheets, even if there is nothing to be updated in a particular sheet.
- When deleting any entry, always ensure that the deletion flag column is marked with ‘X’ for the specific value that needs to be deleted.
- Ensure that the Excel file format strictly follows the required template to avoid errors during the upload.
Generate Download Template with or without Data
- Open the “Mass Upload of Teams and Responsibilities” tile in XCM.
- Click on the Create button located on the right-hand side of the screen.
-
Click on the Generate Download Template button.
- Pop-up will open where you must select YES or NO based on your requirement, then select the Team Type, and finally click Generate Download Template.
- YES → Downloads the Excel file with data of the selected Team Type.
- NO → Downloads only the Excel file with header columns (no data).

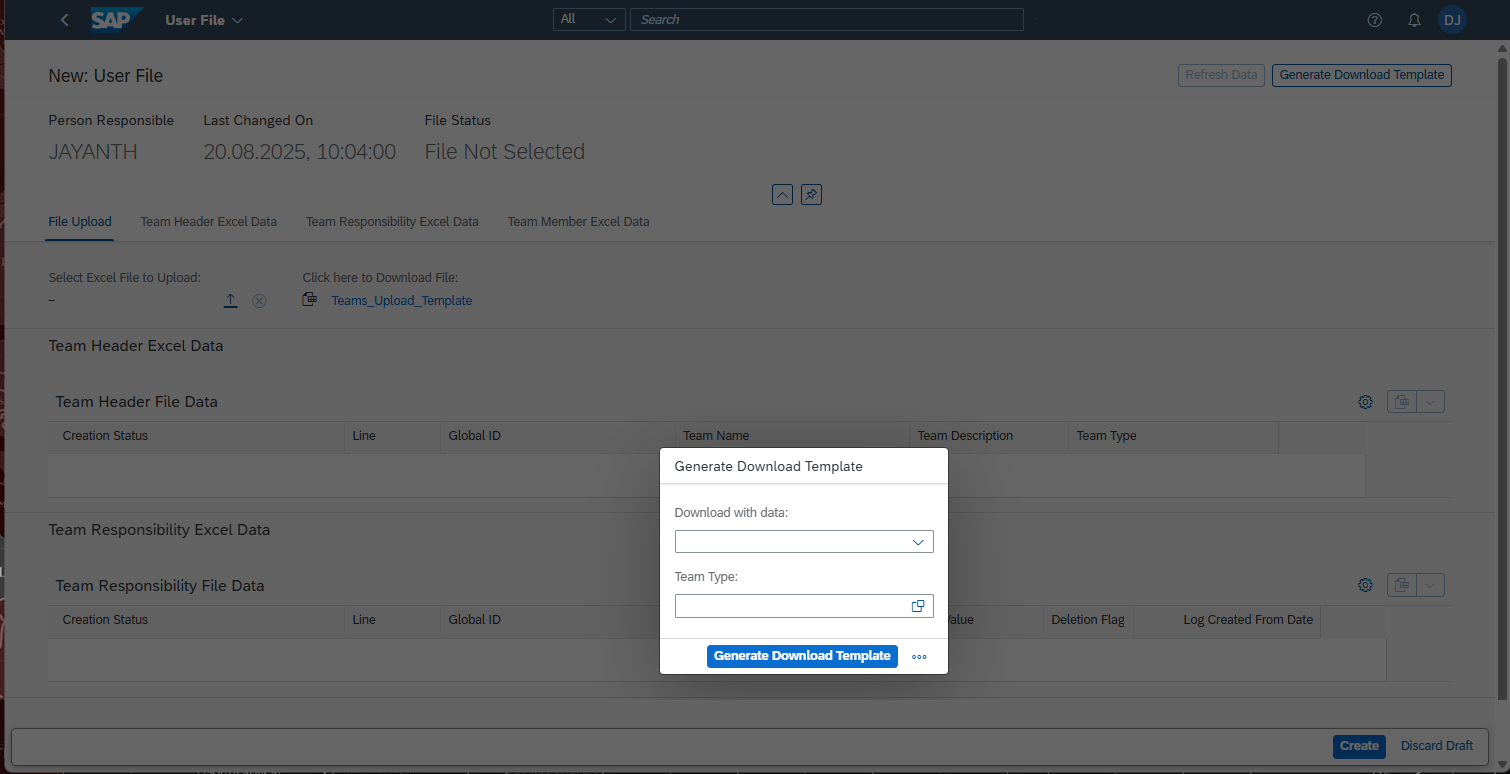
-
Once you click Generate Download Template, the file will appear as a link.
- Click on that link to download the file.
How to fill in the Excel Template for Team and Hierarchy Creation
The example below demonstrates how to perform the mass creation of teams and their hierarchy using an Excel template. Each sheet in the template has been explained separately to show the mapping between the sheet and the corresponding Teams artifacts it creates. However, please note that you must fill in the data across all sheets at once and then submit the complete file to the upload program to create the hierarchy as illustrated below.
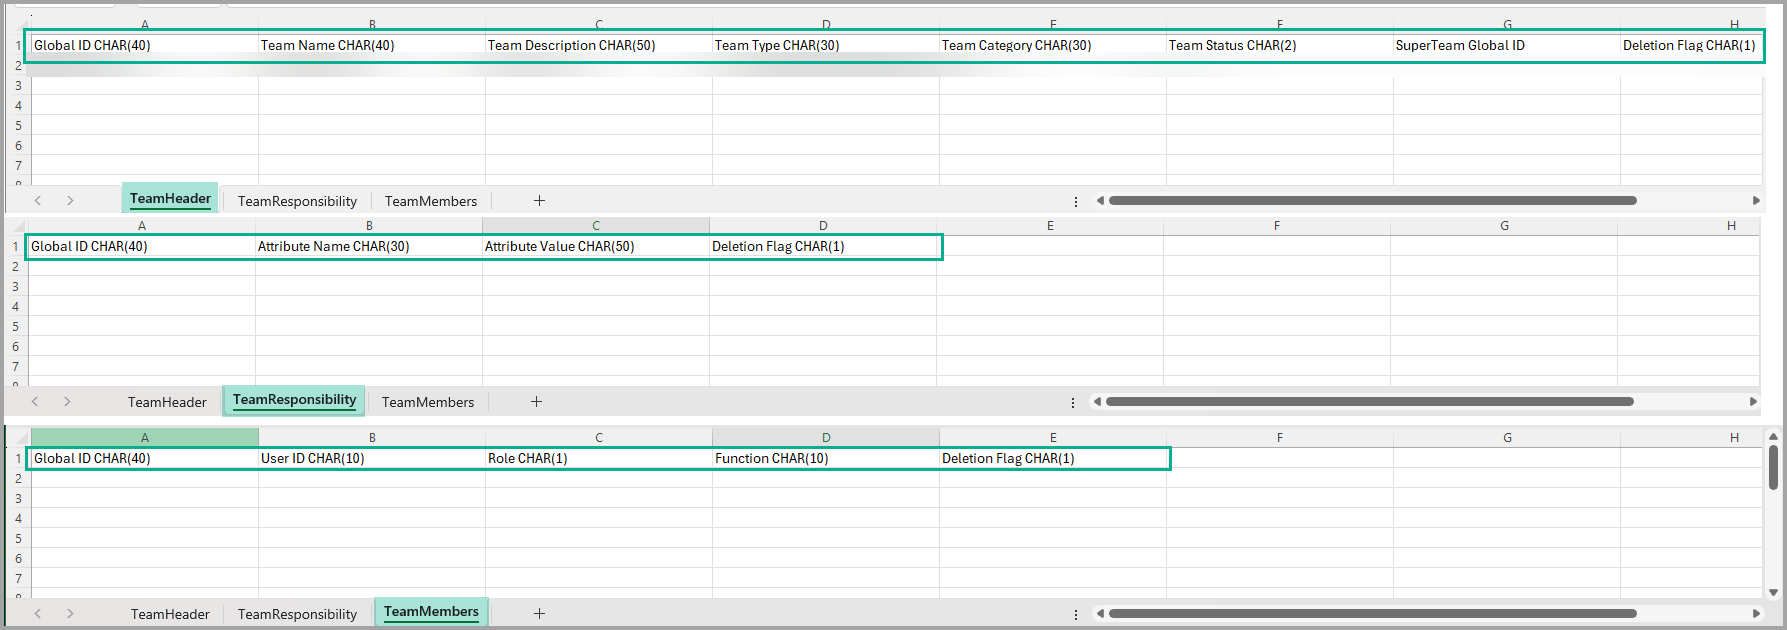
1. Team Header Sheet
- This sheet is used to define the teams, including both super teams and sub-teams.
- In Column A, list all the teams you want to create.
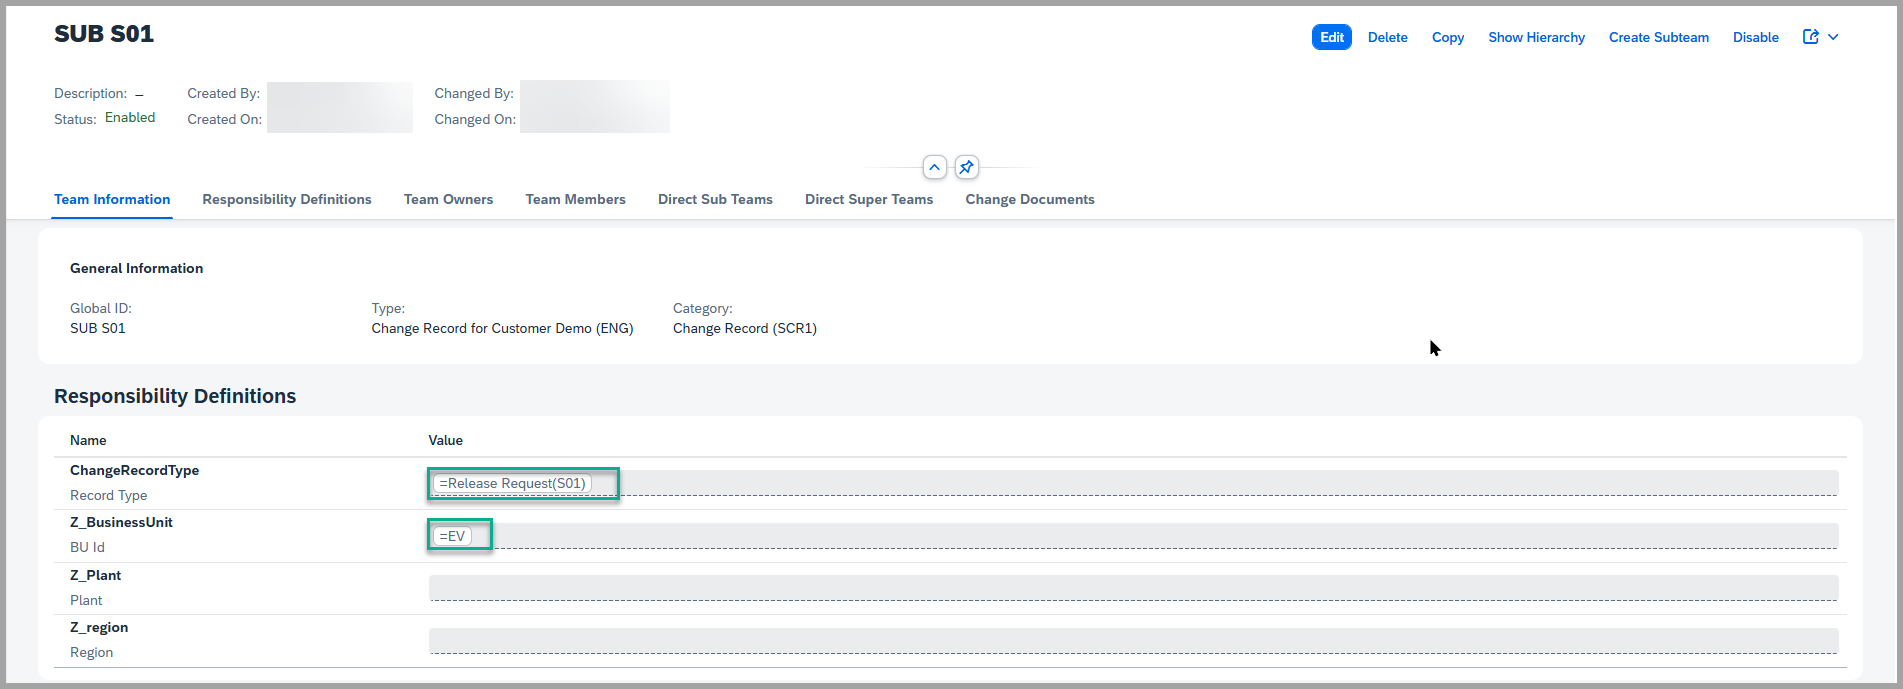
- Use Column G to specify the parent (super) team for each sub-team.
- For example, if “TEAM S01” is the super team and “SUB S01” is a sub-team under it, then “SUB S01” should have “TEAM S01” specified in Column G.

- This structure helps the system understand how the team hierarchy is built.

2. Team Responsibility Sheet
- In this sheet, maintain the attribute values for each team defined in the first sheet.
- These attribute values represent the responsibility definitions used during workflow processes.
- In the Global ID column, reference the team names created in the Team Header Sheet.
- When a workflow is triggered, the system uses these attributes to determine the appropriate responsible persons.

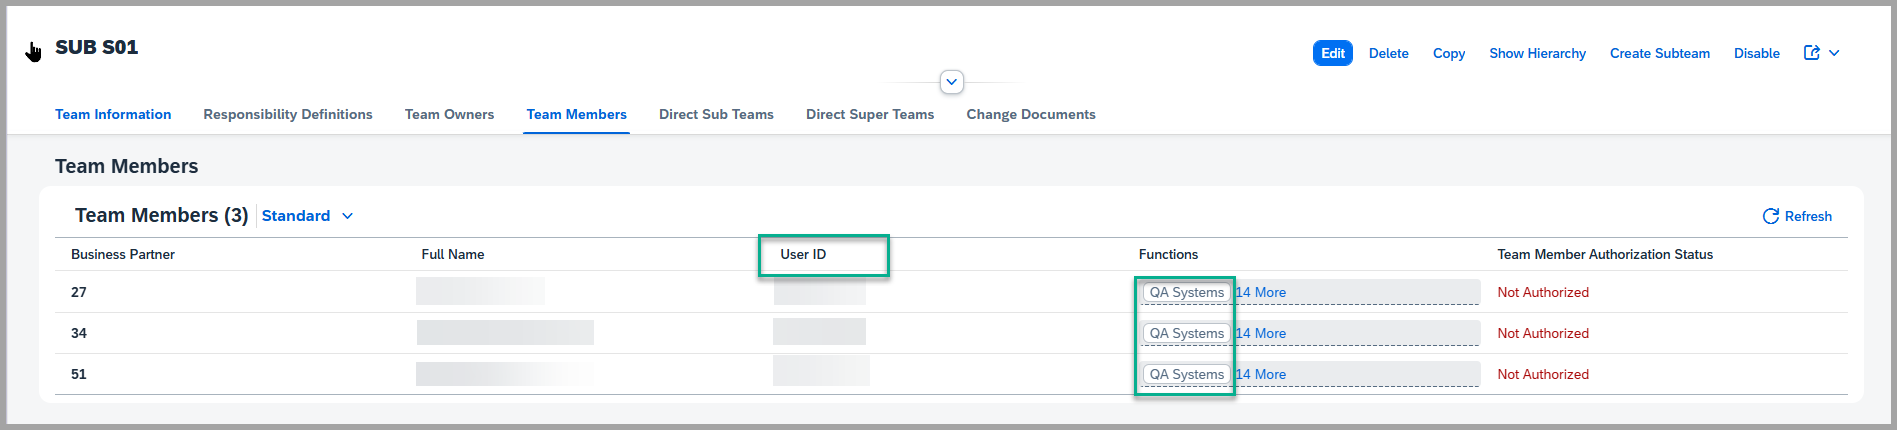
3. Team Members Sheet
- This sheet is used to assign functions (roles) to users based on the teams created.
- You can map each function to the corresponding user within the relevant team, as per your business requirements.

Clear History
- Use Clear History to delete records from the past 180 days.

Keywords
Teams Hierarchy, Upload Program, Mass Creation of Teams, T&R
Prerequisites
- Please follow All the IMG Customization mentioned in the task - IMG Customization and in the Set Up T&R for Change Record
- Do not alter the structure of the Excel file (e.g., sheet names, column headers, or field formats). Any changes outside of the allowed fields may result in upload errors.
- Assign the authorization object
/XCM/TRto role ZSTX_BR_XCM_CR_PROCESS_ADMIN. By assigning this authorization object, users with this role will be able to create and clear history..