Creation - Forms
To change the Creation Wizard Form Steps follow these steps:
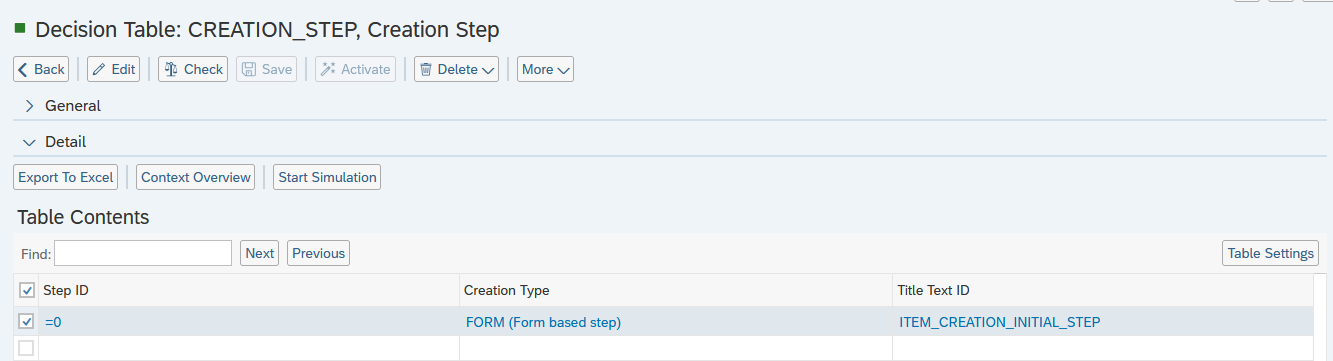
Step 1: Creation of new Creation Steps
Open your BRF+ Application and navigate to the expression table “Creation Step” (Technical Name: CREATION_STEP).
Disclaimer: You always need at least one Step Id with the value “0”. This Step will then always be the initial Step and can be either a Form or Graphical Step!
-
Step ID: Enter any ID for your Step. This is later used to define, which fields are shown for this Step and which Steps are before and after.
-
Creation Type: Choose FORM (F4 Help). This determines, which expression tables are used later on by PPP.
-
Title Text ID: Enter any Text ID (Used in “Translatable Texts”, Technical Name: TEXTS). The Text of the Text ID will be used as the Title of the Creation Step.
Example of a Form Based Step:
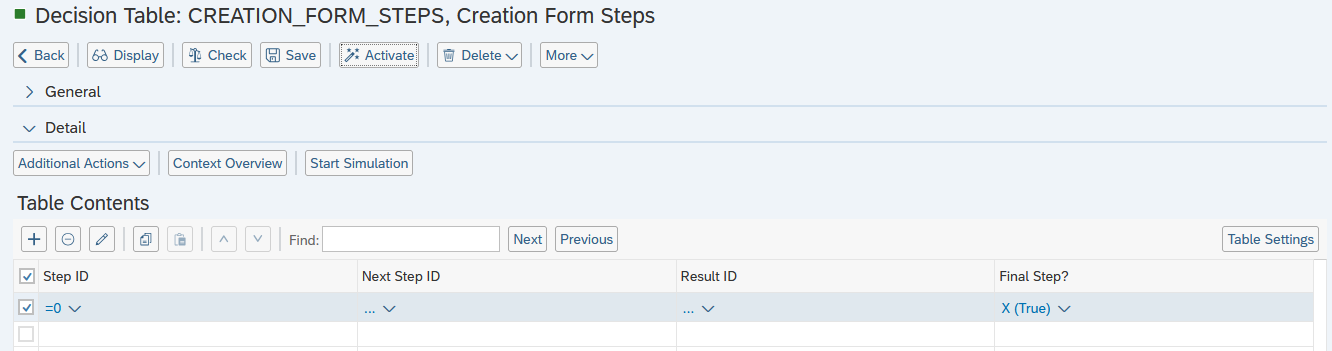
Step 2: Defining prior and following Steps
Open your BRF+ Application and navigate to the expression table “Creation Form Steps” (Technical Name: CREATION_FORM_STEPS).
-
Step ID: Enter the STEP_ID from the expression table “Creation Step” (Technical Name: CREATION_STEP).
-
Bucket ID (Optional): Enter a Bucket ID, if the creation is supposed to be narrowed down, depending on the already entered input.
-
Item Type (Optional): Enter an Item Type, if the creation is supposed to be narrowed down, depending on the already entered input.
-
Next Step ID: Enter any STEP_ID from the expression table “Creation Step” (Technical Name: CREATION_STEP). This Step is then shown after completing the current Step.
-
Result ID: Enter any Result ID (Used in “Creation Result Buckets”, Technical Name: CREATION_RESULT_BUCKETS; “Creation Result Datasets”, Technical Name: CREATION_RESULT_DATASETS; “Creation Result Item Types”, Technical Name: CREATION_RESULT_ITEM_TYPES; “Creation Result Project Templates”, Technical Name: CREATION_RESULT_PROJECT_TEMPLA). This ID will be used for predefined Resultsets to choose from. More Info in: Customizing the Creation Wizard - Results
-
Final Step: In case the step is the last one in the creation process set this field to true and it will finish the creation line.
Example of setting a Final Step:
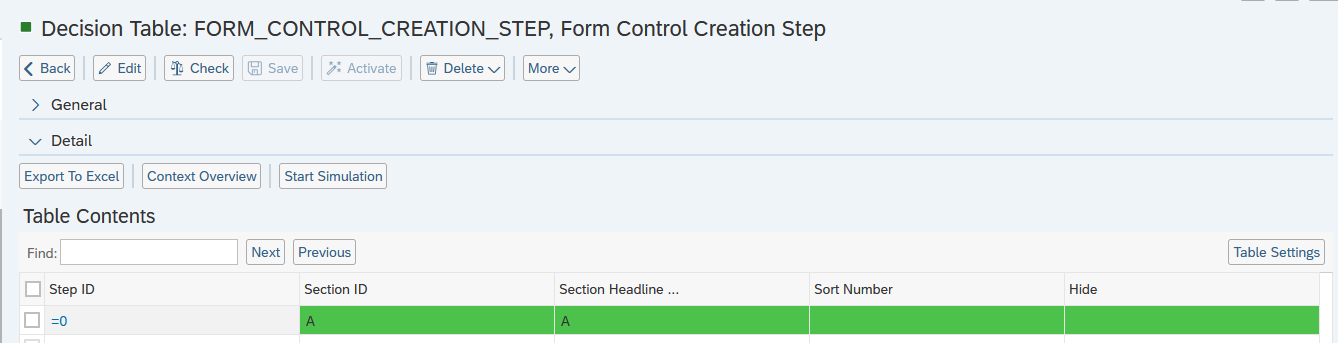
Step 3: Adding Form Controls to Steps
Open your BRF+ Application and navigate to the expression table “Form Control Creation Step” (Technical Name: FORM_CONTROL_CREATION_STEP).
-
Step ID: Enter the STEP_ID from the expression table “Creation Step” (Technical Name: CREATION_STEP).
-
Bucket ID (Optional): Enter a Bucket ID, if the creation is supposed to be narrowed down, depending on the already entered input.
-
Item Type (Optional): Enter an Item Type, if the creation is supposed to be narrowed down, depending on the already entered input.
-
Section ID: Enter any ID for your Section. This Section ID has to exist in the “Section Control” (Technical Name: SECTION_CONTROL) expression table.
-
Section Headline Text ID: Enter any Text ID (Used in “Translatable Texts”, Technical Name: TEXTS). The Text of the Text ID will be used as the Header of the Form.
Example of a Section being linked to the Step:
Step 4: Creating Sections
Follow this guide: Forms, Sections and FieldGroups and ignore Step 3: Assigning Sections to a Form.
Step 5: Adding Text
Folllow the guide Text to add Section Headline Text ID and Title Text ID to adjust UI.
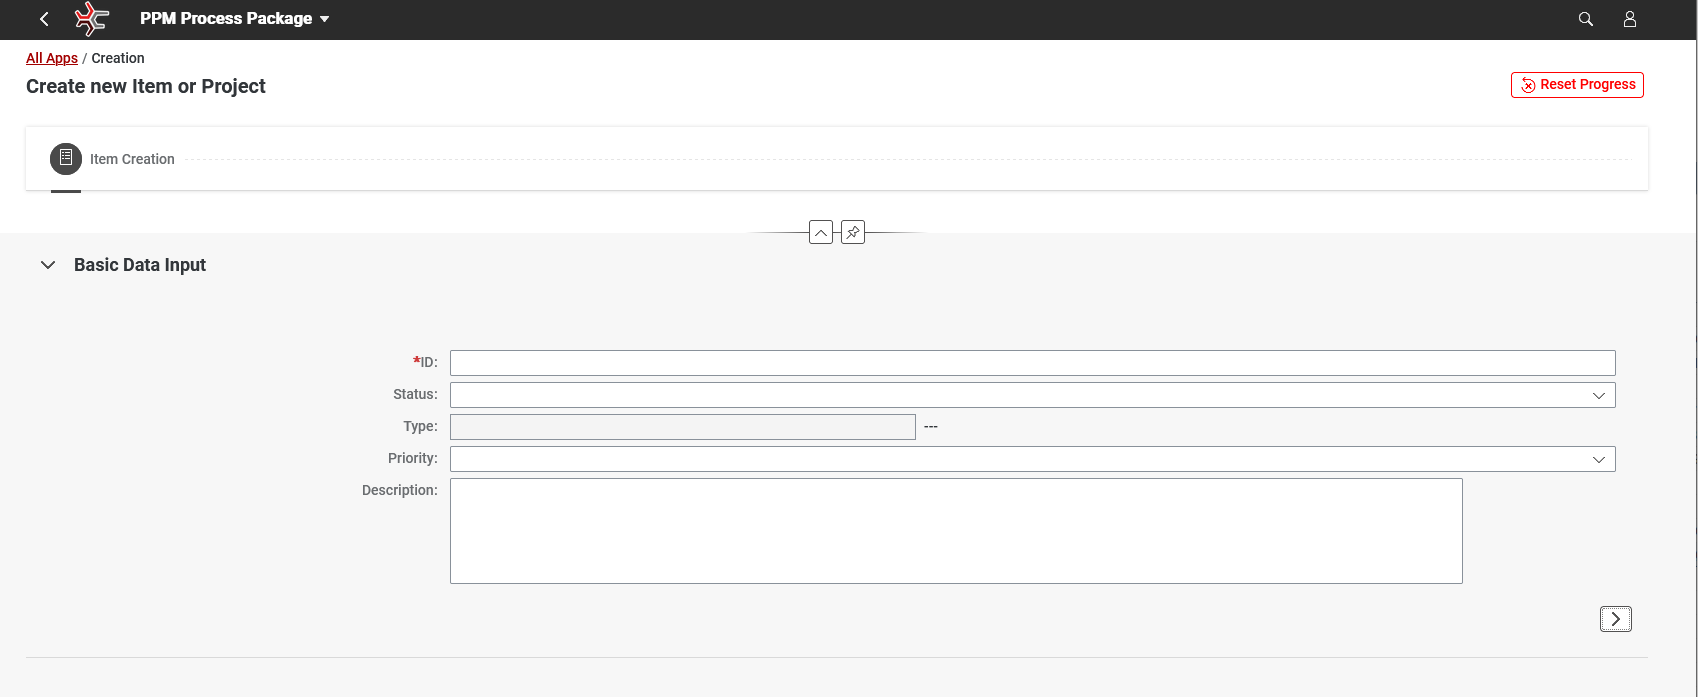
Example
Here you can see an example of a Form added into the Item creation Process. In this case we can fill Basic Data during the Creation and not only Name and ID as it is in the default Creation Process.
See Also
- Forms, Sections and FieldGroups
- Text
- Creation - Graphics
- Creation - Results
- Translation of BRF+ Text Values
- Customizing the Creation Wizard - Graphics
- Customizing the Creation Wizard - Results
- Customizing Fields - Forms, Sections and FieldGroups
Keywords
brf+, add, form, creation