Migration Cockpit (ER → CR)
Overview
The XCM customers might currently manage their Change Management processes using Engineering Records (ER) in their SAP ECC systems. To ensure a seamless transition and continued process execution within a unified environment, it is essential to migrate ongoing Engineering Records into S/4HANA Change Records.
To support this transition, XCM (eXtended Change Management) delivers a Migration Kit that offers flexibility to migrate Engineering Records either individually (record-by-record) or in bulk, based on specific business needs. This enables organizations to adapt their existing change processes to the S/4HANA platform efficiently.
In ECC, product change management was handled through SAP PLM Engineering Records. With the shift to S/4HANA, customers are now transforming their processes to leverage the advanced capabilities of S/4HANA Change Records.
Change management processes are often long-running due to the number of impacted objects and required approvals across multiple teams. Therefore, it is critical that Engineering Records are migrated into S/4HANA Change Records with the same or an equivalent status, ensuring uninterrupted continuation of approvals and change tracking within a single, integrated system.
Migration Process
- The existing Engineering Records (ER) present in the legacy system will be displayed in the Migration Kit application.
- Select the appropriate Engineering Record type in the filter and click on Go. You can also use other available filters as needed to narrow down the results based on your specific search criteria.

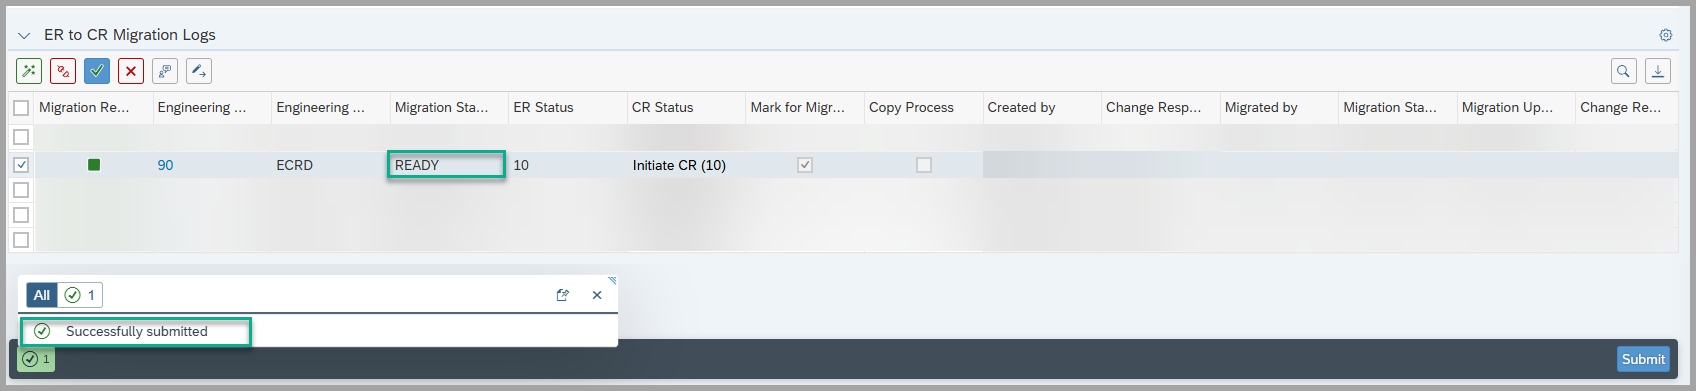
- Once the results are displayed, select the Engineering Record with the Migration Status set to NEW that you wish to migrate to a Change Record (CR).
Action Buttons and Their Functions
In the list toolbar, highlighted in the screenshot below, there are 6 action buttons are available. Each button performs a specific function. Use them as needed for your migration scenario.

-
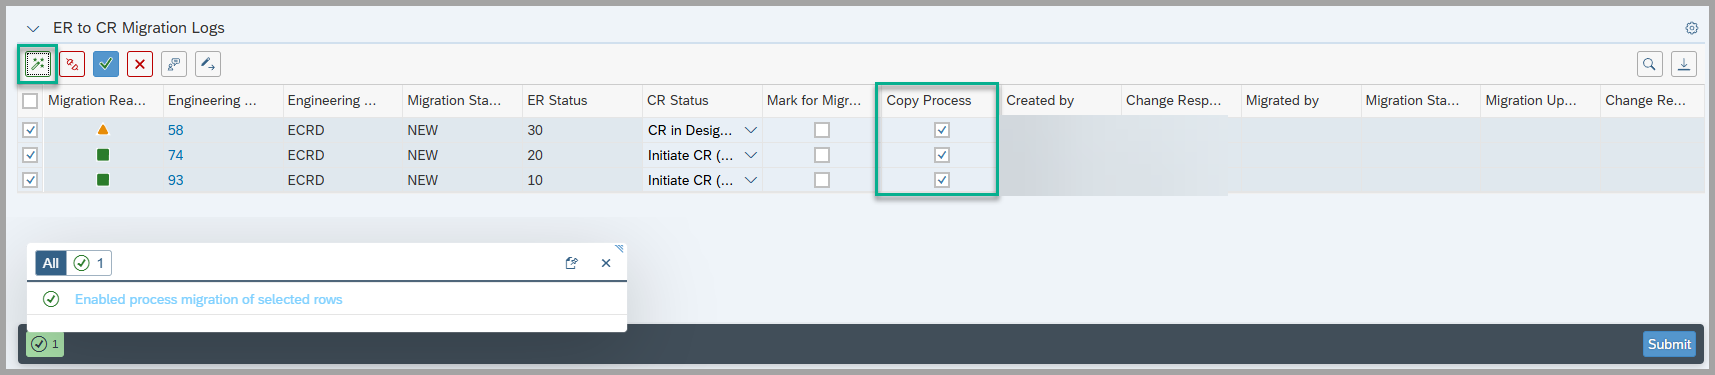
Button 1 – Enable Process Migration:
- This action button is used to mark the “Copy Process” column for the selected Engineering Record(s), provided they are in a valid status, such as NEW.
- If an Engineering Record is not in a valid status, the button will be disabled (greyed out) and cannot be used.
- This feature is particularly useful for mass selection of ERs in the NEW status, allowing users to enable the copy process without having to manually update each record individually.
-
Button 2 – Disable Process Migration:
- This action button is used to uncheck the “Copy Process” column for any selected Engineering Record(s) that are currently marked for copy.
- It allows users to reverse or disable the process migration flag if it was previously enabled.
- This is useful for correcting selections before proceeding with the migration.

-
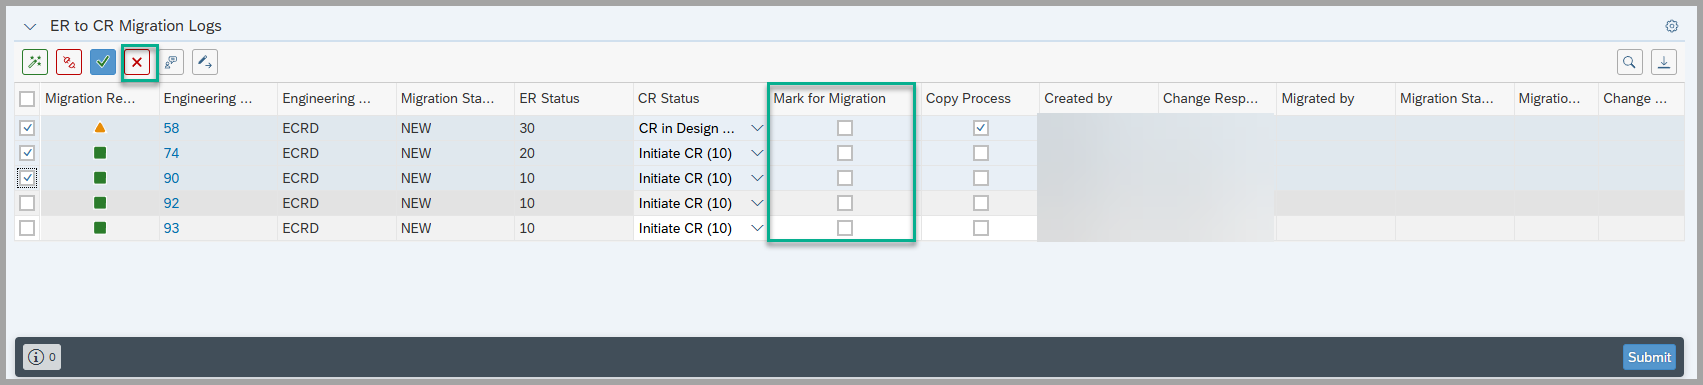
Button 3 – Mark for Migration:
- This action button is used to select the “Mark for Migration” column for the chosen Engineering Record(s), provided they are in a valid status, such as NEW.
- It enables users to flag records that are ready to be included in the migration process.
- If an ER is not in a valid status, the button will be disabled and cannot be applied to that record.

-
Button 4 – Cancel Migration:
- This action button is used to uncheck the “Mark for Migration” column for any Engineering Records that were previously marked.
- It allows users to revert the migration selection before the actual migration process begins.
- Useful for correcting or updating migration decisions without affecting other configurations.
-
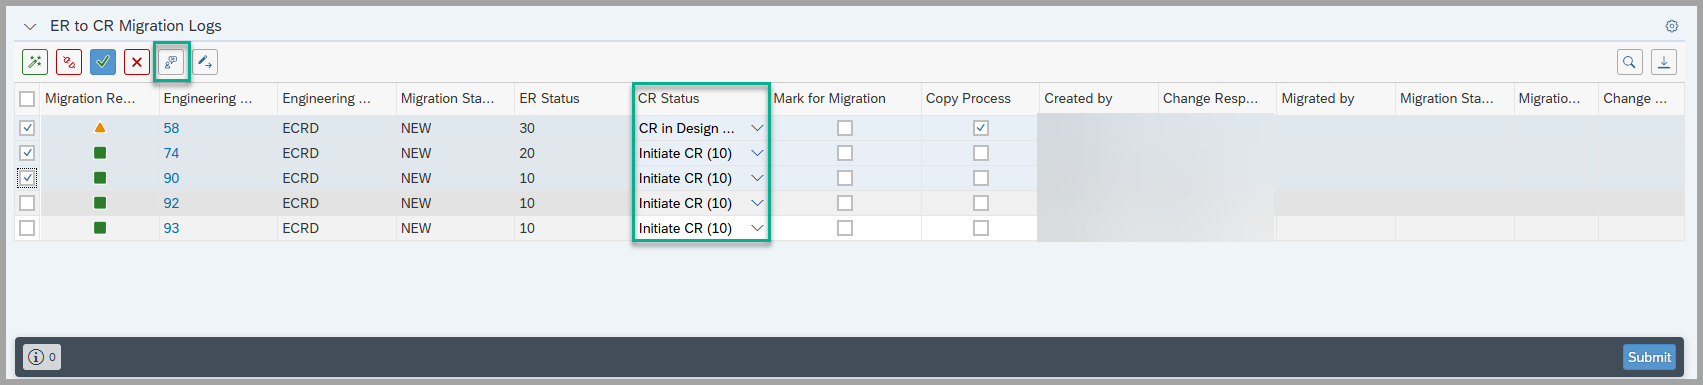
Button 5 – Update Target Status:
-
This action button allows you to update the target status for the selected Engineering Record(s) (ER).
-
When clicked:
- A popup window will appear.
- Use the F4 value help to select the desired target status.
- Click Update to confirm your selection.
-
The CR Status column will then be updated with the chosen status for the selected ER(s).
-
-
Button 6 – Update Target Status and Mark for Migration:
- This action button performs two actions in one step: it updates the CR Status and sets the “Mark for Migration” flag for the selected Engineering Record(s) (ER).
- This is particularly useful for streamlining the process, allowing both updates to be applied simultaneously.
- Ensure the selected ERs are in a valid status before using this button.
- After updating, proceed by clicking the Submit button located at the bottom right corner of the screen to initiate the migration to a Change Record (CR).
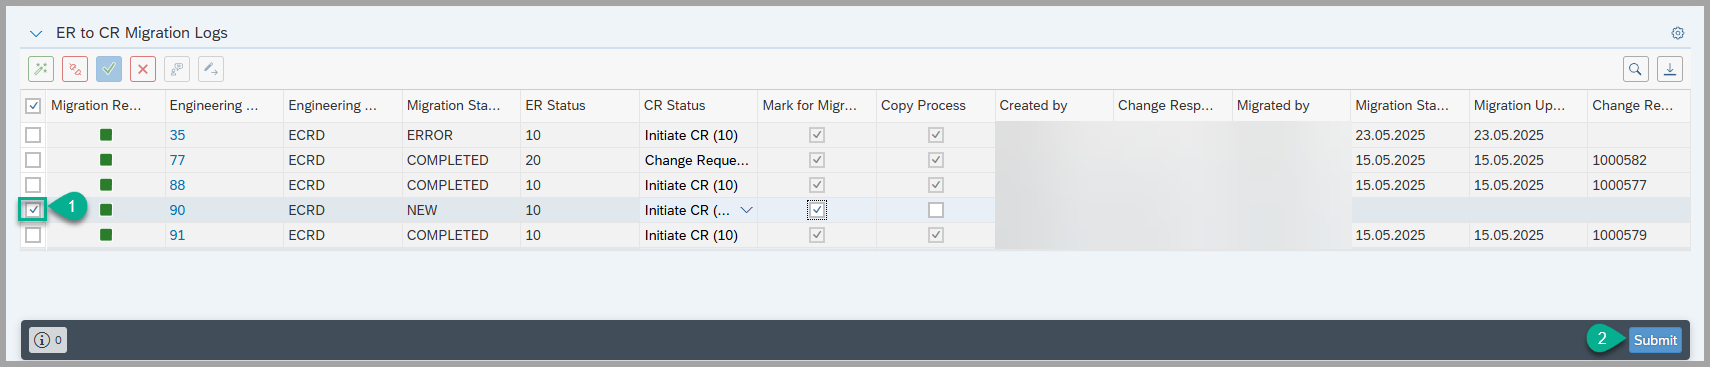
- After clicking the Submit button, the Migration Status of the selected Engineering Record(s) (ER) will change from NEW to READY.
- This indicates that the ER is now prepared and queued for the migration process to the corresponding Change Record (CR).
-
Engineering Records (ER) with a READY status are eligible for migration to Change Records (CR). To start the migration, run the report program
**/XCM/MIGRATION_ER_TO_CR**.-
Migration Process:
- On the selection screen, fill in all required fields and click Execute.
- The Record Type field is mandatory.
- By default, the report processes only ERs with READY or ERROR status; migration will not proceed for ERs in any other status.
- To migrate a specific ER, enter its corresponding ECR number in the report program
**/XCM/MIGRATION_ER_TO_CR**selection screen - The Count for Processing field is used only when no ECR number is provided. For example, if set to 5, the system will select the first 5 Engineering Records in READY or ERROR status and migrate them.
- Note: If both an ECR number and a value in the Count for Processing field are entered, the system will prioritize the ECR number and ignore the count.
- If Simulation Mode is selected, the migration will not be executed. Instead, the system will perform a check and confirm whether the provided ER entries can be migrated successfully.
-

- After the successful execution, the system will display a number of entries successful/error and Processed result.

-
To view the migration logs, navigate to the SLG1 transaction code.
-
Fill in the required fields:
-
Object: Enter
/XCM/MIGRTE_LOG -
Subobject: Choose between two options:
- MAIN_LOG
- ER_LOG
-
-
Using MAIN_LOG:
- No need to specify an External ID.
- Enter an asterisk (
*) in the External ID field to display a summary of how many records were processed during the migration.
-
Using ER_LOG:
- Provide the specific Engineering Record (ER) number in the External ID field.
- You can use wildcards as needed (e.g.,
*49*) to filter results. - This will show the detailed migration log for the selected Engineering Record.
-
Custom Fields – Migration Scenarios
Scenario 1:
If you want custom fields to be displayed in the target system after migration from the source system, these custom fields must be maintained with the same field names in both the source and target systems.
Scenario 2:
Note: To track migration details, the following three custom fields should be maintained in both the source and target systems. However, UI configuration is only required in the target system there is no need to expose these fields at the UI level in the source system.
These fields help identify the source system of the migrated Engineering Record (ER), the original ER number, and the date of migration. The fields are automatically populated during the migration process only if the Change Record (CR) is migrated from an ER. If the CR is not migrated from an ER, these fields will remain empty.
ZZ1_MIGRATED_FROMZZ1_MIGRATED_ERZZ1_CREATED_ON
See Also
BRF Customization
Authorization & Menu Role Assignment
Keywords
Migration, Main_log, Error_log, ER to CR
Prerequisites
- Define the BRF+ application BRF Customization
- Create the RFC BRF Customization
- Authorization & Menu Role Assignment